[google6a7b7d93c7100df5.html] Sunshine's Creations.Vintage Threads Inc.com: July 2010

friends and followers

If you like my blog and the free patterns and tutorials and want to say thank you
I have a wish list on ravelry of patterns (click here)
I would like to make.
Thank you in advance for being kind and saying thank you back.

Love Sunshine

Search This Blog

Wednesday, July 28, 2010

Grandma Harbaugh's yo-yos

close up of yo-yos

kitchen entry
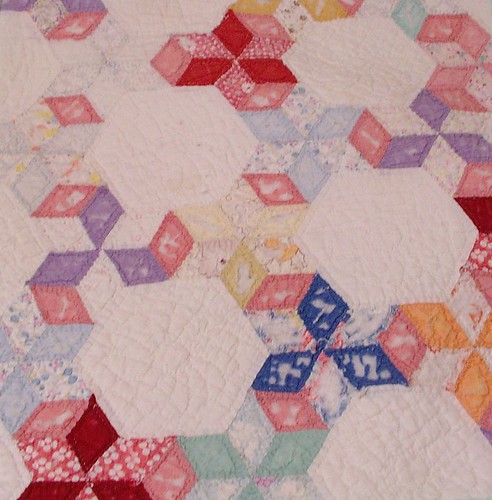
When my husbands grandmother died she had some sewing supplies.  They have since been divided among my sister-laws who sew and myself.  In the the items I chose was a small bunch of yo-yos that had been made but not sewn to anything.  So I sewed them together and framed them today I just love them so sweet and it is nice to have something from grandma, especially yo-yos.

She had a few more (3 and 1) in two different sizes which I will frame some time in the future.  Those are kind of fun as the paper template is still with one cut out from a newspaper with the date and all.
This is the entry way from my front room into my kitchen I think it goes well with the embroidery that I got from my old neighbor.

On the top shelf is the rocking horse my children used when they where just tikes but they have since out grown it so now it is a decoration.  The doll house is "The Littles" from when I was a kid.  It is a pretty cool little doll house has cast metal furniture that functions meaning drop leaf tables actually work.  This is sort of where childhood gets remembered on that shelf.  I have a few more things to put up there but I have to find them first in storage still working on that.
close up of area

Part 26: Nightgown with tatting

gown
night gown
This use yo hang on my sewing room door at our old house with the baby christening gown.  I know this is real simple and plain.  It is on the easy end of heirloom sewing.  But what it has going for it is that someone took the time to tat that entire yoke.  It does have french seams and the lace/yoke and sleeves is added in a way that is synonymous  to heirloom sewing.This actually  fits me but I don't wear it.
yoke
mid shot yoke

yoke detail

Tuesday, July 27, 2010

Bolero Romanian Point lace pattern circa 1900

the whole bolero
I have been working on my storage unit the last few days.  I plan to get back tot eh tutorial for heirloom sewing in the next few days.  I have been working on this a little at night right before going to bed and while watching movies.  It has a long way to go.  I hope it fits it should but if not I guess my dress forms will be well dressed as if they aren't already.
partially laid cords
Originally this was supposed to be done in battenberg lace.  I may make one in battenberg as well but I wanted one in Romanian point lace.  I have lots of supplies from 1900 so if I made one it would be made out of the old linen tapes and such that I own.  I just am not fond of the care involved in a battenberg jacket.  Because Romainan cord is thicker it never needs ironing and has a personality all its own.
where I am working at the moment
A pattern at this price would not happen today.  This pattern is circa 1900.
circa 1900 this price would never happen today

UPDATE
I person in my flickr groups posted a tutorial on her blog she makes her cord different than I was taught so I do not know if hers unravels easy I will have to try her way and see.

But here is the link if you are wanting to learn to do this type of lace. Let her know I sent you take care and have fun making lace.  She has step by step instructions and a video of the cord like I do

Monday, July 26, 2010

Part 25: Not finished antique gown circa 1900

front

Here is the second gown from circa 1900 that is not finished this one has much more embroidery started and it is being worked with floche.  I do have the original thread to finish it so that is how I will do it all white work.
center hem detail hem detail above edginghem
This is a real sheer fabric.  These are not fancy gowns by any means but they are lovely all the same.  The is a label on the dress that reads:
No 355   Infants dress   Use American Beauty Embroidery Floss 651/=K1
details of pattern and thread company

The center back is to be slit open too i think I will use taylors button hole there as well as I do not have any fabric to make a button placket.  So it I use the taylors button hole and make thread loops for the buttons ( also using the taylors button hole over the thread bars it will work well.
back of neck showing lines for cutting


There are marks on the sleeves and the waist area that will need the taylors button hole stitches  then slit open to weave ribbon into.
yoke front detail
neck detailscenter frontright sleeveright sleeve detail of embroidery pattern

Saturday, July 24, 2010

HS101: Tailors button hole

I will be using a tailors button hole to finish the hem on the previous post.  What most people call a button hole stitch is actually a blanket stitch and not very strong.  Notice the running stitch first then the extra loop in the knot section.  The knot section is to face the open part where the button passes through the garment.  The fact that there is one more loop makes it take a little longer to wear out.
Tailors button hole stitch

Part 24: Not finished antique gown circa 1900

front

back

This gown is circa 1900 and not finished.  I have some antique silk thread that I plan to finish it with. It was originally started with white floche (a type of cotton embroidery thread) thread but the person who started it only did a few leaves so I unpicked them as I didn't have enough of the original thread to finish this one and it's sister and it's sister has more embroidery already started on it.  Yes I have two of these you will see the other on Monday.
detail of center hem embroidery pattern
center front hem detail
Yoke detail there are two of these mirror images of each other.  You can see where in this photo I unpicked it.
yoke detail
You know I wish you could still buy pre-stamped baby clothes.   If any one knows of a place let me know especially if it is 100% clothes I am not interested in polyester at all.  Here is a close up of the hem details.
hem detail for embroidery

see next post for how to finish this hem with a tailors button hole.

Friday, July 23, 2010

Part 23: Simple dress with repairs

front with old repairs
back full dress
IMGP1642neck front
This is a real simple dress.  Just how simple you say well it is cut from a single rectangle and then shaped from there.  The sleeve are actually just slits in the sides of the rectangle then they are gathered and put in place.  And the neck and button placket are also just a circle and a slit cut from the center of the rectangle There is one real long strip cut to make the button placket too that simple truly it is.
back
The hem and sleeves have some scalloping details too.
hem
This dress has a simple crochet edging made up of three rows.
Pattern of crochet is
sleeve
  1. single crochet around (neck, arms, and hem) in white crochet thread cut and finish thread
  2. (Change to main color to match embroidery ) sc in any stitch chain 3, skip 3 to 4  sc on previous round which ever works best (the crocheter was inconsistent ) to accommodate  the curves, *sc in next sc, chain 5,sc in same stitch as last sc, chain 3, skip 3 or 4 sc,** repeat from star around end with an even number of sc. slip stitch to first sc,  chain 1
  3. chain 3, *sc in next sc,ch 3 ,sc in loop 4 times, ch 3 sc in next sc at base of loop, ch 3** repeat around , slip stitch to starting stitch cut and finish threads
front panel and repair
The front panel had some real old repairs on it that cane with it when I bought it.  This is how I had thought that I would have done the repairs on my mother-in-laws as it isn't to noticeable once a white slip is under the dress.  But looking at it without the slip I think for this dress I would have bought some insertion lace and sewed two thin strips together or purchase one big wide piece and sewn them to the front of this gown down the panel and just removed the damaged part all together.  Instead of having this repair as the other way it would not have been noticeable at all it would have just looked like it was meant to be that way.

    Thursday, July 22, 2010

    Part 22: Baby Dress and Bib

    front

    I have a few more items to show just didn't for a few days because of tutorial and hiking.  But here we go again.  This one has some real sweet details that you have not seen in the other outfits thus far.  There is a little bit of drawn thread work in this which you have seen on some other items which I failed to mention.  In the group on flickr there is another person who has been kind enough to add some tutorials on how to do drawn thread work. For those who don't know that is the lacy section in the middle of the yoke.
    yoke
    center detail near hem
    center hem hem
    sleeve

    Such had pin tuck in all different sizes and numbers.
    front pin tucksback pin tucks 

    A matching baby bib that also has a little bit of shadow embroidery.  If you do not know what shadow embroidery is here is an explanation for you: Embroidery on a somewhat sheer fabric that has an outlined detail and where the threads crossing in the back make a solid color that faintly shows through the fabric to the front.  If you don't see it look at the diamond in the bib you will notice an outline and a little bit of faint blue in the middle of the diamond showing through the fabric.
    front of bibback with attached linner for thickness bib detail

    Wednesday, July 21, 2010

    Battle Creek Falls

    love the moss in this photo
    river rushing bye
    I am a leader in my church for the 8 year old girls.  We had a field trip today. Two adults 5 eight year olds and 5 teenagers/pre-teens.  I think fun was had by all here are a few photos of the day.
    fall onesecond smaller fall
    look Mae (MOM) a bug
    near trail head
    hi
    balancing on rocks
    Hi Mae ( pronounced my means mom)
    can I get wet
    looking at the falls
    if I hold my tongue just right I won't fall
    studying rocks
    why the name
    Afterward we (me and my kids) went to quilt fair but sadly no quilt show this year so I didn't take many pictures in fact only one of a piece of a very old quilt but I liked the pattern a lot and want to make it someday.
    pretty pattern on old quilt
    Also this was the sign on the gas pump on my way up  the canyon to the waterfall.  I know I have a lot of typing errors and grammar issues on my blog and as such this just made me laugh and I had to get a snap shot of it.  As my family says if mom can find the mistake in the spelling and grammar it must be bad.
    funny sign on gas pump
    My day in a nut shell.

    Copyright/permissions info

    I like to share on this space my ideas and projects.
    Please don't take ideas or photo and claim them as your work.
    I am always happy to have new links to me.  So if you like something just link back to me and give the source some credit thanks.
    Any questions? just ask. I am happy to work with you if you need something
    Creative Commons License This work is licensed under a Creative Commons Attribution-Noncommercial-No Derivative Works 3.0 Unported License. 2006-2019 Copyright Vintage Threads Inc. All content and images.

    LinkWithin

    Related Posts Plugin for WordPress, Blogger...