
Prep work: cut paper templates and fabric
I actually like to buy my templates, mine are die cut, this gives more accuracy to my work and speeds up the process; you can do it either way, though, buy or make. Finished size paper templates are 1/4 inch shorter on each side than the unfinished size template for the piece of fabric.
My papers are 3/4 inch; this is my finished size for the hex block. My fabric pieces are 1 inch to a side. Just a side note, when I buy my pieces I buy two sizes; one for the finished size in a bulk big package and a small package to use as my templates for cutting my fabric.
Ways of cutting fabric
If I am using scraps, I use a pair of scissors to cut my fabric hexagons. If I am purposely using yardage, uncut fabric, I will use a rotary cutter. With this size hexagon I cut my strips to 1 1/2 inches wide. Then I place my template on the strips and cut the six sides. After you have cut one, each time you add the template you will only be cutting five sides because one is already cut.
To get the measurement for whatever size hexagon you are using, you will measure from point to point on the unfinished template piece of fabric. On mine that was 1 1/2 inches; yours will vary if you are using a different size hex than I am.
****** Update between stars******
There is an easier way of doing this if you do not care about your seam allowance being exactly 1/4 inch. You can just cut a square that will work to fold over all the sides of the hex. A rectangle would be better than a square for seam allowances but I have not seen people use a rectangle only a square. I do not do it this way as I am picky on my seam allowance but it is an option for you just make sure your square/rectangle is 1/2 wider and taller than your hex. This will speed up the cutting process and if you machine quilt it doesn't matter to much for the bulk. If you plan to hand quilt I do not recommend this: unless after you baste you go back and trim your seam allowances back to 1/4 inch.******end of update*****
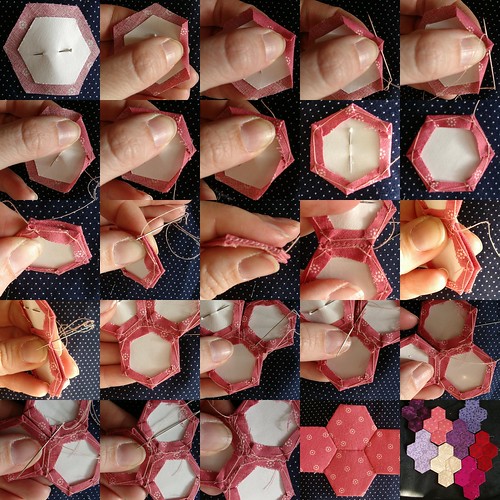
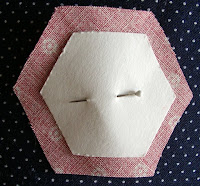
Basting
- Pin paper to wrong side of fabric. I skip this step, but when you are starting out it is a good rule of thumb to do this 'till you get use to it.
 Next you fold over the right side of the fabric followed by the top side. If left handed, do the opposite (do the left followed by the top).

- At this point you can have a knot on your thread, if you so desire. I placed one on mine for the picture, but usually I do not use one; I leave a little tail hanging out. This is a little harder technique when starting, so for beginners I recommend a small knot. Place needle in fabric going right to left and slightly up. Pull needle through and repeat this step by making another stitch in the same spot, aka a back stitch. This will hold the corners in place.


- Rotate hex in left hand so the point that you just finished is pointing right.
 If left handed, rotate left and point last done will be pointing left. Fold down top like you did before.
 Insert needle from right to left, repeat. Repeat this last section of rotation and insert needle twice then repeat all the way around. If left handed, insert needle from left to right, of course.
 Finish off on sixth corner; you don't have to do the first one again. Cut thread; you don't need a knot if you leave a tail when you cut the thread.
 Exception to the rule: if your finished hex size is over 1 1/2 inches, it's good to do the first corner one more time. A lot of tutorials on this technique tell you to stitch through the paper; I don't like to do that as you have to cut all those threads when done. I only stitch through the paper if my finished hex size is bigger than 2 inches (I don't do that size often). If I am doing that size, then I do one stitch in the middle of each side. This is a really tiny stitch see example I posted at a later date than this post. This way when I want to remove the papers all I have to do is make a small snip with scissors (6 times per block) and pull the papers out. This leaves in the corner stitches and the other stitches are pulled to the back. These middle stitches are known as a stabilizing stitch, and I only do them one to a side. More than one stabilizing stitch to a side and you have to pull out threads. It also takes too much time, and I believe it to be a waste of time. Make sure if you are doing your hexagons like mine (you leave your basting stitches in), that you use a basting thread that will not show through your work when finished.
 - On the last hexagon for a flower or whatever shape you are doing, I finish my hex a little differently. At the end of basting I do the first corner again, but I bring my needle out in the point of the hex. This sets me up for the next step which is assembling the blocks. If you noticed, this block doesn't have a pin in it. Like I said, that is a step I don't do any more, but when I was learning how I did. That is a personal choice.


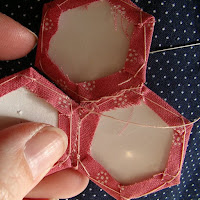
Assembly
- Place two hexagons right sides together. If right handed your starting thread should be on the left;
 if left handed, on the right. Insert needle grabbing only two or three thread thicknesses on each fabric of each hex.
 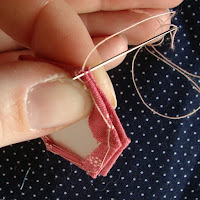 DO NOT GO THROUGH THE PAPER. This is a common mistake beginners make. This makes it hard to remove the papers later. It also makes the papers not able to be used again, and wears out your fingers, too . If you do not stitch into the paper you will have an easy time pulling the papers out at the end, and you will be able to reuse the papers dozens of times, if not more. Make your stitches small and even.
 There should not be any gaps or openings when unfolded.
 Side Notes: I use Gutterman quilting thread 100% cotton and a #9 quilters betweens needle to sew mine together. Use what you like and are comfortable with. Also I like to take one extra stitch at the corners to make them a little stronger because this is where all the pressure is when used and might break easier without this extra stitch.
 - Your thread should be at a corner from the last side you stitched. Repeat the steps in step one of assembly.


- Now a few things that come up while you are assembling your blocks together: First there is back tracking. This means your thread is in one spot but you really need it in another that isn't too far away. Instead of cutting your thread and tying a lot of knots, you can back track. It is faster and fewer knots on the back of your work. In this picture my thread is on the lower right of a seam and I need it in the upper left of the same seam.
 So to get there, I travel over the stitches I have already done. My stitches only go through the fabric on the back of the work, never through the paper and never all the way to the front of the work. They are never more than 1/4 of an inch from each other.
 They do go in the opposite direction of the other stitches (see the stitches' different slants). Now I am where I want to be at the start of the next spot to stitch, also known as a "Y" seam because it resembles the letter "Y".
- Next you have what is known as a "Y" seam. You can see the spot I have yet to stitch in the photo.
 A "Y" seam is where 3 seams come together. When sewing with a machine this can be intimidating to some people. But when doing hand piecing it is easy to work with. The stitches are taken just as before, with little bits of fabric. The only difference is, this time the pieces just aren't laying face to face.

 You can make them lay face to face if it is easier for you. To do that you just crease the hex block at the end of the seam you are doing, where my needle started the seam. This is not my preference because it wears out my papers and makes them less usable, and sometimes the paper pops out, too. Continue in whichever technique you prefer until you have your flower made or what ever shape you are making, I am making diamond shapes.
  When finished stitching the block together, knot and cut thread.


 My papers are actually made out of card stock to make them last longer. Yes, you can use normal paper, but it has a lot of drawbacks, it is very flimsy and doesn't hold up well to wear and tear. When I remove the papers ,I just use a pair of tweezers on real small hexagons, 1/4 inch. If the hexagon is larger than 1 inch, then I just pull them out with my hands. Some people like to punch a hole in the middle of the paper, with a standard size hole punch, before basting it. Then to pull out the papers they put a crochet hook in the hole and pop them out that way. I do not do this because it weakens the papers. Once again, a personal preference; do what you like best, even try both.
The papers DO NOT get left in the quilt. Years ago they, pioneers, did leave the paper in when they used the old "Sears and Robuck "catalog pages as their paper templates, and they tied those quilts. They did not quilt that type, it was too hard going through the papers. Leaving the papers in added extra warmth; it also made the quilts rustle. So, if you have a real old quilt that rustles like paper a little when moved around, that is what is probably inside of it. I remove the papers as I go along, sewing the blocks together. If a single hex has all 6 hexagons bordering it sewn to it, I remove its papers, the center hex, that is.
******Update*****
For those who have asked I found a tutorial (http://thatgirlthatquilt.blogspot.com/2010/08/binding-hexagons-tutorial.html) on line on binding thought you might like it if you have finished your top and don't know what to do. This is not how I bind mine but it is a good way all the same. I bind by hand.******End of Update*****
This tutorial was featured in Small Town Living Magazine in Apr/May 2007 issue.
If you have any questions let me know in comments and I will also answer them in the comments area to help everyone else who reads this because they may have the same question. Also click on photos for a bigger image if you can't see what I am talking about. If you would like to see items I have made, or am currently making, with this technique click here.
If you do decide to try this technique, there is a group on flickr that you are welcome to join and post your results there. This is a group about people who like to do hand piece using English paper piecing method or any other type of foundation piecing. Yes machine foundation piecing is welcome in the group, too.

DO NOT USE THIS PATTERN TO MAKE THINGS TO SELL FOR PERSONAL USE ONLY!!!!

Thank you so much! Your tutorial was very helpful. I didn't realize you shouldn't go through the papers! Maybe that is why my finger's have been killing me! Thanks for the tips!
ReplyDeleteGreat tutorial.
ReplyDeleteI learnt this technique as a child (a very looong time ago), but had forgotten. You just brought it all back to me.
Off to make some right this minute.
Thanks.
What a wonderful layout!
ReplyDeleteVery helpful!
ReplyDeletea really fantastic and helpful tutorial, inspiring too.
ReplyDeleteWonderful tutorial - answered a lot of my questions!! Thanks so much for doing this!!!!
ReplyDeleteThat's a really great layout and tutorial. I've been wondering about the process and this was so helpful. Thanks for sharing! :)
ReplyDeleteMuito bom esse passo a passo. Mostra bem como é feito.
ReplyDeleteEu até agora tinha muitas dúvidas, mas pude entender direitinho como é feito.
Obrigada por compartilhar.
"Very good this step by step. Sample as well as is made. I so far had many doubts, but I could understand directions as it was made. Thanks for sharing." this is the translation bablefish gave me for the above post.
ReplyDeleteI am glad it was understandable to you. Thanks for looking
I am glad so many people like this. I had to do it twice as my first photos where awful. Which delayed the post 2 weeks.
ps. just a note to say that I made 5 (!) (count them) flower blocks that very night.
ReplyDeleteI was SO inspired.
I sewed them onto an old cashmere coat that I'm renovating.
found you via flickr... you should submit your tutorial to whiplash this month... it would be perfect.
ReplyDeletehttp://whipup.net/whiplash/
hmmm, i see you are familiar with the site as you won for you denim rag rug last month... congratulations.
ReplyDeleteI would have liked to but all for this month have to have a post date of Mar 13 this was 3 days to soon. So I will make a different one. I have it half written now just to finish my illustrations (the hard way by hand) then convert them into computer images, then make the item yep lots of work left to do on it. but thank you for your vote for it I appreciate that.
ReplyDeleteI always wondered how that was done! It looks like it would take forever, gives me a new appreciation of the work done. I just might have to try it!
ReplyDeleteThat explains so much!! My mother-in-law is English and there are a few of these hexagon quilts around her house, and the one that seems perpetually in progress has paper in it. For some reason I never asked WHY... and this makes perfect sense! Thanks so much :)
ReplyDeletethank you for posting this! I have a top that I found at an antique shop that used this method, and I look forward to trying it out myself!
ReplyDeleteThis is wonderful, thank you! :)
ReplyDelete:: Thank you thank you thank you.
ReplyDeleteI discovered your blog searching paper peicing on Google. .
. what an awesome blog, your description is AWESOME!!!!
thank you. I bought some neat Dai-wabo fabrics, and plan to
work on a hexagon quilt, when I take my mom to her chemo
treatments. I like to bring stuff to do, so this is
perfect!!!! I just wanted to let you know your efforts
are so greatly appreciated.
Rena in Wisconsin.
great tutorial!! Love it!!
ReplyDeleteI love paper piecing I did a paper pieced mariner's compass also. My first quilt was a paper pieced adaptation (that I don't even like anymore) that I started in college (31 years ago)..
ReplyDeleteWonderful tutorial! Thanks for sharing!
ReplyDeleteYour tutorial is very good and I link it in my blog.
ReplyDeletePlease visit my blog http://mhelenaartes.blogspot.com/ and if you should I can´t link you tutorail, please contact me.
Thank you
What a brilliant tutorial.This was how my grandmother taught me many years ago and you have brought back some very happy memories. I have been struggling to machine piece some difficult shapes, so now I will go back to my English piecing. Thank you so much
ReplyDeleteI'm making a floral arrangement picture from a Jaynette Huff book. The size of template I am using is 1/4 inch. She says to lay the pieces flat and sew them together on the back side. I have always put them back to back which is much easier. In working with such small pieces it is difficult to see the edges of the hexagons. What is the benefit of doing the stitching this way?
ReplyDeletenancy
ReplyDeleteI do not see a benefit of laying the pieces side by side to stitch them if that is what you mean. I have always laid them face to face and stitched from the back like in the tutorial. The other way would be awkward in my opinion to try and hold.
Wow - I'm so glad I found you! Fantastic tutorial - I'm readying some papers and fabric for a test run tomorrow. You are so detailed and make it look easy. Your work is beautiful - I am so inspired!
ReplyDeleteSince you took so much time to put together this wonderful tutorial, thought I'd share a couple lessons I've learned. Maybe it'll add to someone else's knowledge as well.
ReplyDeleteI use water soluble cotton stabilizer instead of paper in my blocks, and water soluble thread and/or water soluble glue stick for basting. The stabilizer feels and acts just like a nice weight of paper. You can even iron it, as long as you don't blast it with steam.
My quilt is turning out to be a long term project, and the blocks store better with the stabilizer still inside. Somehow I just can't bear the idea of pulling out all those papers when I finally finish.
If anyone's interested in exploring water soluble materials, I'd make two strong recommendations: 1. use only Superior Threads' Vanish or Vanish Extra water soluble thread. 2. I've found Leeho water soluble gluestick to be hands-down the best for paper piecing.
Sunshine is correct: having precisely cut templates makes all the difference in the world. As my hexagon-cutting precision improved I saw that it made a big difference in the quality of my work.
Thanks again for the great tutorial.
I was given some items to make a quilt for a young man getting ready to graduate. In these items were some ball caps. What can I do with them? In corporate them in the quilt or make something else? Please help me out.
ReplyDeleteThank You
Purbabe
I was given several shirts to make a quilt for a young man getting ready to graduate. There were several ball caps in this array. How do I use these? Do I incorporate them in the quilt or just make something else with them. Please help me out.
ReplyDeleteThank You
Purbabe
I was currently given T-shirts to make a quilt for a young man getting ready to graduate. Among this material were several hats. What can I do with these. Incorporate them in the quilt? Please give me a few suggestions.
ReplyDeleteThanks
Marlene
if the hats have a soft feel you can cut them the front part that is and sew it on the quilt back like a patch. or on the front. but personally I think if they are very important caps cutting them would be bad. I would probably take them to a frame shop and have one large frame done with all of them displayed nicely in the shadow box.
ReplyDeleteI was just curious. I followed your tutorial and while it was easy, my fabric looks very puckered when completed. Do you starch your fabric prior to cutting?
ReplyDeletenope I just fold it real tight over the edges of the card stock if it is puckered you where a little loose in your folding before you stitched.
ReplyDeleteHi,
ReplyDeleteThanks for doing this. It really helped me to start my own project. See my start at
http://tadlafleur.blogspot.com/2009/06/grandmothers-flower-garden.html
Thank you
Dottie
http://tadlafleur.blogspot.com/
your welcome looks like you taught yourself a lot.
ReplyDeletei'm working on a large hexagon quilt (fabric is cut 5-1/2") and your tutorial was really helpful--the tip on stitching a stitch half way between the corners makes all the difference-- thanks!
ReplyDeleteone thing i wanted to note was that my papers are cardstock and i cut them exactly 1/4" smaller than the fabric on all sides (i.e. an exact 1/4" seam allowance) and that turned out way too small for me. i basted 70 hexagons, started piecing them together and the papers started popping out on me 'cos the seam allowances weren't big enough. i went back (unpicked all my work, sob) and cut down the paper templates 1/8" all the way around and now it's working beautifully.
i do have a question--my pattern says to piece the hexagons in 2 separate long row (mine will be 17 across) and then to piece the rows together. i'm finding it pretty bulky. do you have any suggestions on how to do it otherwise? this isn't a Grandmother's Flower Garden per se, the hexes are all randomly placed (there's pictures on my blog if you're interested). thanks in advance for any advice you can give me.
i loved your tutorial. It was very informative. i was just wondering how you finish the backside of the quilt?
ReplyDeletei have never quilted before and this looks fun and no one tells me how to end the quilt! Do I add batting or a large fabric piece on the back?
I make mine in clusters then attach them together in small groups makes it easy to assemble and carry around.
ReplyDeleteyes you add batting and fabric to the back then quilt and bind it.
It might be a very dumb question but can you explain how do you take the paper out without damaging them?? I mean, once you have folded the cloth around it and stitched it's inside that!! And also pl. tell me at what stage do you cut the basting stitches, once you have finished joining the hexes or before that!!
ReplyDeleteI don't stitch trough my papers for starters so I don't have to remove my basting stitches ever they just stay in. Because I don't bast the papers just pop out after I have sewing the block in place.
ReplyDeleteThank you for such detailed and easy to follow tutorial. I found it very helpful.
ReplyDeleteI learnt Grandmother's Flower Garden when a child. My grandparents sewed a quilt for my older sister in this pattern; she was raised by them and treasures it dearly. I was (eventually) given the scraps from that project to learn with. And thanks for posting the tutorial - your basting technique is far superior to mine!
ReplyDeletethank you for your nice words
ReplyDeleteI loved your tutorial. I've been paper piecing for quite a while -- a Grandmother's flower garden which will probably take me years to finish! I use the same basting method that you do. (Your instructions and pictures are very clear.) What I really didn't know how to do was to make my needle travel from one finished seam to another, so your suggestions on how to do that were much appreciated.
ReplyDeleteI just found your tutorial yesterday. I've been itching to try this, and your instructions made it so easy! I read about 10 tutorials, and found yours to have the best photos and instructions. I am thrilled with stitching the corners and not through that paper!
ReplyDeleteYesterday I made one flower as my first attempt. It looks pretty good, I've got to stitch into the corners better. It turned out FAR BETTER than I thought it would. Going to make some more practise flowers to get the hang of it, and then start cutting into beloved scraps. Thank you, thank you, thank you!!
your welcome all I hope you enjoy it as much as I do
ReplyDeleteLove your English Paper piecing, I've made several quilts using the same layout.
ReplyDeleteI'm always looking for new ideas.
And so far I haven't found to many.
I really love working with the card stock the best, Right now I'm making ornaments with the 6-pt diamond. I just started a blog.
Tietwins @blogspot.com. Want to add some English Paper piecing later to the site.
I found your method very much like my own. Enjoyed you site very much.
Pam
I inherited a grandmother's flower garden quilt that was about 3/4 completed. I have never started completing it fearing the piecing. Your technique tutorial has given me the courage to try to finish it.
ReplyDeleteThat was sweet of you to say. Hope it goes well if you have questions just ask
ReplyDeleteI too, love! flower garden (hexagonal) quilting. So relaxing. Thanks for your excellent tutorial. For those who want to machine sew their hexagons, i have found the book "Learn English Paper Piecing by Machine" with designs by Julie Higgins to be the perfect book that explains fully this method. I personally prefer to hand-piece. Thanks so very much for your tutorial.
ReplyDeletethank you I am sure that will help many who are not hand piecers
ReplyDeleteSharing your craft like this will help us be more creative and resourceful at the same time. I'm glad you're sharing your time with us.
ReplyDeleteTip for everyone if you dont like tacking use a sewline glue pen and stick the sides of your shape then when time to remove use a tooth pick to peel back! no taking out tacks!!! You can buy sewline glue pens and refills from any good online patchwork and quilting shops!
ReplyDeleteVielen Dank für die tolle bebilderte Anleitung. LG Hexe
ReplyDeleteI've enjoyed English Paper Piecing tremendously over the past couple of years, due in large part to your awesome tutorial. My latest blog post has a link to your tutorial. Your instructions and pictures have made the process clearer and easier than any other tutorial I've found. THANKS!
ReplyDeleteGracias, gracias y gracias.
ReplyDeleteEn España hay un dicho que dice "Una imagen vale más que mil palabras" por lo que a pesar de la dificultad del idioma, este post me ha aclarado mucho/
Thanks, thanks and thanks.
In Spain there is a saying "A picture is worth a thousand words" although the difficulty of the language, this post has helped me
Do you think I could make the hexagons bigger, like 4-5 inches?
ReplyDeleteThat BIG RED WARNING is bizarre. Hexagon patchwork has been around since 1701 or so. Did you mean do not plagiarize or sell your tutorial? Because the hexagon pattern is in the public domain.
ReplyDeleteYes not to take my images and make a poster or print out as a handout for a class those images are my work add is the wording... that is what is my copy write
Delete