[google6a7b7d93c7100df5.html] Sunshine's Creations.Vintage Threads Inc.com: February 2007

friends and followers

If you like my blog and the free patterns and tutorials and want to say thank you
I have a wish list on ravelry of patterns (click here)
I would like to make.
Thank you in advance for being kind and saying thank you back.

Love Sunshine

Search This Blog

Wednesday, February 28, 2007

Square Dancing

I noticed the other day that I have made a lot of afghans and quilts out of squares. I have only begun to scratch the surface. It is amazing how much room blankets take up, yet there are a ton of them in my house. I think every bed has about five of them on, all year 'round. There are big ones for king size beds, and little ones for the kids to drag around, and everything in between. So today I decided to show some I had made out of yarn.

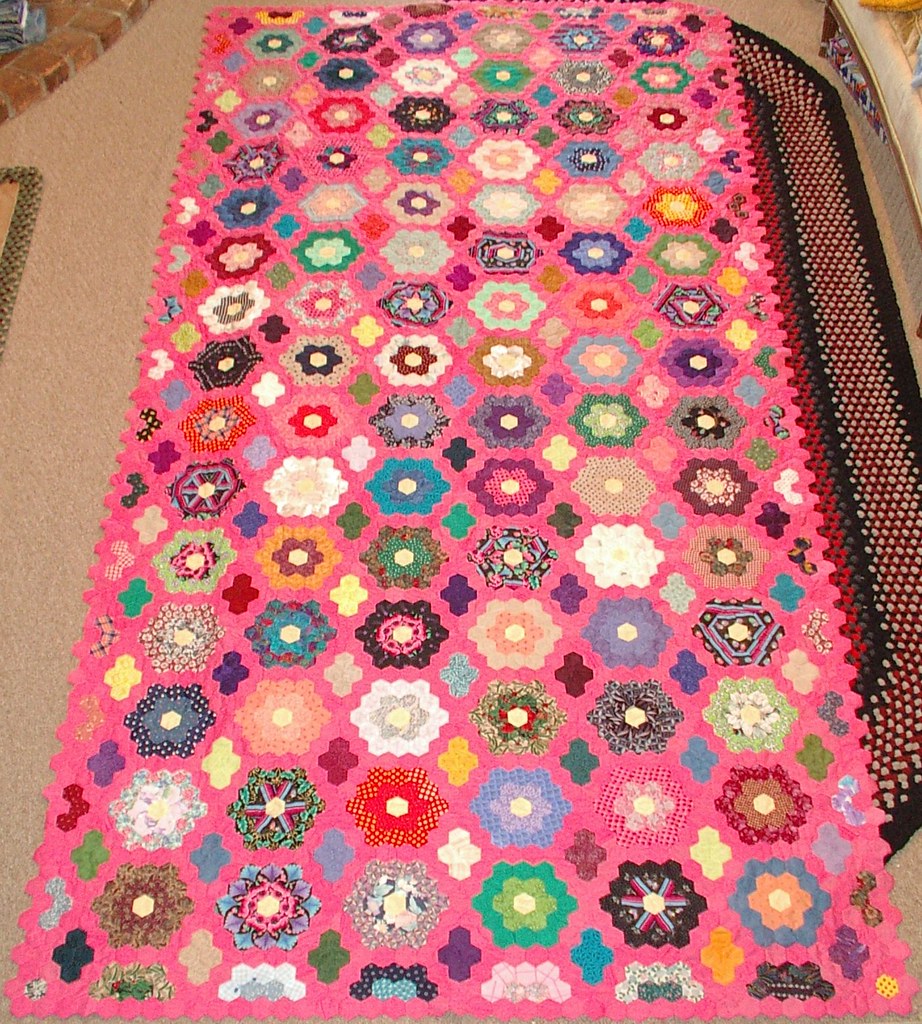
About ten and a half years ago I decided to reteach myself how to crochet. The first thing I did was a very, very large granny square, big enough to fit the king size bed. I'll show that tomorrow because I have to unmake my bed to get it; I think it is the third one down. I call that one the ugly blanket that should never see the light of day, but it works for added warmth. The second blanket, afghan, I made was small granny squares. When I was a little kid my Vavo had one that I just loved to crawl under on Saturday afternoons to watch Sci-fi theater and Kung-fu theater. Don't ask me why, but I watched those every Saturday afternoon as a kid. The sun would come through the window and land right on the couch and I would curl up under a blanket it was just so warm and toasty it was all I could do to stay awake to watch. As soon as the shows ended I would fall asleep for a great nap, loved that. So I made the black afghan to remind me of that. Too bad it is made out of acrylic yarn; the one from my youth was wool. However, when I was relearning to crochet all I could afford was thrift store yarn so that is what I bought except for the black; that was purposely added so it would look like the one from my youth.The next one was made on the vintage weave-it rug looms. It was the only loom made by weave-it that had the wood pegs; the rest have metal pegs. 
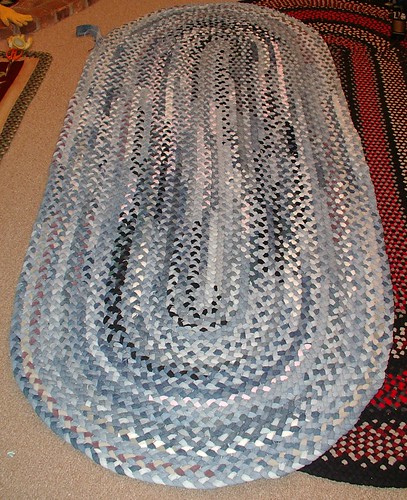
The yarn is Aunt Lydia's rug yarn that was purchased at thrift stores; this time not because I had to, but because I wanted to. Every time I found a skein I would make more squares. After a while I had enough squares to make an afghan and this was born. It does have a black crocheted edging to hold the blocks together and around the outside edges, too. If you can believe it, the edge is made from the scraps from the black granny square blanket from 10 years prior. Yep, things have a hard time making it to the garbage at my house. If it usable yarn, it will be saved; even one that is only 2 feet long -- you can make crazy daises with those, and they can be used to make a blanket or used as an embellishment on an item. Another tool from the 30's to 50's.

Lastly we have one that took me about two years to make, not because it was hard, it wasn't. It was that it was a class that I was teaching and every week I had to design a new block for the students to learn. Because it took awhile to create and draft patterns, and I only had to do one a week, that is all I did; one a week. This one is made out of wool. NO two squares are the exact same block; some have similar stitches, but in different configurations. The yarn was a gift. Because I was teaching the class at Heindselman's, they just gave me the wool from left overs from projects that the employees had made as store samples. The bonus was, I got to keep it in the end.
I hope you had fun going to the square dance with me; maybe you have a few of your own.

Tuesday, February 27, 2007

Circles of love

Recently, on one of the forums I belong to, a lovely lady lost her fiancé to a bad car accident a short time after her father had a heart attack. So the ladies on the forum are making circles of love. The above picture shows my two. They will be made into a round table cloth to show we care for her. She is training to be a chef and loves cooking and setting tables, so this will be a reminder that she is not alone. In case you are curious these are the size of a cd and will appliquéd down to a round (circle) tablecloth.

Monday, February 26, 2007

update

Right after my last post my daughter started having problems again. I thought we where done with this. It was upsetting to find out the doctors gave us the wrong test results. She doesn't have appendicitis, but they are looking at four other things that could be wrong and we need another CAT scan.

Saturday, February 24, 2007

St. Patrick's Day Garland

I made the yo-yos yesterday while waiting at the hospital to find out if my 7 year old needed her appendix out; between two visits, roughly seven hours of waiting in a hospital. But I assembled the garland today. (My daughter is fine and the problem she had was easily fixed; all is good there.) Please feel free to make your own version. Yo-yo tutorial on Heather's and Heart yo-yo tutorial at Penny's.So I guess this is more of a hospital garland than a holiday garland. My daughter had fun watching me make it. The other stuff she was doing wasn't fun at all, so it helped keep her, and my, mind a little off of the ultra sound, and blood tests, and C.T. scan (I think the nick name for it is cat scan). Like I said, she is well now.
sorry for the bad photos in Utah at 5:30 at night it is dark, so these are dark.

Friday, February 23, 2007

WIP poppy corsage

I am in a few swaps, and I needed to come up with a lot of items. So this is what I decided I am making for them today. There is a tutorial on how to make these at JuJu loves Polka Dots . They are made out of a stuffed yo-yos. I think they are very, very cute. I under stuffed the first one I made (see the little tiny blue one on the right in the bottom photo). I did much better on the rest.

While you are thinking of things to make, check out this and this.
Ga-ga for Yo-yos is a group about people who like to make yo-yos and and make things with yo-yos. The fabric type, not the toy type
Ga-Ga for Yo-yos. Get yours at bighugelabs.com/flickr

Thursday, February 22, 2007

Shamrock from Penny's Hearts


On Penny's blog there is a tutorial/pattern for a heart shaped yo-yo pattern. If you make three hearts out of green fabric, you can make a 3 leaf cover. I used blue thread so everyone could see it for photos normally I would have used green.
Steps
  1. Make cord for stem. You could also use I cord or a piece of ribbon.
  2. Cut leaves.
  3. Form them into hearts.
  4. Stitch hearts together about 1 to 1 1/2 inches up from bottom point and stitch back to point and do next heart; repeat step all the way around till 3 hearts are joined.
  5. Attach cord making sure not to twist the end of it.
  6. Stitch sides of cord together.
  7. Near the end, to form curve, stitch once on one side then the other then back in the same hole as the first stitch do this 3 times sort of a gathering stitch.
  8. Attach pin to back of shamrock and wear on St. Patrick's Day.
Next time I am only going to use one button right in the middle instead on one on each leaf. I think it will look better.

Update:
I also made a garland using these same hearts for St. Patrick's day.

I have a group on flickr about people who like to make yo-yos and and make things with yo-yos. The fabric type not the toy type you are welcome to join.
Ga-Ga for Yo-yos. Get yours at bighugelabs.com/flickr
DO NOT USE THIS PATTERN TO MAKE THINGS TO SELL FOR PERSONAL USE ONLY!!!!

Family Fun Old Fashioned Candy Crystals / Rock Candy

For family fun about 1 week ago we made candy crystals. You can make them, too. You will need adult supervision because this requires cooking water and sugar on the stove.

Supplies needed:
  • 1c. water
  • 3c. white granulated sugar
  • 3 drinking glasses
  • 1 wooden spoon
  • food coloring in desired colors (optional)
  • 3 pieces of cotton cords, measuring 8 to 10 inches each
  • 3 Popsicle sticks, or pencils will work, too
  • 1 small plate
  • 1 sauce pan
Directions
  1. Mix together the 1 cup water with 2 cups of sugar in the sauce pan place on stove . Heat the mixture over medium-high heat until it boils, or bubbles rapidly. (Keep children away from this part.)
  2. Keep stirring 'till the sugar dissolves. The water will look clear again. Then add the remaining sugar a little at a time. Do this 'till no more sugar will dissolve.
  3. Turn the heat off on the stove. Let the mixture stand to cool for 15 minutes. Have the adult pour the mixture into the glasses. At this point add in the food coloring.
  4. Now tie 1 end of the cotton cord around the sticks. Next lay the sticks across the top of the glasses (we used mugs; I don't recommend them because it was hard to get the crystals out). Let the cords hang into the mixture.
  5. The crystals will start to form in about one day (ours was a little faster than 24 hours). Now pull the cords out of the glasses and lay them on a plate to harden and dry out.
Eat and enjoy.

Just so you know, ours had a hard time coming out of the cup. I do not recommend mugs; real tall glasses work best. So I scooped everything out and laid it on a cookie sheet that had been covered with plastic wrap and put a child's toy block under one end so the crystal could form and the excess liquid could run to the other end. The end results are in the pictures; it still worked, just a different way of doing it. This way took about 2 1/2 days to dry out . Then I just picked up the plastic wrap and all the crystals peeled off so nicely and I placed them in a crystal bowl.

This would be nice as an Easter, Birthday, Mother's Day, St. Patrick's Day or Valentine treat.
DO NOT USE THIS TO MAKE THINGS TO SELL FOR PERSONAL USE ONLY!!!!

Wednesday, February 21, 2007

Bubble Pink Quilt #1

I call this the bubble gum pink quilt for the obvious reason; all the pink in the background. I made this top a few years ago. Heather showed a Grandmother's Flower Garden in progress. This one is my Grandmother's Flower Gardens in progress; I actually have a few in progress, using different size hexagons. This one uses 3/4 inch hexagons. The pink in the background actually comes from a feather down comforter my husband and I used when we taught nursery. It was the gathering place for all the kids to sit and sing while we waited for everyone to show up for class. We taught that class for a little over two years. When the comforter wore out it made sense to use it in something else, so now the 40-some kids we taught are remembered in this quilt. The quilt measures four and one half feet by nine feet. I know that is an odd measurement; I made it to fit on the back of a sofa and to get the most use out of the pink fabric. The scrapes from this quilt made a doll quilt that is currently being hand quilted. This quilt has yet to be set on a frame for quilting.

English paper piecing:
This is a group about people who like to hand piece using the English paper piecing method or any other type of foundation piecing.
English paper piecing/ foundation piecing. Get yours at bighugelabs.com/flickr

Tuesday, February 20, 2007

Part 6: Finished / For the time being

I finished the rug, sort of. I left the end undone and not a tapered finish like I would have done normally. This is because as we wear out more jeans I can make the rug bigger. So, I think this will be a continuing rug for a few years but it will be able to be used while it is growing and in between growth spurts. Boy it sounds like a kid!
This took seven days from start to finish.
Dimensions 3 1/2 feet by 8 1/2 feet
Part 1: here
Part 2: here
Part 3: here
Part 4: here
Part 5:here
Part 6:this is it


Above links just talk about this project.  If you are interested in learning how to make this type of rug.  I have a series of tutorials on my blog just go here.

Heart Swap

If you remember, a while back I made two Russian needle punch hearts for a Valentine's Day heart swap. I just got my two in the mail today.

The bright pink one to the left is from Donna Deen. The white one with pink embroidery is from Melissa, the person in charge of the swap. I wonder if the swap went straight across or if people didn't get the person they swapped with. I never thought to ask. I wonder who got mine. The two hearts I got work together well. I don't think I am going to do anything with them for awhile; I may end up in more swaps and get more hearts. If so, then I can make a small Holiday wall picture out of them.

Part 5: Braids

Well, I have braided every scrap of denim in the house, all that we had worn out, that is. This gives you an idea of the size of the rug and the look of it. If you look you can see a yellow size small womans glove in the top left of the photo for a size reference.I did all this last bit of braiding in the last two days. I hope to get the rug all stitched today and call it good. This is one of the fastest rugs I have made and trust me, my hands feel the burn from doing so much work with a fiber that doesn't want to play nice. It is a little hard on the hands to braid, but the real hard part is stitching the braids together. Last night when I went to bed my hands had swollen some. They are ok right now and ready for more punishment. I have truly done a whiplash to my hands on this one.
Part 1 here
Part 2 here
Part 3 here
Part 4 here
Part 5 this is it
Part 6: here the end

whipup whipup

Monday, February 19, 2007

Part 4: More reels

So I emptied out the other box in the attic to discover it was mostly blue and one purple. Oh well it is what I have so it will work. I sewed them all up and made reels. Then I got to braiding. I braided 4 more rounds; roughly 8 inches have been added in width and length. Then late last night my husband said, "Oh I have some jeans you could use for this; they are in my closet." Great! I could have used them the day before so the colors would be more random; that is life. I think it will still work well; I have a little bit left from Saturday left to braid. So, if I use those for two parts of the braid and the tan, light khaki and blue my husband had for the other part of the braid, maybe it will still blend in with the rest pretty well . If not, it is a scrappy rug by nature and it is totally being controlled by faith that it will work out well.
Part 1 here
Part 2 here
Part 3 here
Part 4 this is it
Part 5 here
Part 6: here the end


whipup whipup

Saturday, February 17, 2007

Part 3: 2 feet by 7 feet

I have been working on the recycled rug a lot the last few days. I have used up all the denim I had made into reels. I have another box of old jeans that I had been storing in my attic 'till I figured out what to do with them, so now I will cut them up and add them to this rug. As of right now, the rug is two feet by seven feet. I hope to get it to four and half feet by nine and half feet. That will make a nice little rug for a kids room or play room.

I have been asked what does my needle look like and what size thread do I use. The blue sewing thread in the picture is to stitch the denim together.;linen six-ply cord white/cream is in the middle of the picture, and that is one of my needles. I have a larger one; I just can't find it right now. The linen and big needle are used to stitch the braids to the rug.
needle thread cord

Part 1: here
Part 2: here
Part 3: this is it
Part 4: here
Part 5: here
Part 6: here the end


whipup whipup

Friday, February 16, 2007

Update on Rug / WIP part 2

IMGP3189
I have been working on the rug the last few days. I have twelve rows braided and eight sewn to the rug. It is interesting to watch where the colors end up. All the strips had been tossed in a random pile and mixed up by three kids. Then they were grabbed at random by three little kids and handed to me to sew, making about twenty random wheels/reels to grab from as I braided. What is funny is that all the pink from one pair of jeans is pretty much ending up on one end and one side of the rug. I don't mind; it's just interesting. I think the rug is coming out nice.

The top photo shows the rug with the twelve rows around it after they have been braided and five of them stitched in place. The bottom one shows eight rows stitched in place.

The yellow glove in the photos is what I wear to keep my hands from getting cut up. It is hard to see in the photos, but if you look closely, you will see a five inch needle; that is what I am using to stitch the braids to the rug. Bottom photo, left side near glove, you can see it the best.

Dimensions of rug currently are one foot four inches wide by six feet four inches long. When all twelve rows are stitched to it, the measurement will be two feet wide by seven feet long.IMGP3193
Part 1 here
this is part 2
Part 3 here
Part 4: here
Part 5: here
Part 6: here the end


whipup whipup

Wednesday, February 14, 2007

Happy Valentine's Day

Valentine cookies
I have never been fond of this day 'till having kids. They think the day is great, and it is rubbing off on me. Doing things with them and making things with them shows our love for each other. It doesn't have to be store bought; just fun making a mess together as we make cookies. Have a lovely day and remember it is about love not gifts.

Copyright/permissions info

I like to share on this space my ideas and projects.
Please don't take ideas or photo and claim them as your work.
I am always happy to have new links to me.  So if you like something just link back to me and give the source some credit thanks.
Any questions? just ask. I am happy to work with you if you need something
Creative Commons License This work is licensed under a Creative Commons Attribution-Noncommercial-No Derivative Works 3.0 Unported License. 2006-2019 Copyright Vintage Threads Inc. All content and images.

LinkWithin

Related Posts Plugin for WordPress, Blogger...