
all the yarn overs I am going to call hook over or hook under
ho =hook over
hu= hook under
the pattern is
chain 2 skip chain closest to hook single crochet in second hook doing first Hook over and second hook under turn go through first bar on side. *ho then hu pull off turn. Now go under the two bars on side at the same time * repeat from star to star for desired length

Finally figured out how to rotate that image see below for a rotated video so here is the updated video
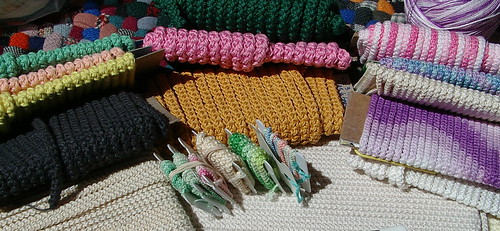
tutorial done in sugar and cream yarn size F hook, but I usually use size 10 thread size 10 hook
size 20 thread size 12 hook
size 30 thread size 14 hook
anything smaller a size 16 hook
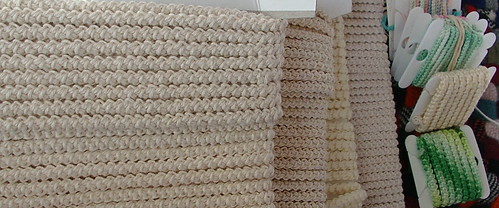
The last photo has two other cords in it; they do not unwind from both ends but add nice texture to your work. These are some of the cord I used on the bolero vest.
size 20 thread size 12 hook
size 30 thread size 14 hook
anything smaller a size 16 hook
The last photo has two other cords in it; they do not unwind from both ends but add nice texture to your work. These are some of the cord I used on the bolero vest.

Other names for this type of lace: Romanian macramé, Romanian Point lace, Romanian Crochet, European Macramé,
You do not have to use this cord just for Romanian lace; use it anywhere a strong cord is need. Also, you can string beads on it and add a little differnt texture to your work. You could string all the beads on first or add them as you go, but this is not traditional. However, if it is your work, that doesn't matter. Also you can use this as a cord embellishment, if using smaller crochet thread like size 30, on clothes and other items just as you would rick rack on top of items.

Please help me -- my play video isn't working on my computer. Please let me know if this plays for you. Would love to see any results from this; there is a group on flickr for this type of work. I will do more tutorials in the future on how to baste this down to a pattern, how to find patterns at quilt/fabric stores even when they say they don't have them or know what they are, and lastly a few filling stitches. But I am not promising when I will do this other than sometime this summer because of work and I still need to get the last rug tutorial up.
**If you like my blog and the free patterns and tutorials and want to say thank you
I have a wish list on ravelry of patterns I would like to make.
Thank you in advance for being kind and
saying thank you back.
Love Sunshine
But please do not feel like you have to**
**If you like my blog and the free patterns and tutorials and want to say thank you
I have a wish list on ravelry of patterns I would like to make.
Thank you in advance for being kind and
saying thank you back.
Love Sunshine
But please do not feel like you have to**
Update November 29,2011
New group on Ravelry all about Romanian point Lace please feel free to join in the fun
Update January 14 2012
I was asked a question in the RPL group on ravelry and this is the answer to it
Question : does it make a difference if you only do hook over both times instead of hook over and hook under?
- I know hook over/ hook under works ( I already knew this)
- I know hook under/ hook under doesn’t work ( I already knew this)
- I now know hook over/ hook over doesn’t work (just tested it had to find out plus it is awkward)
- I now know hook under/ hook over the reverse of number 1 works (just tested it had to find out) (works but is awkward to me I am right handed) hey I just learned something new may help someone (wonder if it would help lefties since they do things the opposite)
It wasn’t exactly your question but it made me curious so I thought I
would test option 4 and it worked so there are two ways to make the cord
and they are opposites of each other. No dumb questions everyone learns
from all questions that brings up something new.
There is another blog that has a tutorial up for making an ornament if you end up going to that blog use her tutorial only for the ornament her way of making the cord is the wrong way ( I can't remember which but either number 2 or 3 is her way) and it will not unravel properly and will cause you nothing but grief in trying to make it unravel, just an FYI.
There is another blog that has a tutorial up for making an ornament if you end up going to that blog use her tutorial only for the ornament her way of making the cord is the wrong way ( I can't remember which but either number 2 or 3 is her way) and it will not unravel properly and will cause you nothing but grief in trying to make it unravel, just an FYI.

The video play works for me. Thanks so much for taking the time to do the video. I want to give this a try!
ReplyDeleteThanks for doing this! A friend asked me to make one a month ago and I just have not had time. I'm going to refer her here. The only thing I would do differently is to say hook the thread from the front and then the back instead of over and under. Doesn't matter when you can see it though.
ReplyDelete:-) Gina
Thanks for the video and invitation of flirck group... :) I try to do romain lace cord for used with my pendents... thanks again... :)
ReplyDeletehttp://orquideaartsandcraft.blogspot.com/
Thanks for the excellent video. I've always wanted to try that! :)
ReplyDeleteThis is a great video. thanks very much for posting it.
ReplyDeleteThe only suggestion I have is if you could somehow angle the camera so that it's over your shoulder so that it sort of looks like we are doing the crochet along with you.
Thanks very much again.
This is a lovely tutorial, thank you! The video played just fine for me, and I was able to sit with hook and thread and go along with you. I have a few inches of cord started and I'm very pleased with how it's turning out. I am using Aunt Lydia's size 3 in warm rose and a D hook. It was what I had lying about without a current project attached. I am looking forward to your future tutorials as I have no idea what to do with my cord once it's done. I have never done needle lace before, but I love lacemaking and learning new methods. Thanks again!
ReplyDeleteThank you for sharing this. Very easy to follow your video. I grabbed some worsted weight yarn and a size k hook (I crochet with a death grip). This will make a great subsitute for I-cord.
ReplyDeleteI tried 3 different browsers and I can't get the video feed. If you get it fixed, get it up on yahoo or do a photo tutorial please let me know. I'd love to see it and find out how to make this beautiful cording. Rabbit fu_inle at hotmail dot com
ReplyDeleteIt is fixed every one else can see it the only reason I can't is my computer in Linux based and it has an issue with flash
ReplyDeleteI got it now. Maybe it was some connection problem the other night. I dont know. Thank you for the instruction. I tried doing it and I really like how the cord looks.
ReplyDeleteWow, that's a neat technique I've never encountered in my 35 years of crocheting!!! Thanks for sharing that with all of us :)
ReplyDeleteHello Sunshine,
ReplyDeleteThank you for this great tutorial. It is so nice to see these things demonstrated. I am sure I looked rather comical watching these with my body twisted so that it approximated your hand positions so that I could follow along.
I do have a couple of questions that I hoped you could respond to.
How does the cord unravel from the beginning end with the slip stitch there? Do you have to cut it off and then unravel?
Are instructions available on the Internet for the two other styles of cord that you used in the bolero jacket and that you have pictured above? If not, do you know the names of the stitches?
Thank you again.
yes you have to cut the first little bit off. should have mentioned that in the tutorial thanks for that question.
ReplyDeletethe other cords only unravel in one direction this is the only one that unravels from both ends. The others are in a book published by Silvia Murariu.
Thank you so much for this great tutorial. I have the books by Sylvia Murariu, but the instructions for the basic cord were not clear to me. This was very clear and I'm having a satisfying experience with it now. thanks again, Karen
ReplyDeleteyes Sylvia's native language is not English and since her book is self published it is rather difficult to follow the instruction on the cord. I tried and gave up with that book. But the book is very much worth the other cord patterns and the lace lay out patterns so I do recommend the book.
ReplyDeleteJust found your video tutorial...thank you so much. I've been trying to work this cord from written and drawn instructions and just couldn't get it. Now I've got it! I look forward to making yards and yards of Romanian Lace Cord. Thanks again.
ReplyDeleteI have made my first cord.
ReplyDeleteThank you so much!
Many thanks for your tutorial. Despite being Romanian and growing up watching my mum crocheting this type of (macrame, she call it) cord I just learned how to do it yesterday from your little movie. Thanks again.
ReplyDeleteI've never heard of this in all my years of crocheting. It looks simple enough. Thanks for the great tutorial.
ReplyDelete~a
Hi Sunshine (I like that name),
ReplyDeleteThank you for the cord tutorial and video. I tried it and made a small length. I have shown it on my blog at http://crochetkari.blogspot.in/2012/07/my-first-sewing-project.html I hope you will visit me and let me know if it is okay. I have also linked back to your blog. I hope to make a bigger project someday, but before that I want to have a go at the yellow capelet which is simply divine. Thanks for the free patterns.
Regards.
THANK YOU SO MUCH!!!! I TRIDE AND IT MAGNIFIC.....
ReplyDeleteI just found this! Awesome! Thanks so much! (And yes, the video is very helpful!)
ReplyDeletebellissimi lavori, brava ciao.
ReplyDelete