
Monday, June 30, 2008
Fabric storage
I was reading this post on bura ellen which led me to this post on the happy zombie which is all about straightening up fabric stashes. I thought some of my readers might like these tips, so I thought I would pass them along to you all. Follow the two links above to find out more.
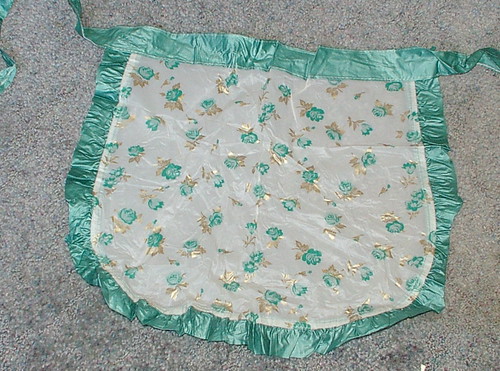
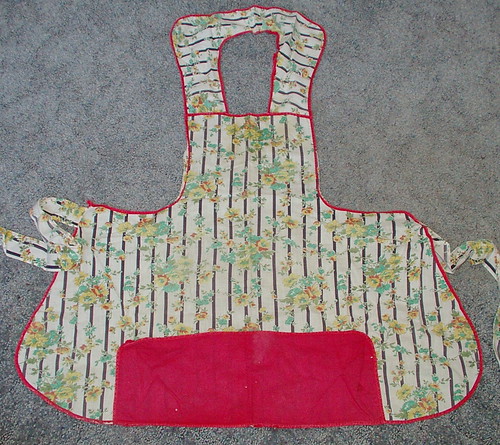
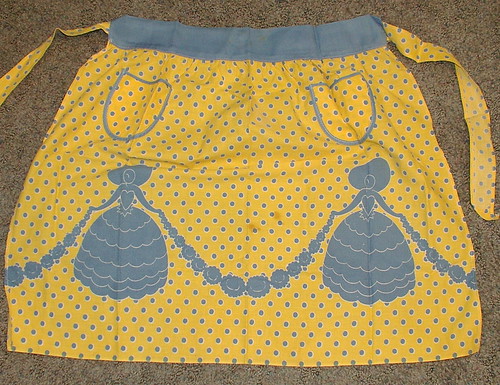
Day 13 of an apron a day....
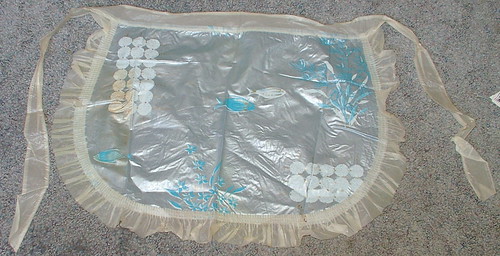
This one is also a store bought apron same vintage as the last one, I would guess.
I think it is from the 1950- 1960's, probably more a 1960's apron, but not really sure because I have never seen plastic aprons other than the ones in this set.
Saturday, June 28, 2008
Where to find Vintage apron patterns
In the process of trying to date GGH aprons I have been looking on line at vintage patterns for sale. Here is a link I think people will like if they are looking to buy vintage patterns.
sovintagepatterns.com
decadesofstyle.com
This has nothing to do with aprons per se, but this site has some cool sewing accouterments
kelmscottdesigns.com
sovintagepatterns.com
decadesofstyle.com
This has nothing to do with aprons per se, but this site has some cool sewing accouterments
kelmscottdesigns.com
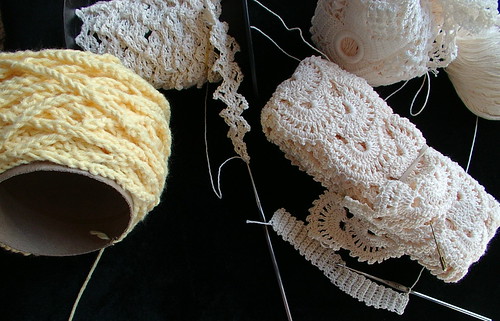
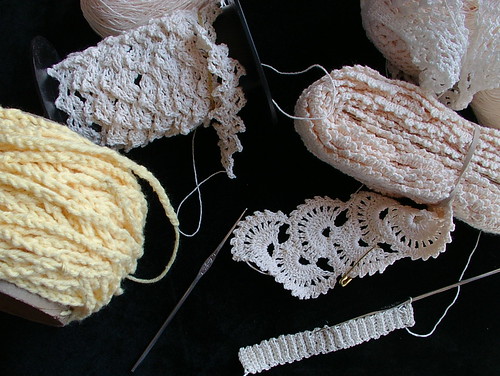
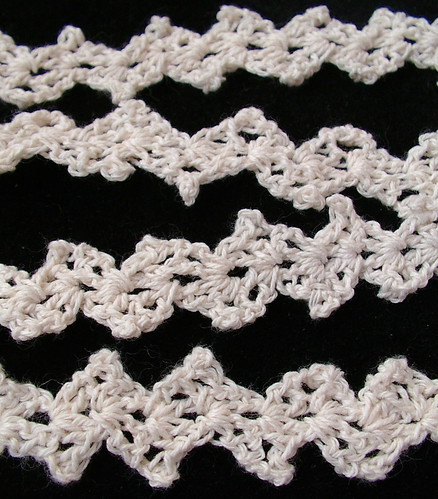
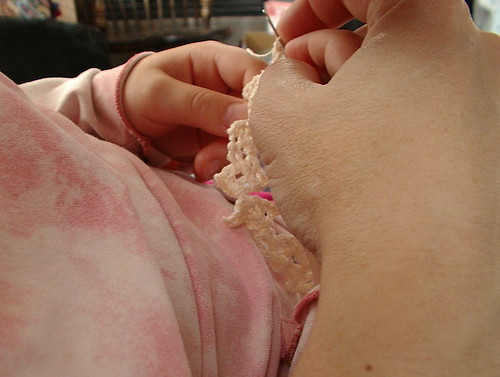
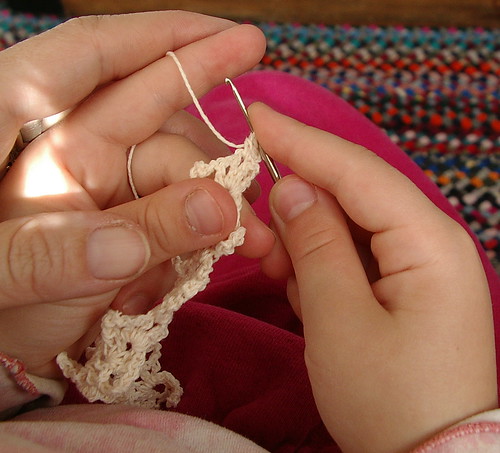
Progress on kids and my crochet lace
Day 12 of an apron a day....
This is probably a 1950's apron.
Friday, June 27, 2008
Day 11 of an apron a day....
I believe this apron is from the late 1950's to the very early 1960's.
Thursday, June 26, 2008
Day 10 of an apron a day....
Wednesday, June 25, 2008
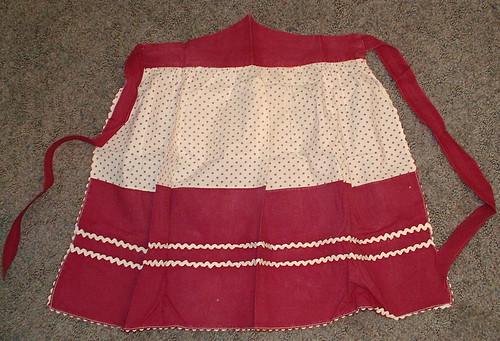
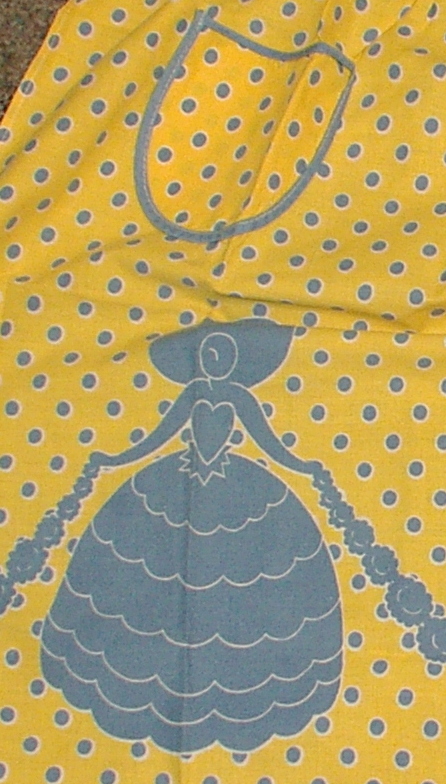
Day 9 of an apron a day....
I think it is from the 1950- 1960's; probably more a 1960's apron, but not really sure because I have never seen plastic aprons other than the ones in this set.
Tuesday, June 24, 2008
What little hands can do
Decided to update earlier than Wednesday.
So, all three have tried their hands at crochet, and they had me make a piece of lace, too. They didn't want to be alone in their endeavor, so I made a piece of lace and will continue 'till my ball of thread is gone. I have a habit of doing this; if I make lace for fun, I have to use the whole ball. As to why, I do not know.
Results: we will go from oldest to youngest, I guess this includes me. I made yardage lace using size 10 thread and a 6 hook (same thread size, color and hook the 10 and 8 year old used). Bad light in the next two photos; the ones of my oldest daughter is closer to the actual color of the thread.
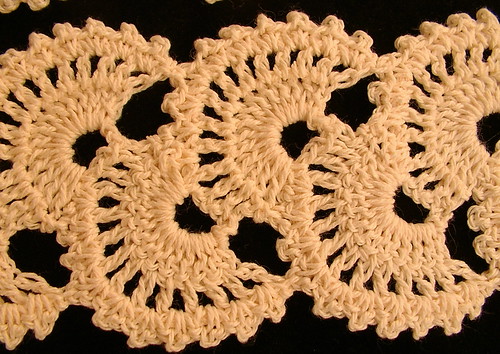
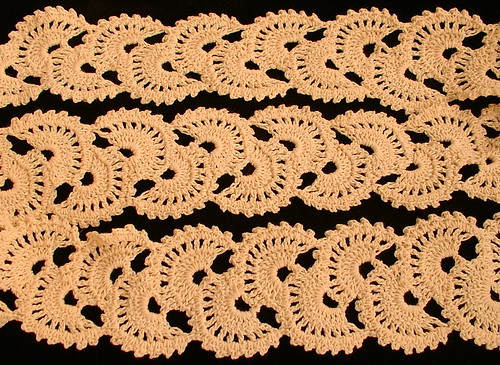
The pattern I used can be found here if you want to make it, too. If you use tiny thread like size 20 and smaller, makes a lovely bookmark like she shows or a real nice, delicate lace. But if you use size 10 thread, it makes a nice heavy-weight lace suitable for clothing and linens such as pillows and sheets and table cloths. If you use yarn, a lovely scarf. I have over 3 1/2 yards already made of this lace, which is the sum of one ball, but I plan on making it longer.
The oldest daughter's pattern came from Leisure Arts Book 111, easy crochet edgings number 8 in the book.
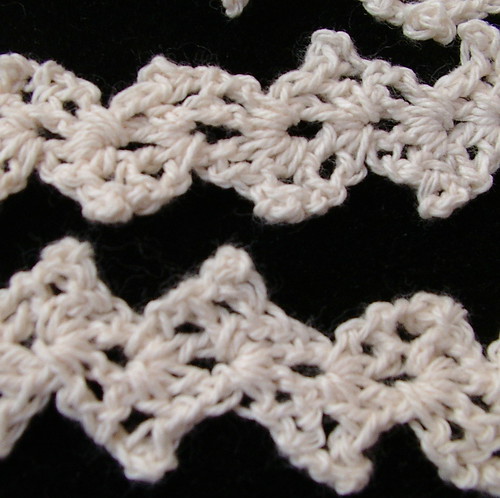
The middle daughter's pattern came out of my head and is posted here.
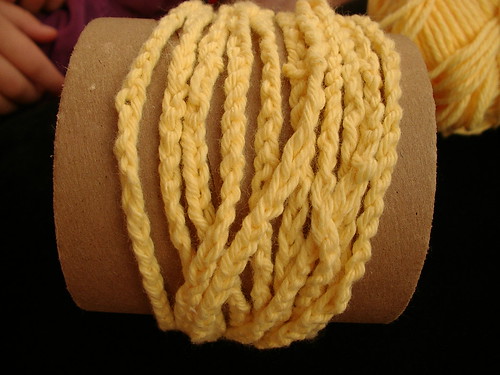
The youngest tried to make lace like the oldest, then we switched hook sizes and yarn sizes to no avail. She is ambidextrous so she kept switching which hand the hook was in because she figured it would feel better in one of the two. The problem with being ambidextrous is that if something is new and awkward, she tries it in both hands and doesn't get comfortable with just one hand. We had this issue all school year with her writing; she would not pick a hand, so she kept bouncing between the two, making for messy handwriting because neither hand is very skilled at it. This led her to a few tears because she wasn't sure why her sisters could get comfortable and not her. So I decided no implements in her hands would be best. Yep, finger crocheting miles and miles of chain. She is very proud of herself because in less than thirty minutes her chain was longer than oldest sister's lace and middle sister's strip and even longer than Mae's lace. So she went from tears to boasting about how fast she was with just her hands where everyone else had to have something else, but not her. I didn't notice that when I took the photo her hand was in the back ground; fitting since she is the one doing finger crochet.
Like I said, they all can do it; just have to find the right tool, pattern, yarn and so forth. In this case, chubby fingers, chains, and cotton yarn.
So, all three have tried their hands at crochet, and they had me make a piece of lace, too. They didn't want to be alone in their endeavor, so I made a piece of lace and will continue 'till my ball of thread is gone. I have a habit of doing this; if I make lace for fun, I have to use the whole ball. As to why, I do not know.
Results: we will go from oldest to youngest, I guess this includes me. I made yardage lace using size 10 thread and a 6 hook (same thread size, color and hook the 10 and 8 year old used). Bad light in the next two photos; the ones of my oldest daughter is closer to the actual color of the thread.
The pattern I used can be found here if you want to make it, too. If you use tiny thread like size 20 and smaller, makes a lovely bookmark like she shows or a real nice, delicate lace. But if you use size 10 thread, it makes a nice heavy-weight lace suitable for clothing and linens such as pillows and sheets and table cloths. If you use yarn, a lovely scarf. I have over 3 1/2 yards already made of this lace, which is the sum of one ball, but I plan on making it longer.
The oldest daughter's pattern came from Leisure Arts Book 111, easy crochet edgings number 8 in the book.
The middle daughter's pattern came out of my head and is posted here.
The youngest tried to make lace like the oldest, then we switched hook sizes and yarn sizes to no avail. She is ambidextrous so she kept switching which hand the hook was in because she figured it would feel better in one of the two. The problem with being ambidextrous is that if something is new and awkward, she tries it in both hands and doesn't get comfortable with just one hand. We had this issue all school year with her writing; she would not pick a hand, so she kept bouncing between the two, making for messy handwriting because neither hand is very skilled at it. This led her to a few tears because she wasn't sure why her sisters could get comfortable and not her. So I decided no implements in her hands would be best. Yep, finger crocheting miles and miles of chain. She is very proud of herself because in less than thirty minutes her chain was longer than oldest sister's lace and middle sister's strip and even longer than Mae's lace. So she went from tears to boasting about how fast she was with just her hands where everyone else had to have something else, but not her. I didn't notice that when I took the photo her hand was in the back ground; fitting since she is the one doing finger crochet.
Like I said, they all can do it; just have to find the right tool, pattern, yarn and so forth. In this case, chubby fingers, chains, and cotton yarn.
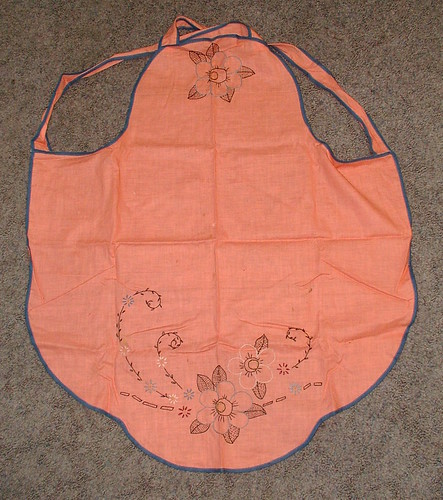
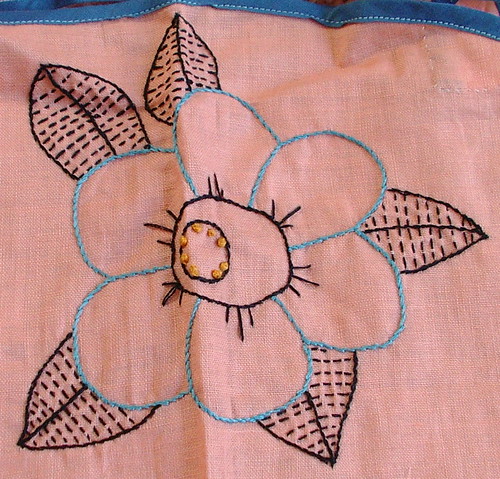
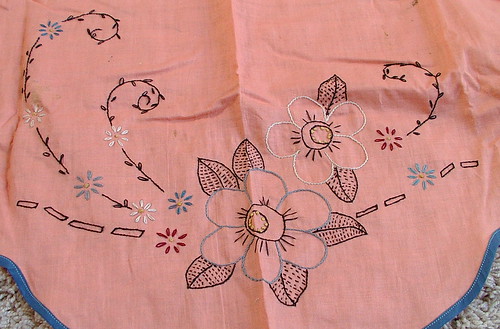
Day 8 of an apron a day....
I believe this apron is more from the 1940's from the fabric.
Side note: Wouldn't this be cute with black fabric with pink polka dots and pink gingham accents. OK, I am weird.
Monday, June 23, 2008
Little hands
I started with the oldest, my fairy queen; just a refresher course. At first she couldn't remember, but after about 10 to 15 minuets her hands started to remember and it was old hack and on to making lace; that is what she wanted to do.
Next, on to the middle daughter, my ladybug princess. She had not done any crochet before, so she wanted to try lace making first. I thought too big a step, but I let her try. She tried and was frustrated, so at the end of Saturday night she finally let me convince her a simple pattern would be better, and we would pick it up the next day.
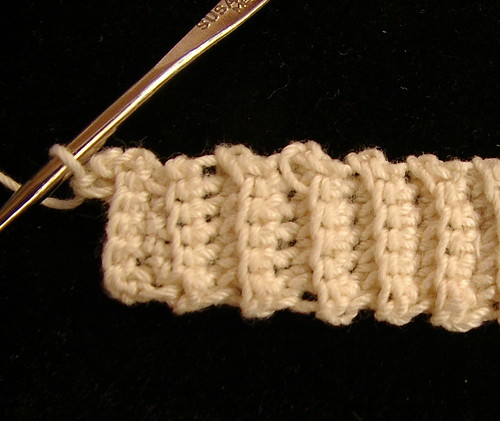
So the next day we started again with the middle daughter; this time it was a very simple pattern: chain 7, skip first chain,* sc in next 6 chains, ch 1 turn * repeat between stars all stitches are back loop only making a ripple effect. The rule is, she has to make the entire ball in this pattern; yes, very boring but having taught children before, this gets their hands used to the thread and the hook and the two working together (yep, she started with size 10 bedspread weight thread, hook size 6 steel) . Plus by the time she finishes she will have worked out all tension issues; kids tend to snap threads a lot in the beginning because they are not used to being delicate or manipulating their hands in so many directions all at once. I believe it is very good for coordination to teach a child to crochet. My oldest daughter I had make leprosy bandage as her first project; not only did she learn to crochet, but she did service work, too. But this daughter is the type of person that needs to see results quickly or gets discouraged, so a leprosy bandage was just too wide to show any length very soon. So, she is basically making the header for her next project where she will go on to making a piece of lace. She has a few inches made and has broken her thread once; not too bad.
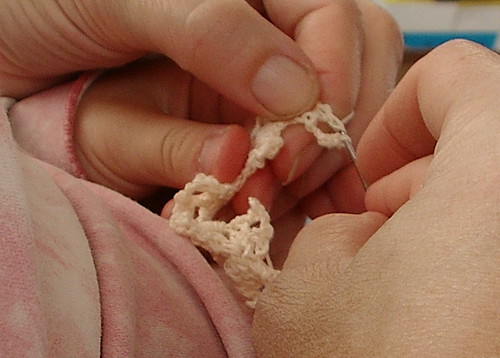
The last daughter, the butterfly girl, I thought was a little young, but she wanted to learn so I wasn't going to stop her. Her hands and mine are the ones you see throughout this post. We started out and I made a few inches of lace. Then I showed her how the right hand worked, she is ambidextrous so this was interesting. Then I showed her how the left hand worked. Then both together, then she was on her own. She wanted to be like the oldest sister and make lace right off the bat. So I tried with her. Once she saw it was harder than she thought and that one sister had to go to an easier pattern, she was good with switching. Her little hands are just a little too babyish still, meaning the chubby little fingers rub together, and get sweaty easily, not letting the thread slide well. So we decided on my next day off (I think it is Wednesday) we would go up to a bigger hook and yarn and that would be easier for her. Maybe she will make a small doll blanket, Barbie size doll that is. I will post their progress Wednesday night.

I love these photos; some I took, some my middle daughter took, they are of me and the butterfly girl. In time her little hands won't fit inside of mine any more; that will be a happy-sad day. It was fun having her sit in my lap as I looked over her shoulder to show her little hands what to do. I miss being a full-time mom so much it hurts at times. But times like these I am glad I still get little glimpses of what I used to have with my kids. My kids are great and understand what is happening, and we all look forward to mommy-daughter times.
Just a side note: When teaching kids I have learned let them try and over step what you think they can do then have a back up plan so they can continue and feel like they have made progress and not failed. Also remember their different personalities when making projects. Some have more patience than others; take that into account. Lastly, the age of the child my kids are 10, 8 and 6. Coordination usually comes with age or practice. The older two do piano and one has crocheted before and made bobbin lace, another has made Russian needle punch. For the youngest, this is her first time into high-coordinated hand projects. So each has different capabilities due to their age and growth and past experiences; all can do it. I just had to find the right stitches, tools, supplies and project for each.
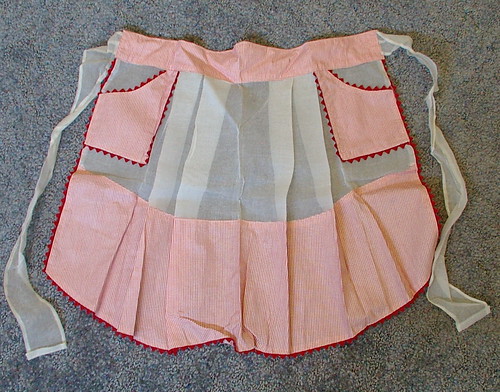
Day 7 of an apron a day....

We are trying to date these; so far I think this one is 1940- 1950 because of the style of apron. Best bet, mid to late 1950's.
Saturday, June 21, 2008

. Get yours at bighugelabs.com/flickr")
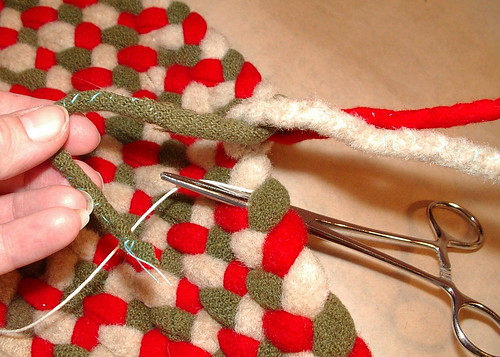
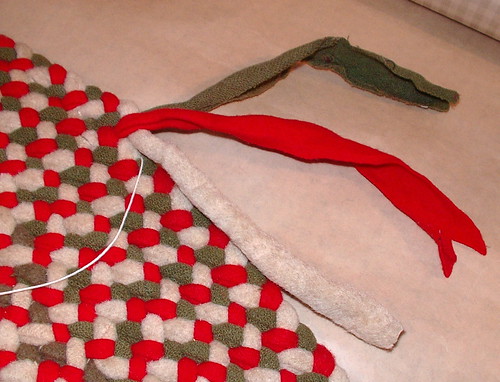
Part 7: Ending in a taper/hemostat tool
Well, finally part 7 of the rug tutorial. In this part you will need to have a hemostat; you can get these at most medical supply stores or your family doctor. This tool aids in pulling the tails into the rug when finishing your last round before the two butted rows.

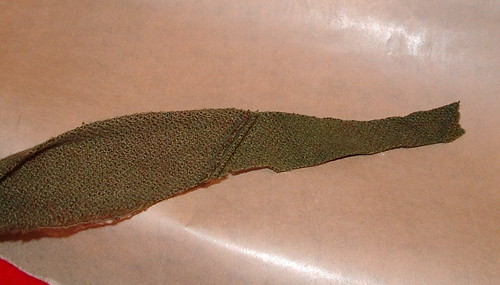
Pull each stand of the braid and fold the sides over and whip stitch closed. I am using blue for the tutorial; please make your thread match the color of your fabric. Do this to all three strands of the braid

Here I braided them together, so you can see how the braid gets skinnier now. However, this is not needed for braiding the rug, so I have to un-braid this part and continue with tutorial.
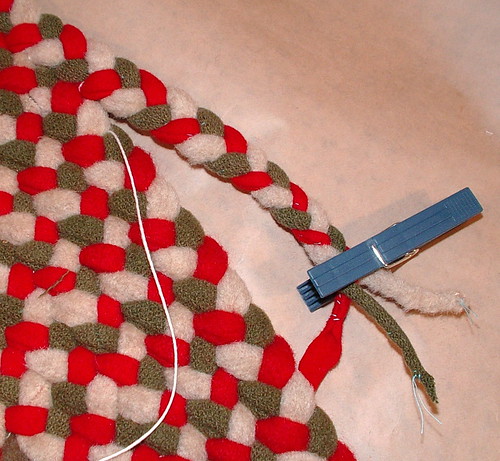
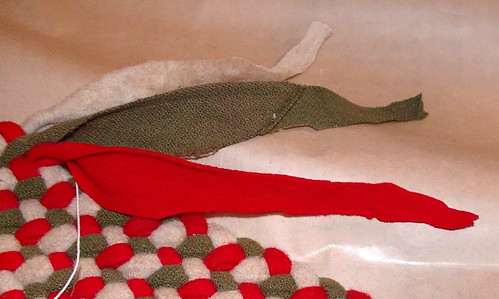
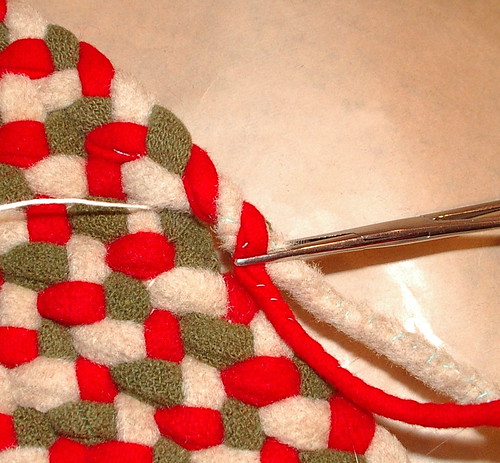
See above photo where the linen cord is coming out of the rug; this is where we will pick up on our rug. The hemostat in the below photo shows where the green strand is going to be woven into the rug.
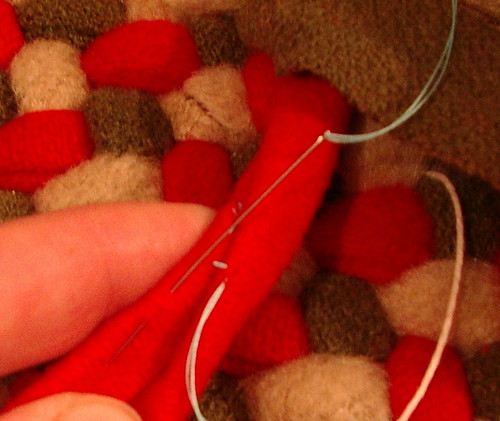
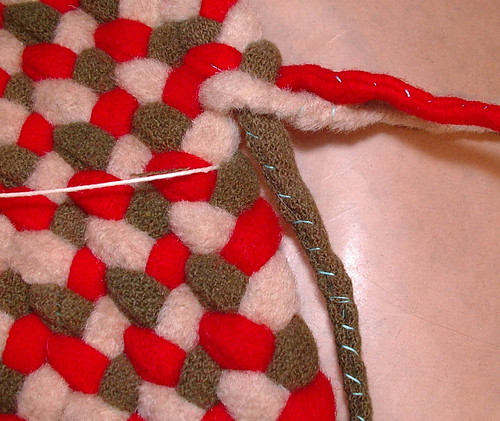
This next picture shows the hemostat going through the space between the braids to pull the green strand into the rug.
Here it is being pulled through.
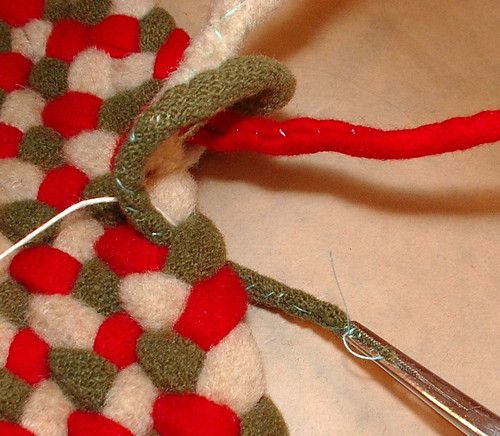
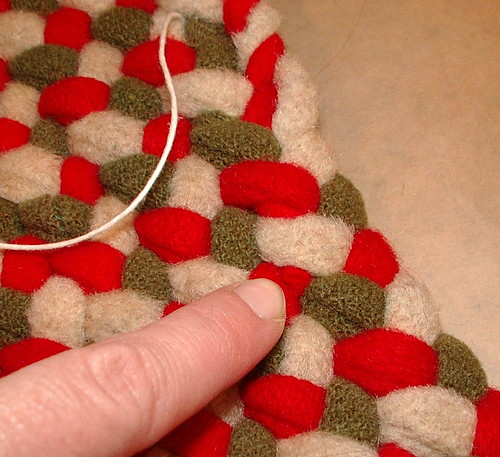
Repeat 'till it has gone through about 5 to 7 loops on the rug
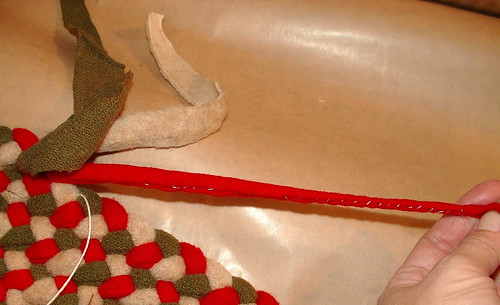
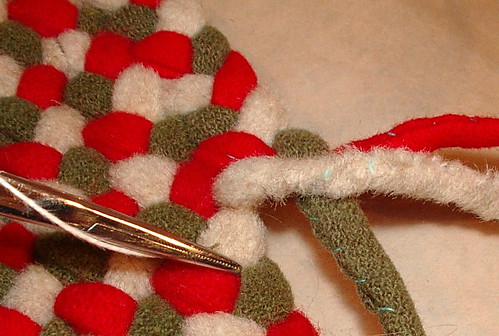
When you have it as far as you want to in weaving it in, cut it close to the rug and make sure the tail is tucked in and not visible.
Now do a few apple peels to get to the next color to be woven in; in this case, the red.
Part 1: Prep work and cutting fabric
Part 2: Will be about sewing the strips together and forming reels
Part 3: About starting a t-started rug
Part 4: How to start a round rug, apple peel style
Part 5: Sewing and increases / tools
Part 6: How to change colors
Part 7: Ending in a taper/hemostat tool
Part 8: Butting last one or two rows of the rug for a smooth finish
DO NOT USE THIS PATTERN TO MAKE THINGS TO SELL FOR PERSONAL USE ONLY!!!!
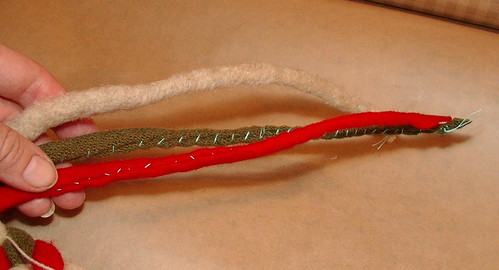
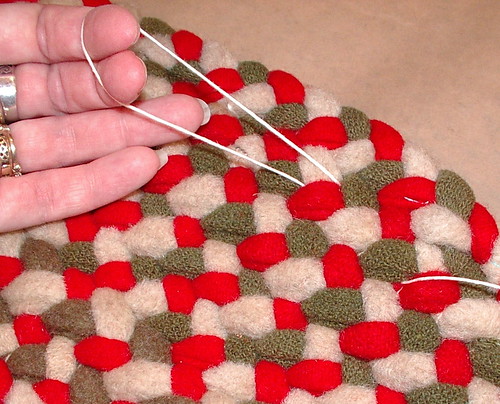
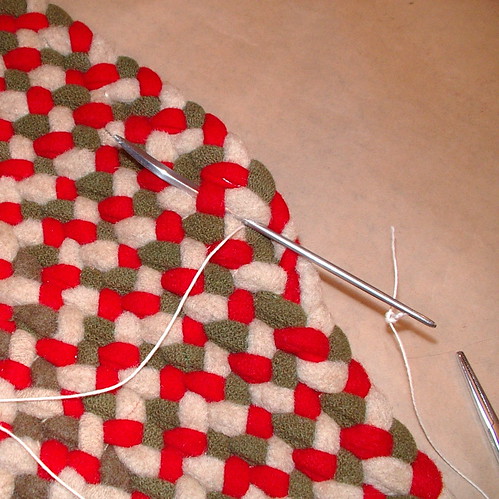
When you have braided the rug to the length you want, cut the braid.
Unbraid the last 12 inches of the braid,
then trim each piece of the braid. Trim both sides so that they tapper down to a point. I am showing, also, that you are not supposed to use one that has a seam in the middle of it because it makes it hard to braid one so skinny that has a seam. My other two do not have a seam in them; that is the preferred way.

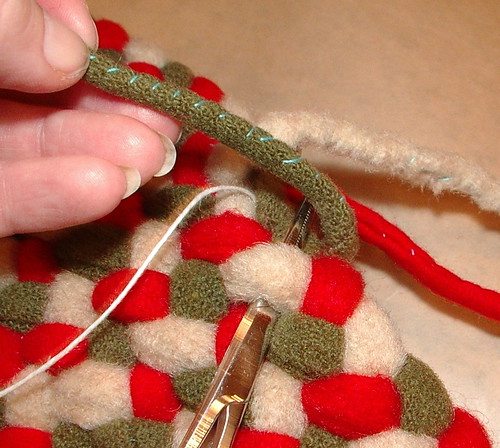
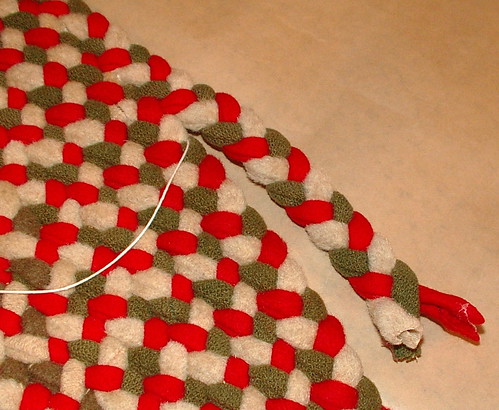
Repeat with the last color. After you are done, make sure and check to see if your ends are cut close enough not to be seen. As you can tell, I need to tuck the red one in or cut it closer. To cut closer, grab hemostat, pull on it hard, and cut below hemostat then let the strand pull back into the rug.
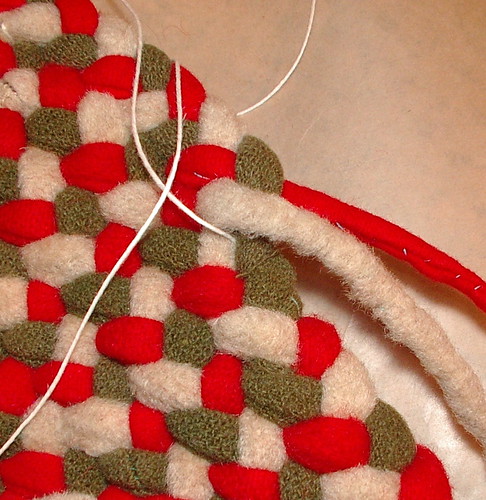
Remember that linen cord that is holding the rug together up 'till this point? Well, now you have to weave its tail into the rug, as well. This is much easier to do than the strands from the braid. Just insert your needle into the next loop and go under about 5 loops this way, then make a u-turn and go under about 3 to 5 in the opposite direction; cut the thread and you're done with this step.

Part 2: Will be about sewing the strips together and forming reels
Part 3: About starting a t-started rug
Part 4: How to start a round rug, apple peel style
Part 5: Sewing and increases / tools
Part 6: How to change colors
Part 7: Ending in a taper/hemostat tool
Part 8: Butting last one or two rows of the rug for a smooth finish
DO NOT USE THIS PATTERN TO MAKE THINGS TO SELL FOR PERSONAL USE ONLY!!!!
Another Braided rug
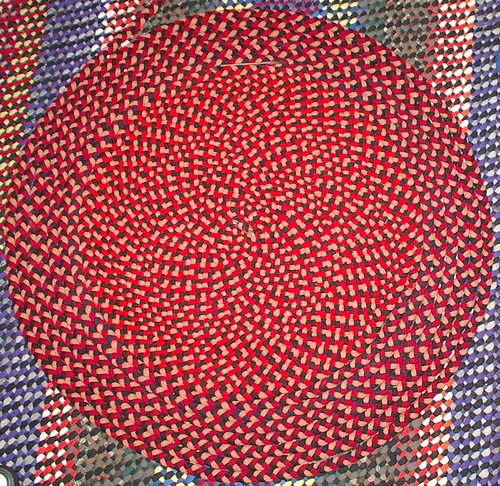
I hope to post the last two rug tutorials today (but I may only get one done) since I have a day off, which only happens every now and again. I posted a little bit of this rug on the post about tatting. I am making it for my SIL who watches my kids almost everyday while I am at work. She is a great blessing to me and my family. I don't think she truly knows how much I appreciate what she does. Sometimes (lots of times) my schedule at work gets changed at the drop of a hat and I never know from 1 hour to the next how long my shifts will be; she rolls pretty good with the punches. I just wish this wasn't the case because I am sure it is a large intrusion on her family. This rug is about three feet across at the moment; not all the braids are stitched together, so this is an estimate. It will be 5 feet across like the last one when done. There are two shades of red in this rug, it isn't a camera trick; there will probably be a few more before I am done because the red keeps running out, while the black and brown haven't yet.
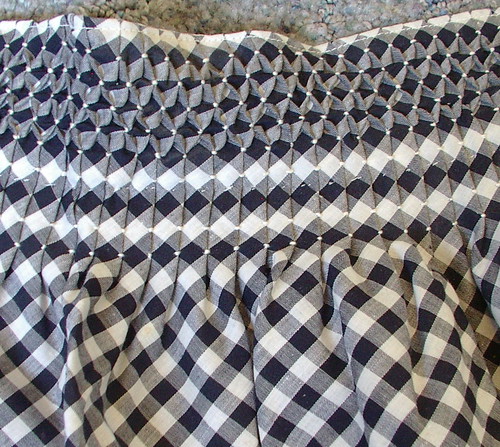
Day 6 of an apron a day....
We are trying to date these; so far I think this one is 1930- 1940 because of the style of apron.
Friday, June 20, 2008
Day 5 of an apron a day....
This apron is somewhat sheer, but I like it much more than the last one. This apron has no pockets and it ties around the waist. More of a hostess/Sunday-best apron than a cooking apron. But this is a child's apron best Sunday dress apron.
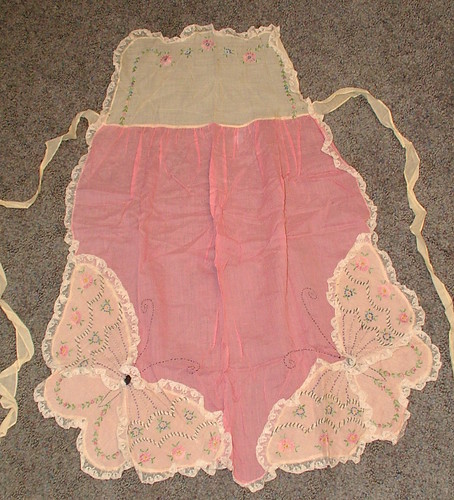
My youngest daughter would probably like this one, too, because she is the butterfly girl in our house. There are snaps on the sides probably to attach it to a dress when great grandma was a little girl. Later in this group of aprons is a another child's apron it also has embroidery.
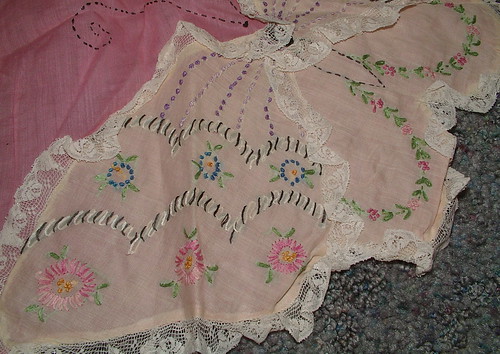
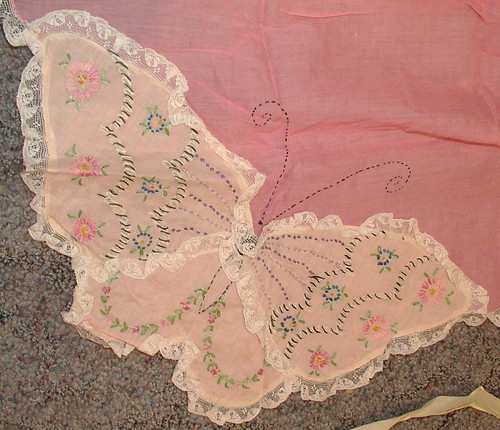
This is a unique apron in that it is the type you pin to your bodice to hold the top in place. There is some shadow work (the black and white embroidery) on the wings of the two butterflies. Very delicate and sweet because of all the embroidery.
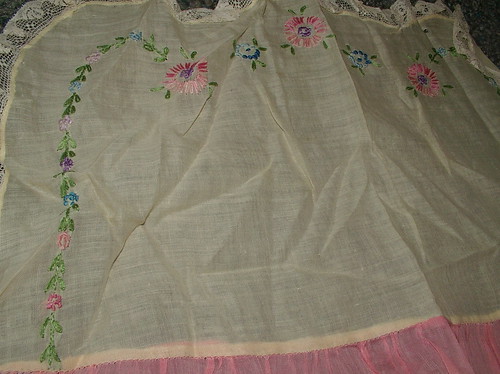
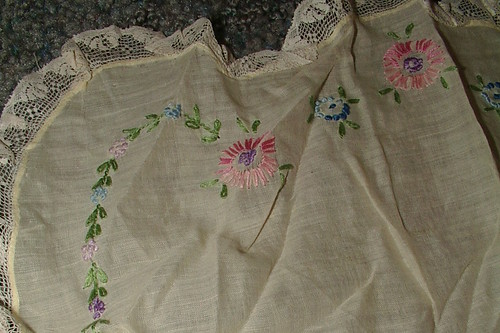
It also has lovely antique cotton machine-made bobbin lace trim.
We are trying to date these; so far I think this one is 1900- 1920 because of the style of apron. Probably the teens.
My youngest daughter would probably like this one, too, because she is the butterfly girl in our house. There are snaps on the sides probably to attach it to a dress when great grandma was a little girl. Later in this group of aprons is a another child's apron it also has embroidery.
This is a unique apron in that it is the type you pin to your bodice to hold the top in place. There is some shadow work (the black and white embroidery) on the wings of the two butterflies. Very delicate and sweet because of all the embroidery.
It also has lovely antique cotton machine-made bobbin lace trim.
We are trying to date these; so far I think this one is 1900- 1920 because of the style of apron. Probably the teens.
Subscribe to:
Posts (Atom)
Copyright/permissions info
I like to share on this space my ideas and projects.
Please don't take ideas or photo and claim them as your work.
I am always happy to have new links to me. So if you like something just link back to me and give the source some credit thanks.
Any questions? just ask. I am happy to work with you if you need something
 This work is licensed under a Creative Commons Attribution-Noncommercial-No Derivative Works 3.0 Unported License.
2006-2019
Copyright Vintage Threads Inc.
All content and images.
This work is licensed under a Creative Commons Attribution-Noncommercial-No Derivative Works 3.0 Unported License.
2006-2019
Copyright Vintage Threads Inc.
All content and images.