

The tutorial has been removed from here and a link added where you can order it in book form. This is because I have contracted to do so with Annie's Attic. I hope this makes it easier for my readers that they can carry a pattern with them and carry that with them and not have to sit in front of their computer screen to work on this project.
The book is still on Amazon and is called Learn to do Yo-yo crochet.
Update:
The pattern that was featured in the September issue of Crochet is now featured for free on their site.
The pattern that was featured in the September issue of Crochet is now featured for free on their site.

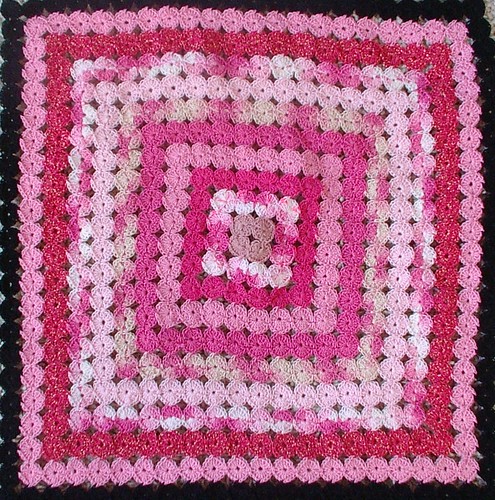
If you play with making a few blocks or an entire afghan or make other things with this technique, please post them on the group I made on flickr. I would love to see everyone's art work.


Now that is one awesome afghan! When I looked at your header I thought the blocks were made up of individual yo-yos. This is definitely something to add to my 'to-do' list.
ReplyDeleteWow! Amazing pattern. Thanks for the tutorial, I'd like to make it with many colours in size 10 thread like you did. Great job :-D
ReplyDeleteThanks so much! Now I see what I was doing wrong when I tried it, lol. I have a large bag of "craft cotton" embroidery thread to use up, so I imagine I'll be making many very small squares.
ReplyDeleteWonderful tutorial - thanks so much. I also thought the blocks were individually made yo yo's. I am sure this took alot of time on your part - thanks for being so generous.
ReplyDeleteOMG...you totally rock! I can not believe you had the time...scratch that, TOOK the time to do this now when you are so busy! THANK YOU!
ReplyDeleteThanks everyone I am glad this is of help to you. I think it would take forever if they had been individual yoyos. But this gives a similar look with out as much work.
ReplyDeleteWhat a fantastic pattern and tutorial! I absolutely love your afghan!
ReplyDeleteThis is wonderful! Thank you for taking all the time it took to do this for us! I appreciate you so much.
ReplyDeletethank for tutorial.I'll try this.
ReplyDeleteI can't wait to try this, the yoyos are beautiful! I'd love to link to this as well if you didn't mind. I believe I found you via CraftGossip!
ReplyDeleteI always like links thanks for asking
ReplyDeleteWow! I never would have guessed that technique! Very cool.
ReplyDeleteWow, I have been wanting to learn to crochet. Beautiful afghan and I love yoyo's! Thnk you!
ReplyDeleteI am SOO impressed! I will definetely try this! Just looking at the finished product I thought each yoyo are made sepearately. this is really cool.
ReplyDeleteWell, I'm not sure why I pursued this pattern from Ravelry, since I REALLY don't like doing millions of little bitty things, but I'm glad I did. What an ingenious idea! Thanks for sharing.
ReplyDeleteI am glad the technique has surprised lots of people it is much easier than the original piece looks like.
ReplyDeleteThat's awesome! What a GREAT tutorial and blog about it. Great work.
ReplyDeletethank you for sharing this great tutorial... I thought that are separate crochet circles I would never thought of this looks fantastic...
ReplyDeletethank you again
x
Wow I just love it. I am not fond of working with crochet cotton and am going to try with baby weight yarn.
ReplyDeleteWow I really love this pattern. Thanks for sharing the tut. I am not a big fan of crochet cotton and am going to give this a try with baby yarn.
ReplyDeleteLove it, grabbed some yarn and a hook before I finished reading the post, have to try it now.
ReplyDeletewonderful, wonderful! Thank you so much for sharing!!!!
ReplyDeleteThis is just goregous! I can't wait to try it!
ReplyDeleteYour tutorial is great, thank you. I would love to try this, I might have learned something today!
ReplyDeleteThis is absolutely gorgeous! Have saved it and will definitely give it a try! Thanks for the elaborate tute!!!
ReplyDeleteThank you so much for this amazing tuto :-))))
ReplyDeleteYou give a great tute!!!
ReplyDeleteThank you for this wonderful step by step! I think I'm going to try it! Have a great week!
ReplyDeleteAnaIsa
I found this pattern a couple of years ago on a Brazilian lady's crochet blog (Undisthreadness) and I love it. It can be made so many ways!
ReplyDeletecool what is the link I would love to see someone else's version of this and how they did it was it like mine and photo by photo or was it diagrams or video. Did the person use thread or yarn cotton, wool or acrylic. I have only ever seen this used as an edging on doilies. I would love to see how someone else did it. I want to make another tutorial but in a grandmothers flower garden style I think it can easily be done with a modification to the stitch count
ReplyDeleteThe blog is called Undisthreadness and it was done by a lady named Beatriz Medina from Brazil who was a member of the Crochet Partners group (which I think is now a Yahoo group). Here is the link to her pattern (which she actually just did as a 16-circle square)- it has actual pictures and some drawn diagrams: http://undisthreadness.blogspot.com/2006/09/16-circles-square.html
ReplyDeleteHer blog hasn't been updated for a couple of years, but she has some really nice patterns on it.
I LUV this!!! It is so amazing, I too thought it was a ton of little yo-yo's all put together. When I first saw the pictures I was like "Oh how nice, but what a pain in the rear to deal with all those yarn ends." Now I am even more excited to make this. I love making doilies and this will be perfect to use up all my half gone crochet thread.
ReplyDeleteThanks so much for generously posting this.
I love this pattern. I would love a printable version. I tried to print the tutorial and got alot of black photos with my words
ReplyDeleteI love this pattern. I would love a printable version. I tried to print the tutorial and got alot of black phitis with my words
ReplyDeleteHi. Thanks for posting this tutorial. I am blind and can't see your posted pictures, so am trying to follow your written instructions. I got as far as making the center 4 yoyos, and joining them in to a square. (They look like four quarters in a two-by-two square. Hoping this is the right configuration.) Then I ch72 for the second round and made the first small shell and half medium shell. But I'm not sure where to join the work to the previous round, then how to continue. Could you please clarify by saying which dc in the yoyo of the previous round you're joining to? Thanks again. Can't wait to see how this turns out.
ReplyDeletedani send me an email and I will call you and walk you through it
ReplyDeletesunshine_harbaugh@juno.com
Thank you for this tutorial! I think it´s great, because you don´t have to know english to understand the instructions (so good are the photos). I´m from Spain. Mª Carmen.
ReplyDeleteLove this technique - and the end result is stunning. Thanks sooooo much for writing it up. I came to you thru Ravelry.
ReplyDeleteI crochet and have always wondered how yo-yo's were made. Thanks so much for that tutorial. I can do this...I hope!...lol!!!
ReplyDeleteThanks so much for the wonderfully detailed tutorial. Having the photos to go with the instructions is a big help. I had seen a yo-yo quilt but didn't know how they were constructed. Now I do, thanks to you!
ReplyDeleteThanks a lot for your tutorial... I'd like to try it one day.
ReplyDeleteI think it's great. I'd like to know your stitch formula for the yoyo stripes pattern too. You've made me excited about crocheting again-now I can't wait to get started.
ReplyDeletesame stitch count
ReplyDeleteI've been looking for something to do this summer, and this looks like it will fit the bill! Thank you so much for sharing this technique, much appreciated.
ReplyDeletedo you have a tutorial(video) on how to to the yo yo hexagon
ReplyDeleteHi,
ReplyDeleteI'm one of the editors with FaveCrafts.com and I wanted to let you know we linked to your afghan pattern. You can see the post on our blog at http://www.favecraftsblog.com/love-crochet-afghans/ It really is a fun pattern.
Thanks so much,
Christine
Is this pattern now only available in the "Learn to Do Yo-Yo Crochet" book that is for sale? I'm not seeing a .PDF downloadable instructions at the link provided -- am I just missing it? Thank you!
ReplyDeletethey have stopped selling the pdf and they are clearanceing out he book so I don't know what to say as I don't have the copy write any more
ReplyDeleteso sad when this happens. I won't buy from Annies attic because they are closing down the free distribution of patterns in this way. Please don't let your copy right go ladies. Commercialisation of old time arts and crafts is too much!
ReplyDeleteto anonymous please read this post for your answer
ReplyDeletehttp://sunshinescreations.vintagethreads.com/2012/01/rant-i-had-to-get-this-out.html
pdf is available on annies attic again and the book at amazon
ReplyDeleteI am not able to find the pattern on Annies Attic at all. Can you provide me with the link please?
DeleteSo when I try to get it from annie's attic it says it is backordered or no longer available. I tried to order it from ravelry, but paypay would not let me use my very NORMAL debit card -- so now I can't find a way to purchase it. Are there other ways to get the pdf? I don't mind paying, just having trouble finding where I can pay for it.....
ReplyDeleteThanks,
Jamie
What is the name of the book that contains the YoYo Afghan pattern? I will go to Amazon & look for it.
ReplyDeleteThank you!
Elaine
http://www.amazon.com/s/ref=nb_sb_ss_i_0_14?url=search-alias%3Daps&field-keywords=learn+to+do+yo-yo+crochet&sprefix=learn+to+do+yo%2Caps%2C0
ReplyDeletelink to where it s on amazon the book is called learn to do yo-yo crochet
Hello Wendy this is a lovely pattern! However, like the person above I'd like to buy the PDF version.
ReplyDeleteIs there anyway to purchase the digital copy still?
Thank you thank you thank you
there is a link on my side bar to the book but i do not think annie's attic has the pdf available any more but the book can still be bough ton amazon.
Delete