
m = middle
l = left
There are two ways of starting this type of braid once you have a t start
The version I use is listed first; the second version, the one I don't use, is listed second. Both work great.
Start with the apple peel itself.
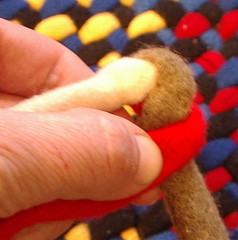
- r over m
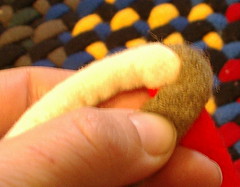
- r over m (make sure when you are braiding you are keeping the raw edges turned inside so that it continues to have the shape you stitched closed without the extra stitches).
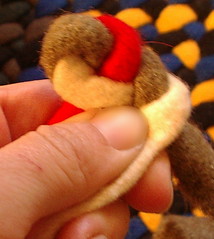
- l over m, pull hard on the piece of the braid that was left over middle 1 complete apple peel made, this picture. The one below shows one more step than indicated in instructions above; it shows the next r over m , r over m as well as the l over m talked about above, then the second apple peel is started with 2 r over m
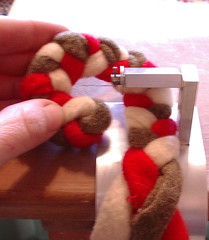
- Do 8 of these, including the first one in the 8. If done correctly, on the left side of the braid will only be two colors where the right side has all three but one color is ever other twist.

- Then start plain braiding, r over m, l over m; keep braid tight and firm. This isn't like hair where you want a long braid, but a short stocky braid. Make sure you are turning in your raw edges.
Version 2:
- Start with normal braid (r over m, l over m) then start "apple peel" (see above).
Part 1: Prep work and cutting fabric
Part 2: Will be about sewing the strips together and forming reels
Part 3: About starting a t-started rug
Part 4: How to start a round rug, apple peel style
Part 5: Sewing and increases / tools
Part 6: How to change colors
Part 7: Ending in a taper
Part 8: Butting last one or two rows of the rug for a smooth finish
DO NOT USE THIS PATTERN TO MAKE THINGS TO SELL FOR PERSONAL USE ONLY!!!!

I'm thinking of trying my first braided rug, so I was excited to find your blog. I was wondering if you would be willing to clarify something. In this post, I'm confused by your statement "his picture shows one more step than indicated in instructions it show the next r over m , r over m as well as the l over m talked about above," because I don't see l over m talked about above. In summary are you doing, r over m, r over m, l over m, and then repeating that 8 times? If not, could you clarify? Thanks!
ReplyDeleteyes r over m, r over m, l over m, pull hard repeat 8 times (for a circle)
ReplyDeleteDid you make a video regarding how to turn ends in whilst braiding?
ReplyDeleteI did not but all I all I do is use my thumbs to keep them turned in as I braid each time a new piece of fabric is pulled from my reel I turn it in with the tips of my thumbs
ReplyDeleteHow long do you cut each strip for your reel? What is the best length? How do you avoid them tangling when you braid? And how do you add a new strip to each strand, please? (Lots of questions!!)
ReplyDelete