
So, here is the start of the round rug.
Supplies for this step:
- Scissors/ruler or rotary cutter/mat
- fabric can be wool (easiest to work with if you are not allergic to wool, that is). jean (denim, hardest on the hands to work with), cotton (very thin; won't last long), cotton toweling (easy to work with, just messy when cutting strips and braiding -- little tufts of toweling everywhere), or any thing you like (I hate using synthetics for this, but if you just have tons of polyester, go for it just [eww] don't show me, I don't know how it is to work with because I have never used it, nor do I want to)
- washing machine/soap/cycle on hot water, dryer
Steps in prep work:
- Acquiring the fabric. You can collect old towels to use in making a bath mat, or worn out jeans to make a kid's playroom rug. Some people use scrapes of cotton yardage that they will never use to make anything else. I don't do this because I feel it is too much work to use such a thin material. The result is lovely, but it takes 5 times the work and supplies and doesn't last even half as long as a wool one. You can use wool mill ends if you have a place near you ,such as Pendleton woolen mills. Now this I do like: cheap price, but high-quality material. If you get your fabric from old clothes, you will have to tear down the old clothes getting rid of all seams and such because they are not useful at all. This is a lot more work, but if you have clothes from a deceased relative, it can be rewarding, too, or if they are clothes your children have worn and such.
- Wash all fabric first in very hot water to shrink them and set colors, and dry on high heat in dryer to shrink it as much as possible before use. This will also help in getting rid of and killing any moths that may be in the fabric, if using wool. I also, afterward, stored my wool in big black garbage bags with moth crystals for three weeks to make sure I don't bring moths into my home; that would be a nightmare at my house!
- Cut fabric into 1 1/2 inch-wide strips, for wool. For jeans, I would use 3 inch-wide strips, and same goes for toweling and cotton fabric. Cut strips with the grain or cross grain of the fabric, never on the bias; bias has stretching issues when braiding, and that is not good. You can tear the fabric; for this, cut small snips at one end of the fabric and just tear to the other side. This makes sure that all your strips are uniform and with the grain or cross grain of the fabric. If you want to cut all the fabric with a rotary cutter, that works, too; just might be on the bias if you are not careful...
Part 1: Prep work and cutting fabric
Part 2: Will be about sewing the strips together and forming reels
Part 3: About starting a t-started rug
Part 4: How to start a round rug, apple peel style
Part 5: Sewing and increases / tools
Part 6: How to change colors
Part 7: Ending in a taper
Part 8: Butting last one or two rows of the rug for a smooth finish
These tutorials will be all about making a braided round rug. If after this everyone likes the tutorials, I will add one on how to make an oval rug; it has a different starting. I will also explain the math involved in the increases and figuring out a finished size of an oval rug. This is useful if you want to make a rug for a special space that you will want to fit with an oval.
I do have a group on flickr about handmade rugs; you are welcome to check it out.

Jean rug I made laying on top of a wool rug I made. I was still working on this jean rug when this photo was taken (and still currently am making it bigger). I don't keep rugs on top of each other as a normal practice.
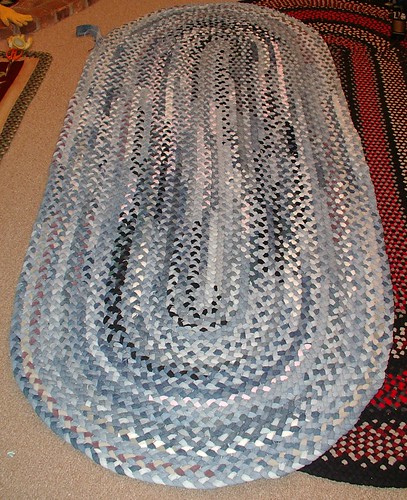
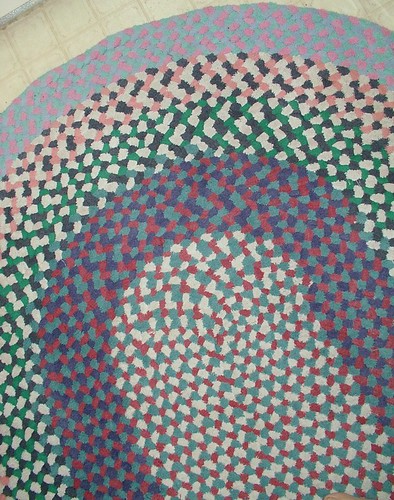
This is the wool rug, known in our house as the ladybug rug, this is below the jean rug in the other photo. two up.
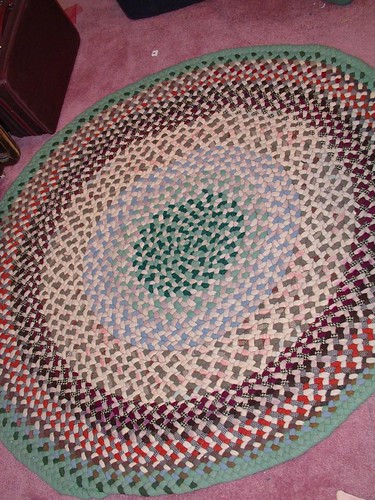
All the pictures above are of oval rugs, except the first one. I have made many round rugs, but the pictured one I have given away to family members. Even the one in my home was a gift to my husband, so I don't actually own that one, either. The top round rug was never finished because, at that time, I didn't know how to butt the ends of a row so it ends at the tapered row. Both ways are fine; one is just stronger. At some point I will go back and finish my husband's rug, if he lets me he likes it the way it is. I think it still needs two rows of butted braid.
DO NOT USE THESE PATTERNS TO MAKE THINGS TO SELL FOR PERSONAL USE ONLY!!!!
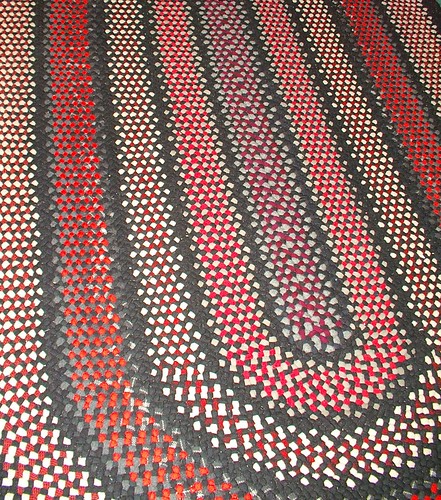
Below is a rug I made from towels that had been well loved and became real worn out and old. They had all been gifts to us at our wedding, so I wanted to save them and make them useful. Thus, a rug was born made out of towels to make a bath mat. You can use brand new towels; it will give you a much softer and fluffier rug. Warning: when cutting towels, it is the messiest of all the fabrics I have mentioned. Do this, the cutting and braiding, in the garage or outside, or you will have a huge mess to clean up.
This is the wool rug, known in our house as the ladybug rug, this is below the jean rug in the other photo. two up.
All the pictures above are of oval rugs, except the first one. I have made many round rugs, but the pictured one I have given away to family members. Even the one in my home was a gift to my husband, so I don't actually own that one, either. The top round rug was never finished because, at that time, I didn't know how to butt the ends of a row so it ends at the tapered row. Both ways are fine; one is just stronger. At some point I will go back and finish my husband's rug, if he lets me he likes it the way it is. I think it still needs two rows of butted braid.
DO NOT USE THESE PATTERNS TO MAKE THINGS TO SELL FOR PERSONAL USE ONLY!!!!

I have to tell you that I'm going to be watching THIS one for sure. I've always wanted to make one of these, but never was quite sure how...Keep 'em coming,please!
ReplyDeleteMichele
These are absolutely beautiful... a friend and I are going to make mini oval braided rugs for our stairways... this is GREAT!!! I'm glad you're sharing!!
ReplyDeleteThanks for being so generous with your knowledge and time, Sunshine. I'm so glad thatyou found some suitable work, too. I've just returned to the workforce part-time after being at home with my daughter. What a change!
ReplyDeleteAnyway, I'm off to sort the stash into rug fabrics...
THANK YOU SO MUCH for posting this, please don't take it down any time soon! I've found a lot of directions on the web about how to make braided rugs, but none as detailed as yours as NONE with pictures. The directions just weren't clicking with me without pictures until I found your site. Thank you thank you thank you! Now I can get started!
ReplyDeleteI agree with all the previous :-)
ReplyDeleteThis is one of the best and most thorough tutorials I've seen, and the best braided rug tutorial ever... i'd buy this as a book, if you have it.
Oh, I forgot to ask - how much fabric do you need for a rug? I have some old sheets, and I wonder if they are enough for a rug... would four sheets be enough for a small rug, about the size of a pillow?
ReplyDelete4 sheets hould get you a nice small place in front of the sink type of rug but I am not sure as I usually do not use cotton I have only done that twice with scraps of fabric that I hated. because even ugly fabric looks good in a rug as it just becomes color and not pattern. That was a crocheted rug not a braided one for braided rugs I usually use wool and a few times toweling for the bathroom area. I have never weighted my rugs but i was told once that it is about 2 to 5 pounds per square foot of a wool braided rug I would lean towards the 5 my self. As the rugs are very heavy it depends on how tight you braid and what width you cut your fabric. sheets will take less weight as it will be a skinner rug (in thickness)and it is a light weight fabric. The good thing is you can always leave one end of the rug undone and just tuck the tail underneath and add to it as you get more fabric till you get it to the size you want. And the becasue this type of rug has color changes it also leans itself to that as well.
ReplyDeleteThank you for this excellent tutorial! I began a braided wool rug 15 years ago . Thanks to you, I now know how to finish it.
ReplyDeleteso glad i could help you would loe to see a picture when done
ReplyDeleteExcellent tutorial!! I can't wait to try rug braiding!! The only thing is I was told that for the rug I want to create-an 8 foot round-I would need 50 yards of wool!!! Is this right??? I want to make the rug with new wool, but if I need 50 yards, that's awfully expensive!! Any suggestions for where to buy wool by the yard at a good price? Is 50 yards for my project acurate?? Thank you!
ReplyDeletei have only ever purchased mill ends or scrapes from someones basement that had been stored for 50 years twice. Pendelton wool mills in Oregon I have not purchased wool in 10 years so i do not even know if they are still in business
ReplyDeletethis is where i have purchased mill ends in the past http://thewoolenmillstore.blogspot.com/p/scraps.html
ReplyDeleteyes even the wool it does shrink but it makes it thicker and a tighter weave
ReplyDelete