

This is for personal use to not sell or barter items made from this pattern. This pattern comes from the early 1940's: Woolies for Babies ( it has been brought up to date with changes by me)
SUPPLIES:
• Chadwick's red heart baby wool, 1 ball (3/4 oz) (ie.. baby yarn wool) fingering weight yarn
• steel crochet hook, no 2/0 (double zero) steel hook
• 1 1/2 yards ribbon, 3/4 inch wide organza or double sided satin
• 2 ribbon rosettes (these you make yourself) you can buy store made flowers or make your own easy to do on a flower loom
•GAUGE: (pattern stitch) 3 shells make 2 inches
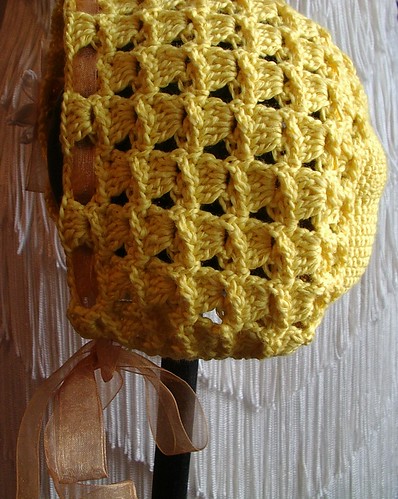
PATTERN:
starting at center of back, ch2.

2nd rnd: 2 sc in each st around (12 sts) place marker here
3rd rnd: *sc in next st , 2 sc in next st (an inc). Repeat from * around (18 sts) 4th rnd: *sc in next 2sts , 2 sc in next st. Repeat from * around (24 sts)
Continue thus increasing 6 sts on each rnd until there are 90 sts on the rnd and piece measures 4 1/4 inches from side to side across center. ( this is 15 rounds)
Now work 1 rnd without increasing, sl st in next st. Ch 1, turn and work back and forth as follows: ( this helps to start curve of hat to transition to rows going back and forth)
1st row: sc in same place as sl st, * make crossed dc's over the next 3 sts to make dc's , skip 2 sts, dc in back loop of next st, ch3, holding last dc and ch3 down with left thumb make dc in back loop of first st skipped, sc in st following crossed dc's. Repeat from * until there are 18 crossed dc's ending row with sc in st following last crossed dc. (91 stitches over 73 stitches) Remaining sc's are back of neck.
2nd row: Ch 3, turn Make 5 dc( a shell) in each ch3 across, end row with dc in last sc. Ch 1 turn. (92 stitches)
3rd row: sc in dc, * make crossed dc's over the next 3 sts, sc between shells. Repeat from * across, ending with sc in top st of turning chain. Ch3, turn.
Repeat 2nd and 3rd rows alternately until piece measures 4 1/2 inches from last rnd of sc, ending with the 2nd row. (if your tension is correct should be 7 or 8 repeats because the repeats land between these two measurements so pick which ever you like)
Do not fasten off work sc along lower edge and back of neck, holding edge it to fit (1 sc per round on front of cap and join two together on transition to back of cap the rest on the back is one stitch into one stitch) (about 9 inches) fasten off.
Finishing...
Run the 3/4inch ribbon under and over the shells of 1st row on front edge. Make the ends even for ties and tack ribbon at each side of cap.
It is actually pictured second row in this gives a little soft ruffle around the edge. Sew on rosettes. I also suggest fray checking all ribbon raw edges so it can easily go through in the wash without worry of fraying; or you can fold edges of ribbon to a point and stitch down instead to do the same.

It is beautiful!
ReplyDelete