
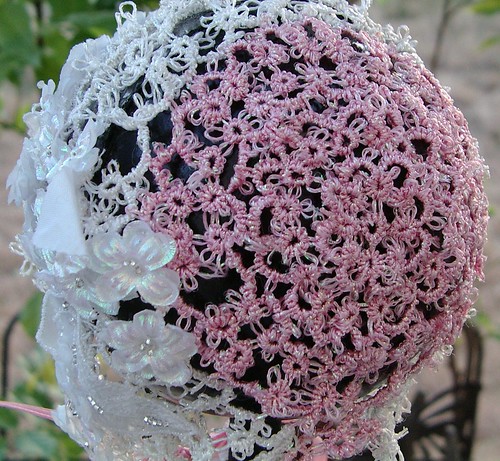
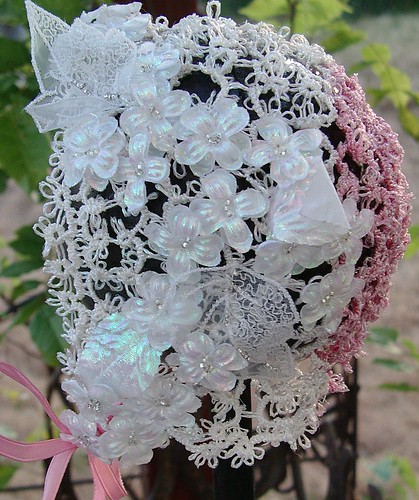
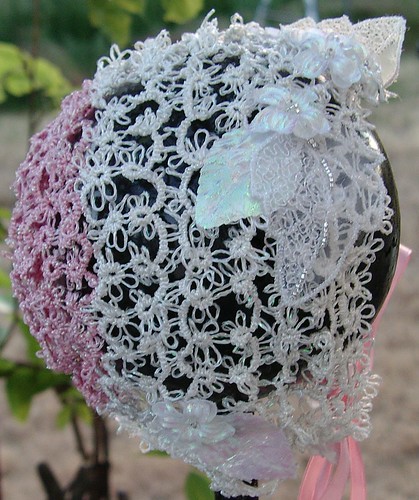
 Since at that time the class I was going to take for beginner tatters wasn't going to start for one week and Halloween was in three days, I decided to teach myself to needle tat to have the desired look for the cap for the baby fairy. So, in less than two days, I did just that. When I went to class for the first time the other students said, "Why are you here? You know how to tat." My response was, "Yeah, but not very well and not with a shuttle."
At the time I had a book by Nina Libin and really wanted to do some things like hers, but I wasn't skilled enough, so I embroidered beads on the bonnet in stead of tatting them into it. I wish I had been a better tatter at that time because it would have been real cool to have the beads tatted in. In the same breath, I probably would not have been able to finish it on time since I was teaching myself to tat, without much leeway in time for mistakes. I always seem to do things like that. I haven't a clue why I get an idea I want to make and, if it takes learning a new skill, so be it.
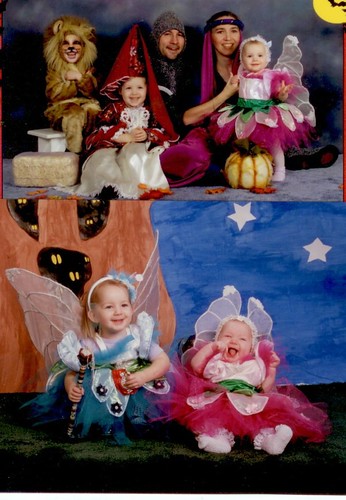
The baby in pink is wearing a costume I designed and created while watching the movie "Everafter" over and over again for months on end. I really loved the wings in that movie that they portrayed as having been made by Leonard De Vinci for Cinderella. Since I had no idea how to make them like they did, I designed and created these wings without a pattern. They are made from craft-wired floral tape and organza, with beads sewn at the tips of the wings and silver ribbon on the veins of the wings, which are also craft wire. The wings have a body harness to keep them from bouncing funny on the body and make them more stable. To make the wings, I had my daughter lay next to piece of poster board and drew my idea of a wing on the board with veins and all. Then I bent the craft wires to this shape and covered them with floral tape, then covered it all with fabric and other items.
The dresses are made from a sort of pinafore concept so the back would be open and allow for the wings to come out. The waist has satin leaves that have, on top of them, another set of leaves that are crocheted individual pineapples made out of rayon embroidery thread. There is embroidery on the hem of the tool netting, too; it's just real hard to see in the photos. That embroidery was also done with rayon embroidery thread. On each of the fabric petals are store-purchased flowers, from the wedding section of the fabric store; each had a beaded center. The bonnet was also rayon embroidery thread. Trust me, it's not a good idea, as a beginner, to give your self two days to learn a skill, make a project and, on top of it, add a super-slick substance that doesn't want to stay put! I also stitched flowers and leaves, both iridescent, all over the bonnet with accents in beads. The bonnet purposely has real long picots on it. I hoped it would make it look more like a flower's center -- a blown dandelion, sort of.
The baby also has on crocheted fishnet tights that had booties for the feet; these were made out of metallic size 10 crochet cotton. I put normal tights on under them because they were way too itchy and rough to be next to a 5-month old's skin. As you can tell, she was happy and didn't seem to mind. A few years later my youngest daughter wore it for her first Halloween, too, but she was much older so the fishnet tights wouldn't work for her since she was almost a year old.
My other daughter, the fairy in blue, has a pretty cool wand in her hand that I made using gourd stitch (some people call it Peyote stitch). This was done over a dowel with a bead at the top of it. The wood bead was covered with batting, too, then the bead work done over it. This is something else I taught myself to make (the gourd stitch and brick stitch). Then I did the brick stitch for the petals on the flowers and added streamers of beads.
Please, don't ask me how long it took to make that. All I remember is that I started it in June for Halloween (I take that back. I remember I went to a Memorial Day sale at the fabric store, so it was May). So way too long, in other words. Just so you know, the last thing I made was the bonnet because it had to fit the baby. If I made it too soon, it wouldn't fit the baby when needed since I had to fit it as I made it. The Blue fairy also had bigger wings. She could not sit in her costume because the wings would bend; thus the harness was great since we could unbuckle the wings and off they came, and the rest of the costume stayed intact. The pink fairy's wings accommodated the fact that she could not stand and could only sit slightly, so they went sideways -- more or less up and down.
In the top photo, I also made the burgundy Princess. The previous year we had two princesses -- a blue one and a burgundy one. The other three costumes I purchased because it became too much for me to keep up with the costumes with the number of kids and the details I wanted to put into the costumes.

I just love it, I had to send the link to several people!
ReplyDeleteabsolutely gorgeous little bonnet. love the details on it. so very pretty.
ReplyDeleteOooh - did see this bonet on Flickr, and didn't chase it down. Glad to have found it again. :)
ReplyDeleteI kneel in awed worship. Wow. Just wow.
ReplyDeleteExquisite.
ReplyDelete