[google6a7b7d93c7100df5.html] Sunshine's Creations.Vintage Threads Inc.com: January 2008

friends and followers

If you like my blog and the free patterns and tutorials and want to say thank you
I have a wish list on ravelry of patterns (click here)
I would like to make.
Thank you in advance for being kind and saying thank you back.

Love Sunshine

Search This Blog

Friday, January 25, 2008

Felt Ornament Heart


felt ornament heart, originally uploaded by sunshine's creations.

If you are thinking of Valentine's Day and want a simple ornament or gift tag, you can always make one of these hearts; follow the last link to the tutorial. If you do make one, please feel free to join flickr felt creations group and add your photo; I would love to see them.

This would be real cute with tatted flowers, too, instead of embroidered ones. I may have to try that. If you make a tatted version, join "the mad tatter" group on flicker and add tatting ones there. If you have no idea what tatting is, check out this site the 25 motif tatting challenge.

Tuesday, January 22, 2008

Colorados

colorado
My daughters were playing with my oldest Colorados the other night and decided to make a picture of my fairy girl (oldest daughter). They got a little bored waiting for grandparents to come and visit; they, the grandparents, were a little late due to unforeseen circumstances. A few days prior my oldest two daughters had a piano recital that the grandparents were not able to go to through no fault of their own. So they where coming over for a private recital from the girls.
daughter in bright triangles
In the process of waiting, this idea came into my daughters' heads -- to make the oldest out of blocks. It is actually a real cool toy; I'm just not sure if I think that really looks like my daughter. But at least the eyes are blue and the image has short hair like she does. I am just thinking she doesn't have a green nose and purple cheeks or bright red lips. I don't know what do you think (rhetorical question).

Monday, January 21, 2008

Between midnight and 8am

snow on deck fun
That is when all this snow fell onto our back deck. We didn't haul any up the stairs; this was already there. The kids are excited to make a snowman. They received a gift of an instant snowman in a box at Christmas, and they have been waiting for one really good snow fall so they could make him on the deck ,so this is the day. The instant snow man is pretty cool; he came with eyes, corn cob pipe and mouth, a carrot nose, buttons and scarf and hat.
snow fun
In the process of making this post I discovered there is a turkey in the box, too. How funny!

Update

While I was posting, they changed their mind to make a snow cave instead. Funny because they have been waiting for almost four weeks to make a snowman.

All Done!

They made a snowman after all. He is sort of the Mount Rushmore of snowmen, I guess. Go figure, kids! They stayed out so long that their little bodies got so cold they couldn't feel themselves. But, they made the snowman, so that is all that mattered.

snowman snowcave


Other hexes and thread

thrifting find
As you can see, I have another started afghan that I get the fun of making into something else. The funny thing is, it is the same pattern as the other. I understand why this afghan was never finished; the person who made it wasn't able to keep her tension the same, or she forgot what hook she was using, and there are three sizes of block. The large and the small could no way work in the same afghan without puckering strangely.
size differnce
So, I am having to take the entire afghan apart to be able to use the blocks. The smallest blocks are still larger than the other afghan's blocks. So I am thinking I will make a few shirts for adults with this; maybe a skirt, scarf, hat, baby bonnet. Who knows, it is whatever strikes my fancy. This one did come with supplies; too bad the original maker didn't have her blocks all the same size, I would have finished the blanket for my children because that was my original goal. But, as you can see, I have started a shirt, and yes the blocks are matched so they will work together.

Aqua Shirt

Aqua Shirt

Aqua shirt now in store.

shirts side by side

Shirts now in store more coming soon

These two shirts are now in the store. Hope to finish another and place in store later today.
green top
Purple top
I have another antique afghan with this same pattern that has larger hexes. So I plan on making a few shirts for adults, too, in the near future. That one will be a little harder to take apart because of the way the blocks have been joined.


Saturday, January 19, 2008

The tops are assembled

full sleeve top
OK, I have assembled the tops. Now the question is, do I go on with my original idea of making dresses, or do I just make them available as tops for a child size 4-5. My daughter is a size 6, so these are a little small for her, in our opinion. But it does show a size 6 can wear them, too. I am still planing on adding embellishments to these as dress or shirt. The reason I ask if they should just be shirts is, as a shirt they are approximately $40.00 to $60.00 each. Where, if I make them into dresses, the price would go up in the hundreds. I want things to be affordable; but, to make these into dresses, I am looking at tons of hours more per dress to make the crochet skirt part.
no sleeves top
In the photo, my daughter is wearing a long, white undershirt that goes over her hips because the undershirt belongs to her 10-year old sister. These crocheted shirts actually would hit the waist of a size 4-5; on a size 6 ,the belly button shows right in the middle ,which embarrasses my daughter, so we made sure not to do that with the undershirt. I will be adding an edging which should correct that problem.

There are two shirts of the top photo and one of the bottom photo.

I can make sleeves for the second one in a different color if someone so desires that, too, like I did for my daughter's dress in the bottom of this post.

Flickr issues

Because most of my photos are hosted on flickr I am at their mercy. If you haven't noticed, the last few days my blog takes forever to load. It is because flickr is having issues with image hosting. So some photos just are not loading, which causes the site to never finish loading and to keep trying. Sorry for any inconvenience this causes any one. Between that and the background being white, not my first choice, my site is even hard for me to look at right now.

Friday, January 18, 2008

What to do with found Hexes

the start of three dresses
So I was thrift shopping a few weeks ago and found this bag of what I guess was the start of a blanket, table cloth or table runner. I have seen the pattern before it comes from the 1930's-1940. So these are more than likely 70+ years old. What ever it was supposed to be it wasn't finished and it had no supplies with it. So I decided I would buy it and make something from it sad that nothing was done to finish it. Since the hexes where already stitched into 5 pieces I had to disassemble to reassemble parts of it. Total 70 hexes what I really wanted was 72 hexes but I figured that one out. So above is what I came up with.

Well actually I have the start of three dresses. These when done will fit little girls between the size of 4-5. Two of the dresses have sleeves the last one will have cap sleeves as there wasn't enough of the hexes to make all three have full sleeves, I was two short so cap sleeves it is. The sleeves look funny when not on a person but I had my daughter try it on and it looks fine on a little girl. They will also have mother of pearl buttons on the back as a closure. Of course there will be satin roses or ribbons on these two when done. I plan on each having a different color skirt to go with it. So this way no two will be exactly the same when completed. I am kicking myself for not taking a before photo. The top right photo is right side out the other two are still wrong side out as I am attaching the pieces together.

I will probably put these in the store when I am done with them, As the size they will be will not fit my older two daughters and would only fit the youngest for about 4 more months. As these are all one of a kind dresses I won't get them in the store again when done.

Below are two from awhile back of one I did for my daughter that was salvaged from a table cloth that had holes and stains I saved the good parts and made the bottom dress for my youngest daughter for Easter one year. Boy they are bad photos with an ugly green towel but the dress was nice.
close up of easter dress
easter dress littlest daughter
The ugly green towel was to hid the ugly pink carper in my old bedroom at my old house. explain to me how a person who dislikes pink as much as I do had a bedroom with pink carpet. Old photos

Post to answer another Question

My to answer another question
There was a question on another blog that I read, and I am trying to answer the post here with visuals. This is sort of how it would be used because I am right handed. This should really hang from my right wrist so it feeds directly into my hand that holds my hook; I can crochet lefty, too, just don't do it much. Anyway, because of that I use my right hand to take photos, too, so it is on my left in the picture.

This is a wrist thread-ball holder. They where popular when crochet and knitting where in the height of fashion. I have patterns for these from 1880-1920. In the center is a cabone ring on each side (not always used). This is where the thread is fed through the item, so that when you are traveling your ball does not end up on the floor and get dirty. This was a common item in most ladies' traveling knitting/crochet bags. When a lady wanted to crochet, she would pull out the lace from the top of the bag and pull out her needle or hook that she had stabbed into the ball, and would start to work. When done, she would place the lace back into the top of the bag and re-stab her ball with needle or hook. This is also a bag that tatters would carry and do the same thing with it, except they wouldn't stab their work, they would just place the shuttle inside the bag. Of course, for tatting the ball bag would hang on the opposite wrist than it would for crochet. So when I tat, this is the wrist it hangs on. For any of these techniques it is best to use a center-pull ball, but it's not required.

The bag pictured above is not antique; it is one I made from an antique pattern.

Coming out of this is a piece of lace I am currently making. The pattern is from Leisure arts 111 Easy Edgings; in case anyone else wants to make it, pattern number 75. The hook size I am using is 10 this is roughly size 30 thread. The lace is actually a light khaki color and is a boil fast thread, meaning it is vintage to antique thread.
lace in progress

Still in progress

Baby Bonnet
This is still in progress, but it is getting there. When I make bonnets in size 10 or 5 thread, they usually only take a few hours to make, about 3-5; size 20 & 30 thread, about 8 hours; size 100 thread, a very long time. This one is made out of tiny thread that most people would sew with, not crochet with. So far, it has about 12 hours of work in it, and I crochet fast.

The thread is white; in the last post it looked cream, but that isn't the case. Still have the brim to finish, then add an edging and ribbons.
baby bonnet

Thursday, January 17, 2008

bloggers busted

Sorry about the weird colors, but blogger is doing weird things to my background. My background is supposed to be black, not white: this bites. I think blogger went on Holiday.

update: A few people seem to like blogger's mistake, so I will leave it for a while and see if I like it.

Baby Bonnet


, originally uploaded by sunshine's creations.

I started making a baby bonnet yesterday from scratch, and I am liking the way it is turning out. I was wondering if people liked it, too, and would be interested in me going back and drafting a pattern to place in my store. It would be available for download after a small fee. This of course is the back of the bonnet. I have started on the sides of the bonnet; that is where the thread is attached. If there is interest, I will do it; if not, I won't.

Tuesday, January 15, 2008

English Paper Piecing Question

Flower Garden in progress - detail
This picture was posted in The English paper piecing group on flickr. A discussion arose about how to baste large hex pieces. My tutorial explained it, but visuals are better. I do have permission to show this example of how not to do it by its maker, Anne Brumley. Pictured are her first blocks; I actually think they are well made. I do not see the stitching between the blocks, her fabric choices are vibrant and lively. I just want it clear that these are well-made blocks, and the only thing I wanted to clarify was all the basting threads. All the threads you see have to be removed; there are also lots of them, which makes that time consuming and your fingers will hurt from going through the papers so much with the needle.

In the way I do it, all you have to do is cut six small threads; just six small nips of the scissors, then pull the papers out (which saves time) and just leave in the basteing threads.
front of two inch hex
So, you do a back stitch in each corner where the fabric folds over on top of itself. Then, in the middle of each side of the hex you do an ever so tiny stitch that goes through the fabric and the paper. I have made a few things with this technique, so I promise it is simple and not hard.
2 inch hex helping with example
Go all the way around in this manner; cut thread when you get back to the beginning. I hope this helps whomever does bigger pieces in English paper piecing. Below are other examples of Anne's work; she uses silk in some of her work, and it is lovely. She picks very nice fabrics and has good hand piecing skills; she is a very nice hand seamstress.
Flower Garden in progress 1
1 inch hexagons
1 inch hexagons
On my way.  How cool is the lucky kitty fabric?
Neat tesselations with rainbow!

Kanzashi part 2

This was posted in the flickr group by Kurokami, if any one wants instructions in English, with nice pictures to help you understand the techniques involved.

Part 1: Preparing your Fabric
[link]
Part 2: Petal Folding
[link]
Part 3: Making your own Kanzashi - Base
[link]
Part 4: Making your own Kanzashi - Basic Flower
[link]
Part 5: Making your own Kanzashi - Base for Falls
[link]
Part 6: Making your own Kanzashi - Falls
[link]
Part 7: Making your own Kanzashi - Finishing Touches
[link]

Monday, January 14, 2008

Hair today gone tomorrow

On Saturday I talked about how long all three of my daughters' hair was. Also how I wanted to make Kanzashi for them. I still do, just one will have to be on clips instead of combs or hair pins now.

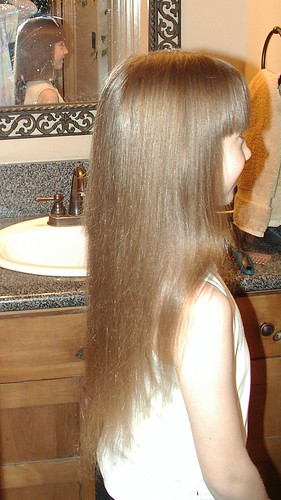
Because, as of today, one of them no longer has long hair. She had the longest out of all three; it was below her waist, and she was starting to sit on it. It was getting a little annoying for her and hard for her to keep the knots out, with winter static and all. So we removed it (a good 18-24 inches original length, removed over 12 inches in length; look in the mirror in the right photo you can see the haircut is half done), so her hair is just above her shoulders, now. Sorry, I didn't feel good this weekend and didn't get that bathroom cleaned -- dirty mirror, oops. She is also embarrassed by this photo because this is her pajama shirt, and she never shows her shoulders unless she is in a bathing suit. It is only on her because I am cutting her hair, otherwise no photo would ever be taken with her dressed this way.

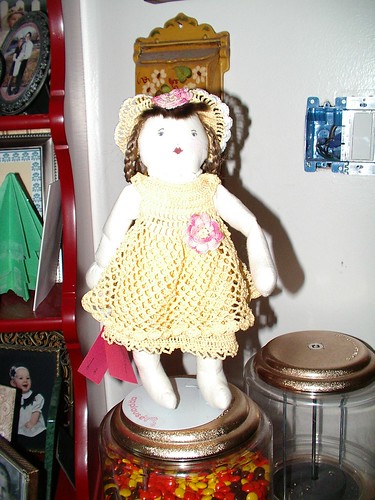
The last time I cut her hair I made the doll shown to the left. Yes that is real hair from my daughter on the doll. So now I have this stack of freshly washed and dried clean hair again, trying to figure out if I should make something again.

The reason is, last time I did something with it because that was her first haircut. Well, this is only her second one, and she is ten. Each haircut represents roughly half her life. So I am taking suggestions as to what to do. Currently, the hair is just resting in a metal tin 'till I figure out what to do with it. Photo at left taken in my old home. The room was being rewired; those are not live wires on that wall.

Saturday, January 12, 2008

Kanzashi

peach kushi

my kusudama, originally uploaded by amaebi79.

I am looking for tutorials on this subject and any information you might have as to where to buy supplies for this. I am also wanting information as to which flowers and colors are worn in which months or seasons. I also started a group to try and gather information. If any one knows of a book in English that teaches this, or a tutorial in English on the internet, that would be great, as well.

I am wanting to learn this so I can make some for my daughters' hair. They all have waist-length hair, and I think this is just lovely.

Thanks, sunshine

The two photos are by Amaebi79; her link is right below the photo or just click on the photos to go to her flickr page

Kanzashi. Get yours at bighugelabs.com/flickr

tutorials in Japanese that I really like:

Thursday, January 10, 2008

Snow sculpture day at school

snow fun
One of the two schools my kids go to has a snow sculpture day every year, one to two days after the first big storm. Well, that happened two days ago: 16 inches of snow fell at the school. So, today was sculpture day. Each class gets to make snow sculptures. This is just the one from the K-grade that my youngest daughter is in. They have been reading about A.A. Milne and his story, Winnie the Pooh, so they thought it good to make Winnie the Pooh. After all the fun and freezing our tails off, we went into the school's cafeteria, and hot cocoa and donuts were had by all.
imgp6911

Wednesday, January 09, 2008

For those who drink soda and crochet

I crochet but don't drink soda ,so I wouldn't be able to make this project. For those who do, here is something to do if you are bored, but first you have to drink six sodas. Not sure how anyone could crochet on that sugar rush, wink wink. So, if you want to do this, go here. This was sent to me by Maven, a friend in search of oya patterns.

Photo to left not taken by me but from the link above.

Monday, January 07, 2008

Item 13 in 25 motif challenge


2 inch wide tatting, originally uploaded by sunshine's creations.

This is a ruffly, two-inch wide tatted edging; this is one of my favorite motifs. Everything is a count of 4 double stitches, that makes it easy to remember. The only exception is the two picots on the chains at the bottom where you attach to the fabric that has two double stitches between them; same goes for the three picot in the top large ring on the trefoil. Check out the 25 motif tatting challenge; there is some real cool stuff that has been made. I guess that puts me at the little over half-way mark.

2 inch wide tatting

Garlands

I have made a few garlands the last few days and they are in the store. I am still making Valentine's and Thanksgiving; then I will go on to Halloween and Mother's Day. Those hearts for the Valentine one are taking me a little bit more time to make. All of the garlands are a little longer than 2 yards a piece.

Currently there are:

Patriotic (One)
patriotic garland
St. Patrick's day ( seven)
St. Patrick's day garland
Easter ( one)
easter garland close up 2
Christmas (one)
close up baby boy garland

Copyright/permissions info

I like to share on this space my ideas and projects.
Please don't take ideas or photo and claim them as your work.
I am always happy to have new links to me.  So if you like something just link back to me and give the source some credit thanks.
Any questions? just ask. I am happy to work with you if you need something
Creative Commons License This work is licensed under a Creative Commons Attribution-Noncommercial-No Derivative Works 3.0 Unported License. 2006-2019 Copyright Vintage Threads Inc. All content and images.

LinkWithin

Related Posts Plugin for WordPress, Blogger...