[google6a7b7d93c7100df5.html] Sunshine's Creations.Vintage Threads Inc.com: August 2012

friends and followers

If you like my blog and the free patterns and tutorials and want to say thank you
I have a wish list on ravelry of patterns (click here)
I would like to make.
Thank you in advance for being kind and saying thank you back.

Love Sunshine

Search This Blog

Saturday, August 25, 2012

free pattern grandma's a touch of south west afghan

This is one of three afghans that I received for my wedding many years ago.  This one is from my husbands grandmother on his mother's side.  This won her 1st place at the Lincoln County Fair in Nevada one year.

Make starting chain as long as you wish to make the afghan start with a tail and leave a tail at the end of every row when you cut the yarn at the end of every row.

below is the rest of the pattern pretty simple really

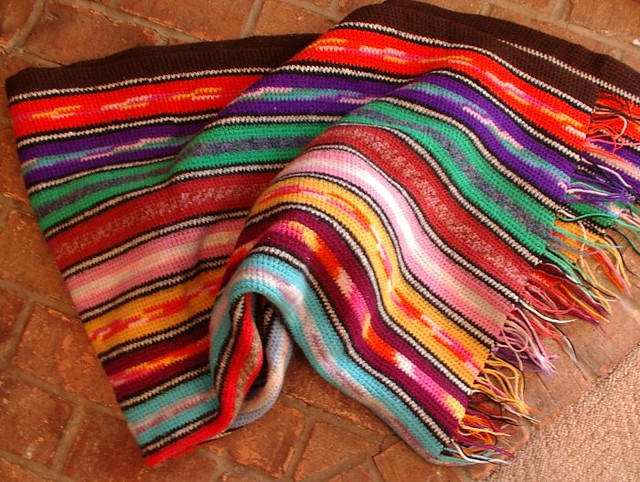
leave tail, chain to desired length of afghan, leave tail again.   Leave a tail at the  beginning and end of each row so every row is cut but you do not have to weave in any ends this makes it go faster than you think it will.  All rows are worked in one direction all stitches are sc stitches except the first chain row.  The afghan should be heavily  blocked afterward as it is hard to see in the original but it is sort of parallelogram.  If you decide you do not like blocking and want an easier way to fix that is to do the reverse direction every row ( ie turn your work) which is not how grandma did it but it is how I would do it if I made one  to make it square.

  • edging: start with  7 rows brown edge
  • Row a: 1 row white
  • Row b: * 1 row black
  • Rows c, d, e:     3 rows 1color 
    • (changing color after each repeat)
  • Rows f,g, h,: 3 rows variegate ( use the same variate for all three rows)
    • (matching to color of this repeat or a striking contrast color of this repeat)
  • repeat  rows c,d, e,  with same color as use last
  • repeat row b
  • repeat row a*
  • repeat from * to * to desired length minus the width of the brown edge
  • repeat  edging

to finish
Tie yarn together in groups of three to make fringe (except the first group will be four becasue of the starting chain).

Original was done in wool and felted a little.

Also the original was also mirrored from side.  But if you have more odd scrapes you can skip that but if you want a more south western look I do recommend mirroring the stripes from one side to the next.
Blue ribbon blanket

If you like my blog and the free patterns and tutorials and want to say thank you I have a wish list on ravelry of patterns I would like to make.
Thank you in advance for being kind and
saying thank you back.

Love Sunshine But please do not feel like you have to

Friday, August 10, 2012

Sugar is Sweet...and so are these

 detail cupcakes
I have been playing with cup cakes, butter-cream frosting and royal icing  as of late.  Here are a few pictures of that playing around.
My kids had fun with all the cupcakes pictured because they got to eat some of them.
siz eof flowers for wedding
All the loose flowers in the trays below they do not get to eat until my younger sisters wedding.  The flowers for the wedding range in size from 2 1/2 inches to 3 inches.  Much larger than any store bought ones I have seen.  You know the funny thing about this is I learned how to do this (cake decorating that is) about 19 years ago so that when I had kids I could make cool cakes. Kids came but I never had the time to make those cool cakes I wanted too. So now my kids are shocked that mom can all of a sudden do things like this. I tell them there are lots of things I know how to do but just don't have the time so they have never seen me do it, at least not in a time in their lives that they can remember that is.  As  I did do it till the oldest was about 4 years old. So not in the last 11 or so years

wedding flowers for cupcakes
 lots of cup cakes
The above is the reason for the other cupcakes kids just have a hard time seeing sweets made but not getting any to eat so I made these to make them happy.  Way too much sweets.  I will probably be giving some to the neighbors.
24 cup cakes

Wednesday, August 08, 2012

Just a few hats

My daughter is trying to raise funds for a school field trip that happens in June of 2013.  The trip cost $3,000.00.  These are items we are making to try and sell to raise that money as the school will not be doing fund raisers the students have to figure out how to raise the money themselves.  So I am donating my time and supplies to her and she will make some ammigurumi too and add those to this page too.  Most items are one of a kind unless you do a special order which will take a little more time to make but happy to do it.
To learn more go here.

special order  in Any High School monogram AHS or colors
one size fits most adults
please specify stripes or checks
high school Monogram hat #2 stripped backhigh school Monogram hat

OOAK One of a kind  Already made ready to ship
TAXI Hat
Adult x-large

taxi hat

OOAK one of a kind Already made ready to ship
LOVE hat

One size fits most adults

Love hat

Friday, August 03, 2012

August RPLAL is in the process

august pattern started
I have been working on the August RPLAL too not just revisiting April's pansy doily. have decided to go with a grayish black color for this.  I had decided originally to use three colors but out of the cord I already had made I could not find three colors that I liked together with out making more cord.  So I wanted to be able to go forward with this.   Thus one color.  I am thinking about using a true black for the filling stitches not absolutely sure on that yet.

Pansy Doily all basted

pansy doily all basted
I have the pansy doily all basted and have started to weave in all those tails.That is the only major draw back to this pattern lots of tails.  But since I knew I wanted to use lots of colors and different cord sizes that where left overs from other projects it does not bother me much.  It is a good project to work on while doing others as you can use the scrapes of the others to make this.   I think it would be lovely in many shades of ecru,cream, tan and white too for a mono chromatic look but not all one color all though that is always an option.  I have not fully decide yet what I am making with this collar, yoke or doily as originally designed.  If doily not sure if I want fabric, Solomon's knot , or chain mesh filling for the center.  I still have all the center rings to make.

Wednesday, August 01, 2012

Day 4 and Day 5 and RPL cord

Day 4
dress with matching slip
I waited 1 day to post the last two items in the heirloom sewing becasue I was working on posting the free lace pattern yesterday.  This would have been a 7 day set but I decided to show the matching sets the dress with matching slips together instead of separate so this is the last post of heirloom baby dresses for  a while.
dress and slip set
 dress front
This dress has the most detail out of all the dresses I have show in this grouping.  It is unbeleiable how many pintucks are on this little dress.
sleeve yoke dress
 Pin tucks on both the front and back of this dresses yoke area.  And lots of embroidery by hand on the yoke and hem and some by machine as well to frame the dress and the yoke.
back of dressyoke detail dressdress hem

The matching  slip
slip
The slip shows its age a little bit with a  tear under the sleeve.
tear on slip
As with the other items I have shown as of late this also has a machine sewn edging.
slip neck
But ahnd embroidery still takes center stage on the hem of the slip.
slip hem
Day 5
Plain Jane slip
taffata slip
This slip is pretty plane Jane as slips go but it does it purpose well to make a cotton batiste dress not be see through.  
slip yoke
This is made out of taffeta And is finished with a simple zig zag stitch over the edges to give the slip a little bit of a scalloped edging.  Simple but useful.
slip hem

Romanian Point Lace cord
 16 yards cord after being measured
I also had to get some Romanian Point lace cord made for the the RPLALs.   It does not just make it self so that is what I have been working on the last two days and 16 yards to show for it.   I know does not seem like much but it is an amazing amount of time that goes into making the cord before you can even think about making the lace.  Now it is all neat and ready to be used on what ever project I choose.  
16 yards
I keep all the done cord in a metal tin ( that use to hold chocolates).  The joy of making a cord that unravels in 2 directions I do not have to make it fit a certain spot on a certain pattern I can just make cord when time permits and place in the tin waiting for future use.  You can tell which is the newest one I just finished it has the most on it.

 box of cords ready to go
When I get little bits of this and that left I do something like the pansy doily that can use up all kids of odds and ends in colors and sizes and voila no more odds and ends.
pansy doily in the works

Copyright/permissions info

I like to share on this space my ideas and projects.
Please don't take ideas or photo and claim them as your work.
I am always happy to have new links to me.  So if you like something just link back to me and give the source some credit thanks.
Any questions? just ask. I am happy to work with you if you need something
Creative Commons License This work is licensed under a Creative Commons Attribution-Noncommercial-No Derivative Works 3.0 Unported License. 2006-2019 Copyright Vintage Threads Inc. All content and images.

LinkWithin

Related Posts Plugin for WordPress, Blogger...