Click on this photo above to make it easier to read if you want to work from the original old pattern. This is all the information that was originally given to make the cap. You will see as you go through this post I am trying to give much more information so that even a novice can make it.
Irish Rose Baby Bonnet
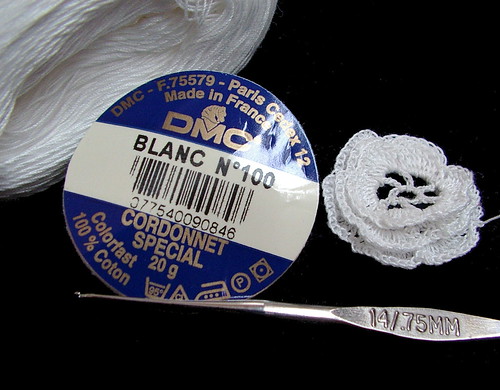
Size 100 thread & Size 14 hook
Key
ch = chain
dc = double crochet
tr = treble crochet
x = times
p = picot
sp = space
* = start and end of repeat
sl st = slip stitch
**If you like my blog and the free patterns and tutorials and want to say thank you
I have a wish list on ravelry of patterns I would like to make.
Thank you in advance for being kind and
saying thank you back.
Love Sunshine
But please do not feel like you have to**

For Rose:
chain 7, join in a ring.
- 1st round: Chain 7 ( counts as 1 treble and ch 3, 1 tr in ring ( ch3, 1 tr in ring ), 4 x ch 3, sl st in top of the tr of the 1st ch7.
- 2nd round: sl st in ch sp ch3 ( counts as dc), 5tr 1dc in same space, one dc, 5 tr, 1 dc under each ch 3 loop around join by sl st in top of ch 3
- 3rd round: ch 4 ( this is a drop down chain and is ignored at the end of the round), 1 dc in top of tr of round 1 in between the back of petals, * ch 4, 1 dc in top of next tr; repeat from * around ch 4 join with sl st to top of first tr in this round
- 4th round: sl st in ch sp ch3 ( counts as dc), 7tr 1dc in same space, One dc, 7tr, 1 dc, in each ch 4 loop around join by sl st in top of ch 3
- 5th round: Ch 5 , 1 dc in top of 1st dc in between back of petals on round 3, * ch 5, 1dc in top of next dc; repeat from* around join with sl st to top of first tr in this round
- 6th round:sl st in ch sp ch3 ( counts as dc), 9tr 1dc in same space, One dc, 9 tr, 1 dc in each ch 5 loop around join by sl st in top of ch 3
- cut and finish thread unless you are doing the one rose that starts the center back of the bonnet do not cut thread on that one that should also be the last rose you make


Note : The roses must be joined together in working, leaving two free petals on each side.
- make a round of 14 roses forming a circle
- make a row of 15 roses do not form a circle
- make a round of 24 roses forming a circle
- make 1 rose and start baby cap assembly do not cut thread of this rose see assembly below
For rose see above directions
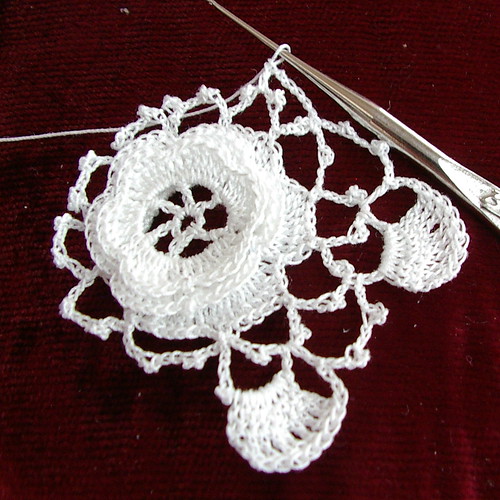
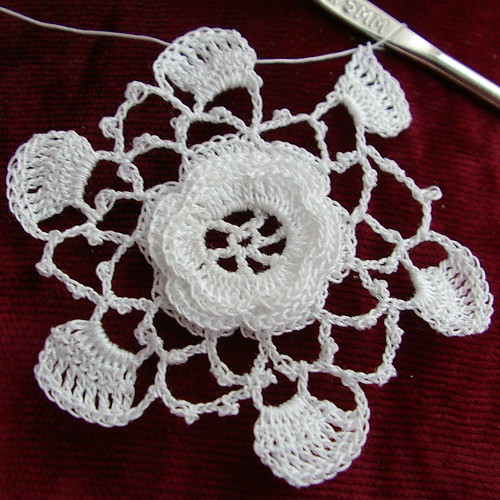
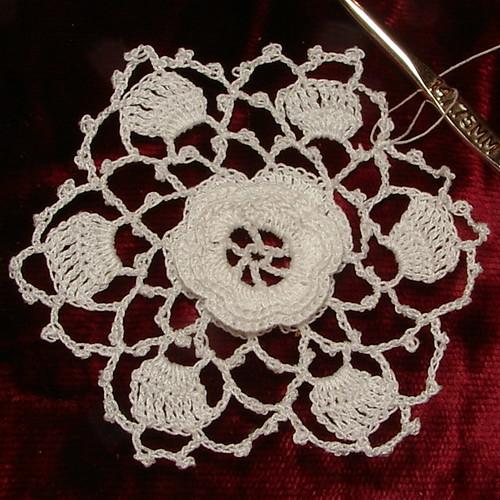
See picture to right above for joining roses reference
working in rounds
When you have completed the starting rose (center back)after you have joined to the first dc of the last round sl st into the next 3 trc (all joins with blocks and petals are made either on the 3 tr from right or 3trc from the left on all the petals and blocks).
- round 1: sl st up to 3rd of 9 tr on next petal (this is just a repeat of above note), * ch6, sl st into 4th ch from the hook to form picot, ch 6, p, ch 3 j petal on 3rd trc on petal (also see photo as there are two joins per petal); repeat from * for a total of 12 times (including first time not in the repeats), join to the 1st loop see photo. * Work 1 p loop, **ch 6, 1 dc in next loop, turn,ch 3(= 1 dc) 9 dc over this loop this is counting the first chain 3 as one of the dc, turn, chain 4 (= 1 trc counts as one of your trc) 9 tr in 9 dc (meaning one in each one), ch 3, 1 dc in same loop with 6 ch, ** make 2 more p loops and repeat from * around make 1 p loop at the end and join w dc.


- round 2: Work another round of p loops; see photos

- from here up has been redrafted I have not reworked below this point yet (this note was added April 10, 2008)
- round 3: next row make 4 loops, then repeat from ** to **( see round 1) for block, 4 more p loops; repeat block and 4 p loops around. total of six blocks should have been made
- work another row of p loops
- Next row work * 6 p loops, repeat from ** to ** for block, then repeat from * 3 times.
- Work another row of P loops
- then a row of 14 roses, joining them to preceding row by two petals, and to each other by one petal.
- Make 2 rows of p loops. This makes the crown.
- Work back and forth for 6 rows with p loops leaving 7 p loops free.
- Make a row of 15 roses, see above row of 14 rose for how to join
- then 9 rows of p loops, making the last 2 rows go entirely around the cap.
- make a row of 24 roses clear around the cap. This will make 16 around the face and 8 around the bottom

The wording has been changed from the original as the way people wrote patterns 100 years ago differs from today's format and would be confusing to the modern crocheter. With that being said you will still need a little understanding of how Irish crochet works to follow the pattern as it is still assumed you know the techniques involved such as an Irish rose and picots.
DO NOT USE THIS PATTERN TO MAKE THINGS TO SELL FOR PERSONAL USE ONLY!!!!


That's a beautiful little cap. I'm going to try just the roses for some crazy quilting lace motifs.
ReplyDeleteI'm interested in the old patterns, too.
That should be lovely I am thinking I might post more. I am just not sure if there is much interest out there for these old patterns. I think they are lovely and I like them more than a most of the new patterns I see with fat yarn. I like thread work
ReplyDeleteHi Sunshine... I have a blog called Fabric Follies where I put up links to free patterns and you would be surprised at the number of people online looking for just this kind of pattern! It just takes a while for them to find you...grin Please do put up more of them!
ReplyDeletewww.jerwife3.wordpress.com
Thank you for your comment I was starting to wonder if any one would comment on my question.Your welcome to link to my site from yours if you think people want this pattern.
ReplyDeletePlease post more vintage patterns, I know I will love to try them. I do think it would be a shame to let them disappear into nothingness. Thanks, Your site is great.
ReplyDeleteI love these old patterns. Please post more!!
ReplyDeleteI love all types of patterns, I never know where inspiration will strike me. Please keep up the great work!
ReplyDeleteHI
ReplyDeletewow lots of old books, wish you were in the midwest close to my mom. Please put up more patterns, I can't crochet but like to look and mom loves to get patterns since she is homebound.
Please keep up the with the beautiful vintage patterns. I love them and your site.
ReplyDeleteI think now that this is up on Ravelry you'll find that you have many more visitors :]
ReplyDeletemore please!!
The bonnet is beautiful...
ReplyDeleteI love the old patterns and have incorporated some of the stitches in some of my own work. Please do post more, it would be terrible to lose this part of history.
I am constantly amazed at the intricate and beautiful designs made with such fine threads. I have tried my hand at the lace crochet but my eyes are just not good enough.
This is a wonderful pattern, please post more. Also, do you happen to have any knit patterns for baby hats? I am looking for one with cable and seed stitch, that has a diamond shaped ear flap. Thanks so much for this delightful pattern - gotta love those oldies. I am blessed to have all of my mother's pattern books which go way-way back.
ReplyDeleteI am looking for more antique baby bonnets to make. The one you have pictured is beautiful. Can you post some more? Please?
ReplyDeleteHi Wendy,
ReplyDeleteI was wondering if you can provide some help with the Irish Crochet Baby bonnet pattern that you posted in your blog.
First off, I'm having a problem with symmetry in the flower motif. At the end of round 2 the hook is one 1 dc above the foundation (round 1), yet, after the initial ch 4 the instructions direct to make a dc into the next tr of round 1. So, the first chain 4 loop begins at the top of a dc, but ends at the bottom of one (top of tr). Likewise, the last loop of that round ends at the top of the treble. After putting the petals into those loops in the subsequent round they don't look symmetric at all. At the beginning of round 2 I thought that perhaps slip-stitching down to the level of the trebles from round 1 could be helpful.
What do you think?
Then, I have a hard time understanding the instructions under "Baby Cap Assembly".
So, on the first rose I'm supposed to slip stitch to the 3rd tr of the first petal, then ch 6, but what's this: "catch back into 4th st to form picot". Do they mean the 4th stitch on the chain or the 4th tr of the petal? If the former then I will get a pretty long chain with lots of picots in them. Is this correct? If so, where does it end, i.e. what is it connected with?
At the end of that sentence what does "catching last lop to 1st" mean? And: What does "Work 1 p1" mean? Make 1 picot with one chain in it?
I haven't read through all of the instructions yet, but I'm sure there will be more I won't understand. It would be great if you could explain in general how the piece is constructed.
Thanks,
Georg
Just so you know the pattern was meant to be an expert pattern meaning you where supposed to have prior knowledge of how Irish crochet work and how picots work. All the information was there that was needed to make the bonnet.
ReplyDeleteSteps such as how to climb to one level to another where omitted in 1900 and I don't need them as I know how those techniques are made so they stayed omitted in the pattern I posted.
To make it easier for beginners I am reworking the pattern at your request. I have reworked the roses in the hopes it is more clear for an intermediate crocheter it will never truly be a beginner patter as it has trebles in it and beginner patterns never do.
I hope this part is easier for you as I have not compleated the bonnet I am making it. It is marked on ravelry as only 10 % done meaning I am making roses and not the filler chains yet.
The other part you had questions on are picots you join the 4th chain from your hook that you just made. Picots are another thing that is assumed you new how to make in 1900.
I only changed a tiny bit of words from the original when I first posted this meaning I broke it into rounds as originally it was not written that way. This makes it easier for the modern crocheter to follow today for most people don't have the skills that all crocheters had 100 years ago sad really as lots of patterns are being lost because people don't have the skills to read them. I like leaving the old patterns usually pretty close to how I find them because if you can teach yourself to follow them you can make anything you see with out a pattern as you know the skills behind making an item not just how to follow a pattern.
But for you and other readers I will revamp this one and make it easier for the modern crocheter.
I hope this helps when I have worked through the other parts, assembly that is, I will revamp those instructions as well.
Hi Wendy,
ReplyDeleteThanks for your mail.
I understand that quite a bit is left out in these old pattern descriptions. I'm not totally new to Irish Crochet, but I'm not advanced in it either.
I can't help get the impression that you are somewhat reluctant to revamping the description for a beginner. But you wrote yourself that these types of patterns will vanish if people don't save them. What better opportunity for you to make the pattern description as universally understandable as possible? In fact, ideally, it would be great if you could post the original description along with a "translated" (i.e. modernized) version. This would help people understand the old patterns and enable them to do so many more projects in Irish Crochet. Kind of like a rosetta stone for Irish Crochet.
I see now how I misunderstood the flower. I didn't realize that the first chain is a drop-down chain to come down to the level of the previous round. I tried this, but I don't like the result. It is not even. The flower doesn't come out symmetric that way.
I tried a couple of modifications to the flower pattern over the weekend. E.g. one where the petals are started by a sc-hdc-dc-tr combination and end in the same in reverse order. Only the number of trebles in the middle is different for the three rows: 1, 3 and 5. That way I am already at the level of the foundation at the end of the petal round and don't need to put in a drop-down chain. That makes the flowers much more even, but, of course, it changes the character of the petals significantly.
Can you send me some pictures of a flower that you made? Preferably shots from front and back? I'd really like to see how they come out for you.
I've tried to continue the pattern past the initial flower and, of course, don't understand a couple of things.
The description of the first round of picot loops doesn't say anywhere where to attach all the subsequent picot loops to the flower. It only gives the starting point as the third treble on the first petal. From the picture I could see that the picot loop has one more connecting point on the same petal, though I'm unsure which one. If I make it symmetric by choosing the third treble from the end of the petal, then the distances covered by adjacent picot loops are uneven. I.e. a picot loop between petals would have 6 stitches underneath, whereas the picot loop across one petal would only have 4 stitches under it. But perhaps it doesn't have to be this precise, I don't know.
Another thing that struck me as odd was the number of repeats. In modern descriptions whenever there is a repetition mentioned, it gives you the instructions one time and then tells you how many more times you have to repeat that. Was it different back then? Since, if I were to execute the picot loop once and then "repeat from * 12 times", I'd end up with 13 picot loops for the first round, which is clearly too many. I only need 12 to finish the round. 2 per petal x 6 petals = 12.
And: is "catching last lop to 1st" a typo and it should be "loop"? Or does "lop" stand for something else I'm not aware of?
Once I get done with the first round, I see this obscure "Work 1 p1", which, btw, I think is a typo. I think it means "Work 1 pl", meaning "work one picot loop". I've seen a transscription of an old pattern like this before, where the person copying the pattern clearly didn't understand what he was doing, and in the original the lower case "l" was identical to the "1". So, "pl" (picot loop) was written as "p1" everywhere. Quite confusing for the beginner. Do you agree that the same error occurred here?
But: I am wondering whether this one picot loop is the transition between the first and second round, or the transition has been omitted and it is actually the first loop of the second round.
If the latter, how do you transition from the end of the first round to the beginning of the second? Do you slip stitch your way up to the top of the first picot loop of the first round? If so, how do you slip stitch over a picot?
There is one other little thing that I don't understand, but I'll look at it again and perhaps I can figure it out.
I appreciate your help on this and would love if you could answer my questions.
Georg
As stated int he original pattern you are to look at the picture for joining placement it was never written into the pattern. Traditionally this was done visually. Thus the three fourths angle shot so you can see enough to get the idea. I have not worked that part of the pattern as of yet when I get there then I will revamp the pattern I have left a mark on the instructions saying where I have revamped to. I will post photos today. on the blog as per your request.
ReplyDeletetake care
sunshine
I've been looking for pattern with this kind of thread for long time
ReplyDeletei'm glad to find them
the hat is so cute
i wish to make it oneday
thanks
Yay! I'm going to begin this pattern tonight. I'm giving myself 3.5 months to complete it--That's when my Baby girl will be baptized!
ReplyDeleteI'll be chronicalling the process on my fam blog: www.the-charbas.blogspot.com
I love these vintage patterns!! Thank you so much!
ReplyDelete