Supplies:
- Template -- cd or plate, depending on the size you want (small plates work better than cd size). I did cd size for tutorial; it's easier to take photographs, but you will get smother rounded sides with a bigger circle (small salad plate or large soup bowl)
- Scissors or rotary cutter / mat for fabric
- Quilters see through ruler with square grids on it
- Scissors for paper
- Needle and thread if doing all by hand / sewing machine if doing all by machine / or half and half
- Card stock to make square template
- Pencil
- Trace round template onto fabric and cut out (use what ever method you want, such as: trace and cut with scissors or use a rotary cutter and mat with template).

- Lay right sides of circles together in preparation for sewing.

- Next, either sew by hand or on a sewing machine with a 1/4 inch seam allowance.

- Overlap beginning of seam by 1/2 to 1 inch.

- Cut a small slit in one side of fabric being careful not to cut through both layers. Make this incision close to where the folded sewn edge will be.
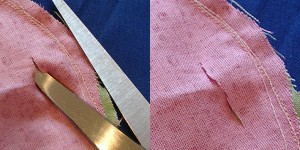
- Turn fabric to right side through the small hole you just made.
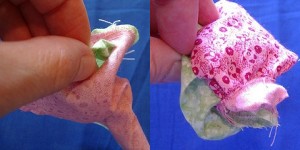
- Put something inside of circle to push all the edges out. The back side of the pencil works well for this.
- Smooth out circles.

- Iron circles.


- Figure out inside square size. As this is different for each person who makes this because of different templates used or not everyone's seam allowance being the same. I will just reference how to do it. Way 1: Fold circle in half and iron; fold in half again in the opposite direction mating up first iron marks and iron again. The four marks that are left on the outside edges of the circle are the corner points of your squares. Do this to all your blocks. Sew from corner to corner. Make a row as long as your quilt's finished length will be. Way 2: Place see-through ruler over circle and see what size square will hit all sides, four corners of square at once, and cut that size square out of cardstock. This is your template for inner sewing dimensions of square. Place on all circle and trace. Sew on traced lines as before.

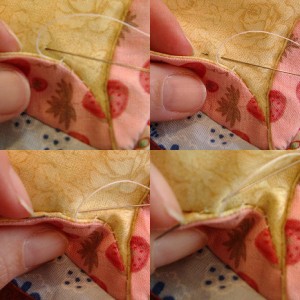
- When sewing seams, make sure that the seam you sew will cover the slit you have made when flipped over.


- Continue in this manner until you have enough strips to equal the width of the quilt.

- Next, start to sew these long strips together

- When all strips are sewn together, iron flaps down
- You now have a choice: you can either sew the flaps down by hand or with a sewing machine. If you use a machine, you can use decorative stitches; I sewed mine by hand.


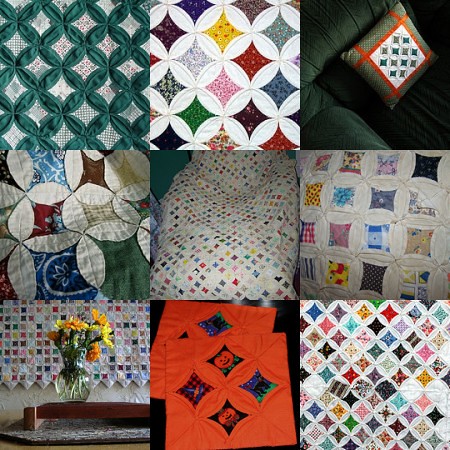
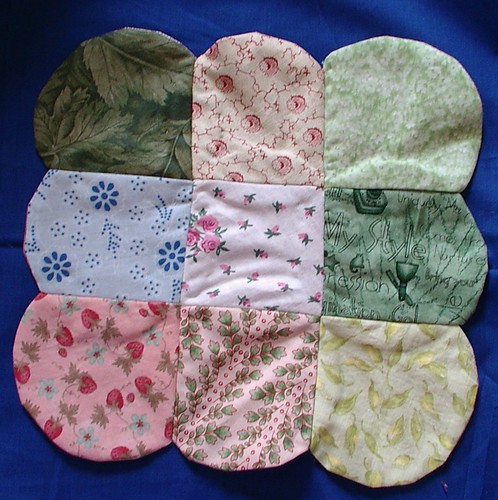
Finished, you can either sew down side scallops and make a straight edge quilt or leave them, as I have, as scallops for a decorative finish and less work.
Below is what the back of the quilt will look like. Front view is at the top of post.
There is no batting in this version. If you want batting, use warm and natural and sew it at the same time you do step # 3; trim close to seam and flip as before. This will make the quilt warmer, but less like cathedral windows. This is more of a spring-summer quilt, not a winter-keep-you-warm type of thing. Of course, this is a doll quilt, but you can use the same technique to make a normal size quilt, too.
If you have questions please ask so I can help you understand how to do this.
For an added surprise go here and you may just end up owning this quilt, or maybe another mini quilt I have made. As a celebration of the 4th of July and my blogiversary.

If you have questions please ask so I can help you understand how to do this.
For an added surprise go here and you may just end up owning this quilt, or maybe another mini quilt I have made. As a celebration of the 4th of July and my blogiversary.
whipup

DO NOT USE THIS PATTERN TO MAKE THINGS TO SELL FOR PERSONAL USE ONLY!!!!