
Repair steps
- Clean first explained below ( I am skipping this step for this afghan)
- Match thread colors
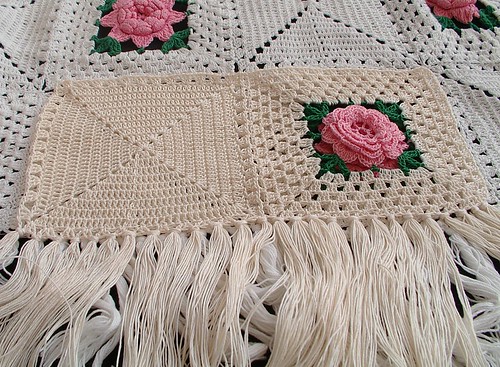
- Then will be the mock blocks. These are the blocks made from start to finish that I make to get hook size right and tension right. Most importantly you figure out the stitch count for the block. This is not usually something that is given to you when you are handed a repair. These, mock blocks, do not have to be in the exact color of thread, just the exact same size of thread. So mine are done and they are in the same pink and green but I used ecru. I do have a mistake in my mock block but I bet I was the only one who saw it. The original blocks have 3 treble crochet per leaf mine has two the reason being the block I picked to copy just happened to have that mistake so a mistake was copied. After I finished my block I looked at more blocks and realized this error so it will not be wrong in the repair just in my sample to keep.
These will go into a sampler book later as I like to keep track of things now days. I didn't when I first started doing repairs now I wish I had. This use to be a common practice to keep track of patterns and things you have done in crochet embroidery tatting and knitting and other things of this sort. Here are my mock blocks fringe and all for this rose afghan repair.
One hint on mock blocks they should be a tiny bit smaller than what you think the original is because when the blocks are put in place they get pulled by the blocks next to them. Also your new stitches are not stretched and squished yet it is still containing a little bit of ease. My first time I did a repair (13 years ago) I didn't do this and when the item was finished my blocks where a little bigger because of the stretch aspect of crochet had to re-due.
- Then the tear out which looks like I am damaging the afghan more. This is where I remove the damaged areas which makes the holes get bigger so I can fix them. This is the scary part for customers if they stop in while I am doing this they think I have just made it worse.
- Then the weave in where I place the thread where it needs to be before I repair. A weave in is where you place the crochet thread with a needle where it has to be before you crochet. This is not sewing this is just placement, do not pierce any fibers with needle or thread will not slide right during the replacement of stitches. This technique is for damage on the inside of blocks where there is already existing rounds on both sides of the damage rounds that need repair. This is the part that most crocheters do not get when they look at their own damaged work and are trying to fix it.
- Then the actual crocheting of the patches.


Washing
But first I usually wash the afghan but this customer wants to do that after the repair themselves. I like to do this first as it shows me how strong the piece is if there are loose threads they get looser during this step and I find all the repairs then. Plus it makes the afghan clean so I can see the true color of the threads when this step is done afterward the patches usually show more. The reason for this is I have matched the thread to a dirty afghan with a clean thread so sometimes the patch is more obvious after the wash because the two colors no longer match and the patch is darker in color.- First you bast the afghan to a white sheet ( no colors as the color might transfer to your aghan staining it). This will hold the weight of the wet cloth so as not to tear out more stitches.
- Then soak in a tub of water ( I use the bathtub). I also use Fels Naphtha soap.
 I shave the soap into the water and let it soak do this several times letting it soak for hours in between the changes of new clean water baths. (Warning this is a tub full of water that is left standing this is a safety hazard to small children please keep a very watchful eye on this tub and lock the room to keep small children and babies from drowning.) The water in time when drained will run clear of dirt and stuff. Of course I am referring to the water that the old afghan or lace is sitting in. Do not rub the afghan together as this can cause more damage- just a gentle swirling of the hand in the water every now and again. This is a mild type of cleaning that works with patients, not an abrasive get it done now type of thing. I do not recommend this for afghans with strong colors next to pale colors, like white, as the colors may not be color fast and bleed.
 - Then let dry if you have a quilt frame you can tack the sheet to it and let it air dry that way. I do recommend placing fans in the room for circulation of air to speed up the drying you can even set the heater up or on to speed this up too. I do not recommend setting it out under a tree or birds may leave droppings. I also do not recommend a heater dryer that tumbles this can tear an afghan apart in a short time.
- If you want to place it outside a nice open area where the sun and air can dry it also this will help with the cleaning too as the suns rays can help bleach out some of the stains. That is if you have done one more step in the wash cycle in the last wash place lemon juice ( just juice not pulp) in the water and some salt this helps to bleach out stains when left in the sun to dry. Be careful with this as this is a chemical reaction and can cause damage to the piece. So I do not recommend it for every piece of crochet or lace.

Tutorials on this repair
IntroPart 1 this post
Part 2
Part 3
Part 4


I used to use snowy bleach which was used to remove pablum stains, etc from babies clothing years ago- I don't know if they still make it. Now I use a combo of baking soda and peroxide based on the piece I am restoring. A lot of people say they use oxyclean but I fear it might be too harsh. This is a very helpful tutorial... kudos to you for helping others keep their heirlooms instead of chucking them.
ReplyDelete