

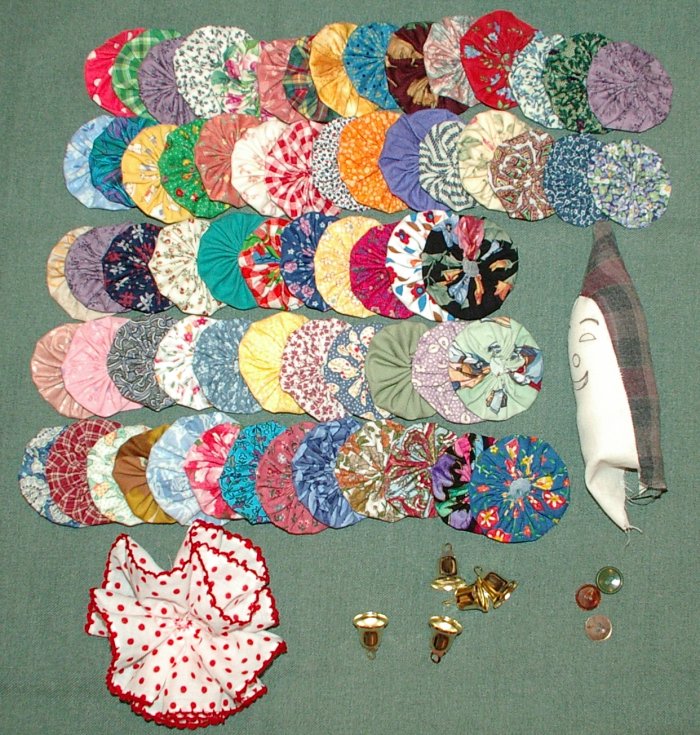
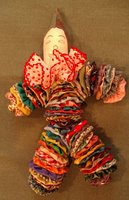
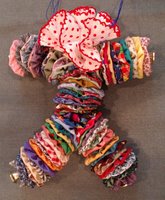
Some people call these yo-yo clown dolls but yo-yo friends is a better name. I have seen dog , cat, elephant, clown, baby, mouse, pig, bunny, giraffe,and bear ones, so it can be more than a clown. It is not hard to make a yo-yo friend; just a little prep work first.
Please read through all instructions before starting your yo-yo friend...
WARNING: Please remember buttons and bells are a chocking hazard. If given to a baby/toddler, it is only a decorative item . This toy is fine for a kid who is older who will not put items in mouth or nose. Please make sure you tell the mom and dad this.
supplies
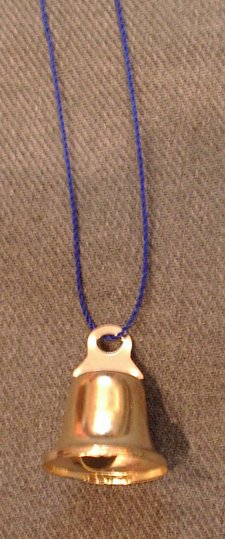
1. 4 to 5 jingle bells -- one for each hand and foot and one for hat if you want one on top
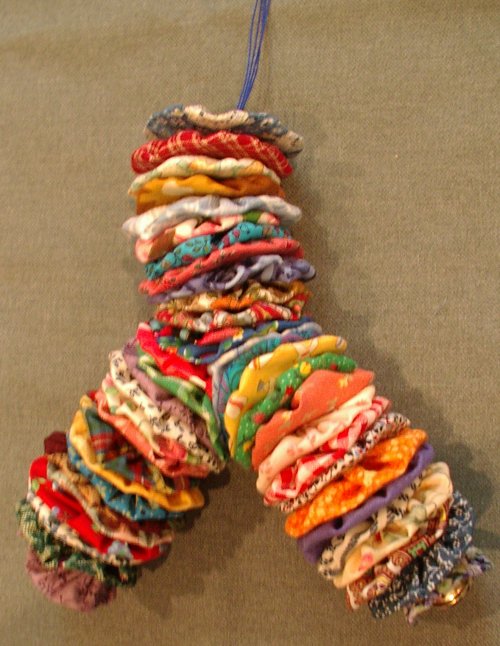
2. yo-yos needed: 66 cd size; 1 plate size (break down below). For a how to make a yo-yo tutorial follow links to Heather's site for a great one. You can also get together with friends and exchange yo-yos. There are lots of things you can make with yo-yos.- 30 yo-yos legs cd size template
- 22 yo-yos arms cd size template
- 13 yo-yos body cd size template
- 1 yo yo neck cd size template
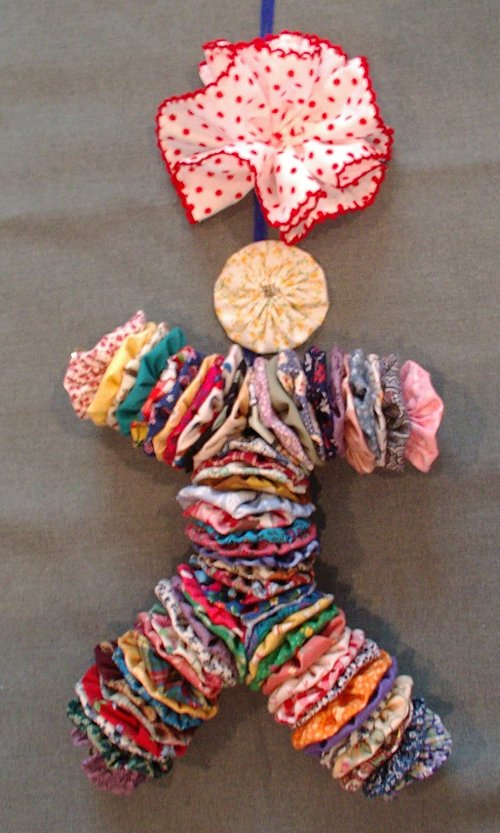
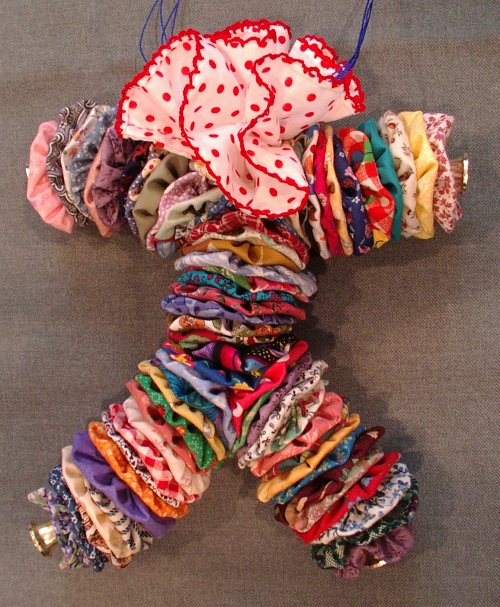
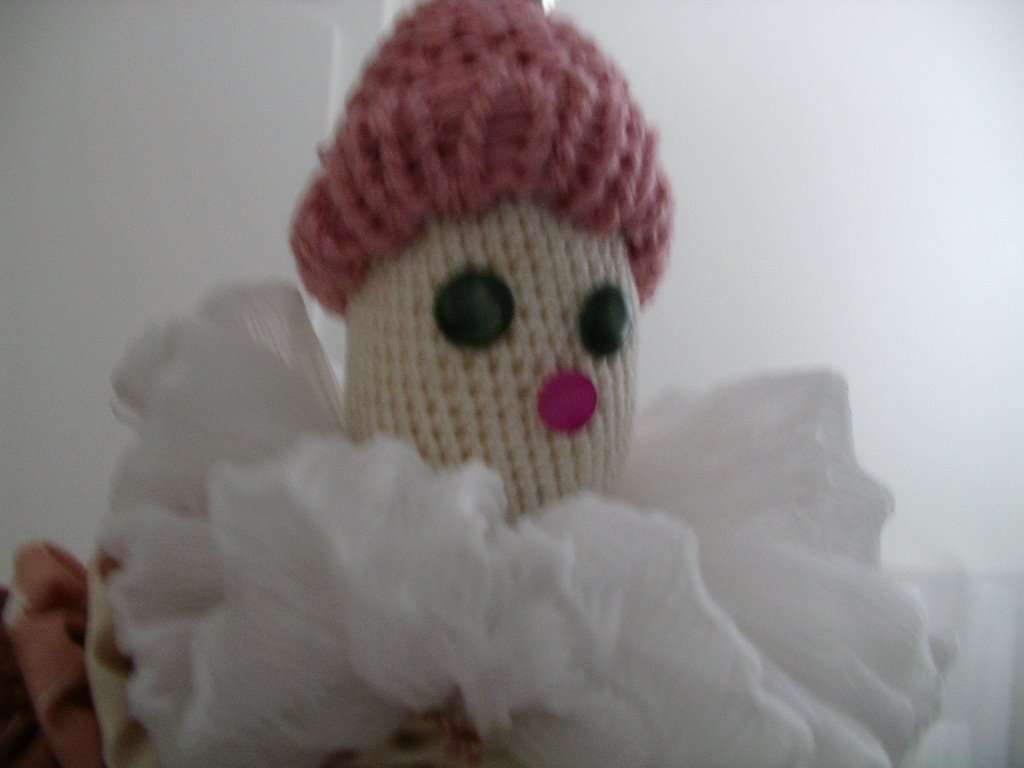
- 1 really big yo-yo collar plate template. You can use lace gathered up or any other wide fabric to make a ruffled collar, even a small doily. See pictures of finished dolls.
4. 3 two hole buttons
5. Nylon thread and needles
If you don't want to use bells, be creative and think of other ideas. Look at my pictures and the links to other people pictures. You can use different types of bells, shank buttons, pom poms, felted wool, or make some stuffed ones for hands and feet, too.
Instructions
Legs
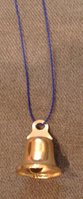 Take a jingle bell, put a string through the bell loop, pull two ends together and put through a needle with bell dangling.
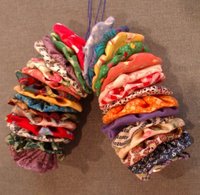
- String on yo-yos; I use 15 yo-yos. Put needle through center of yo-yo. Do again for other leg (use very strong thread; I use nylon then melt the ends when all done after knotting on the head so it doesn't undo itself (which it tends to do other wise).
- remember melt after head is on not after legs are tied
- Make sure yo-yos face away from the jingle bells
Arms
- Take a jingle bell, put a string through the bell loop, pull two ends together and put through a needle with bell dangling.
- String on yo-yos; I use 11 yo-yos. Do again for other arm.
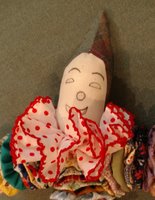
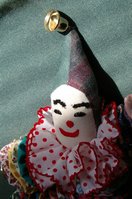
- Make a head with a hat; add jingle bell to hat. You can either paint, embroider, machine sew, or use buttons for the face. It's usually easier to do the face then assemble. I don't always do things in the easiest order. I like to assemble the head then put the face on so it looks like it is in the right spot after being sewn together.
 Now you are ready to assemble. Pass one needle with leg attached through one hole on one button; pass the other leg through the other hole. Tie a knot about three times. The button gives you stability with tying knots. Make sure legs are even in tension before knotting.
- String on all body yo-yos. Pass both needles through the center of all yo-yos. Do not put all the thread on one needle; having the thread go through the yo-yos in two different spots stabilizes the body from spinning so much and wearing out the thread. Pass one set of threads through one hole in next button and then pass the other set of threads through the other hole in that same button.

- At this point, take the arms and string them through the button, one set of arms per hole. Now tie two knots to secure in place.

- Pass all threads through the neck yo-yo and the collar yo yo.

 Now pass needle and thread through the bottom of head, attach third button at this point inside of head. The back of the head should have been left open for this procedure. Pass half of the thread through each button hole. Tie lots of knots, melt thread a little into last knot. Have moist fingers, blow out fire and pinch while hot to secure last knot. The melted tip will keep the knots from undoing themselves.
- Stuff head and close up.


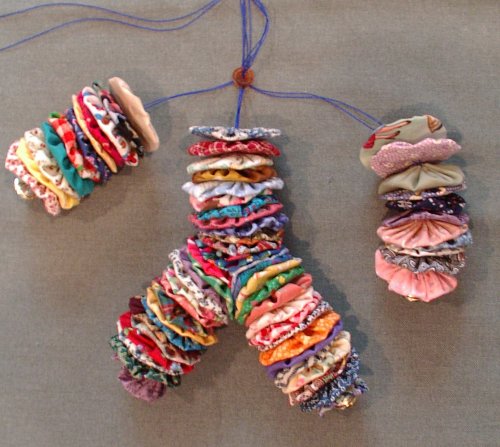


If you look at the bunny, it has a different type of body; there are two sets of yo-yos making up it's torso. This is done the same as the clown except that there are two bodies added straight on top of the legs, making the legs 19 yo-yos long. Then, when made, weave the top 7 from each side together every other side. Stitch through on the edges to weave them together to form the body. As yo-yos got smaller, I used less and less of them. One yo- yo for neck and a doily for a collar. There is only one button in this one in the head to make a strong connection so the knot doesn't pull through the fabric in time.

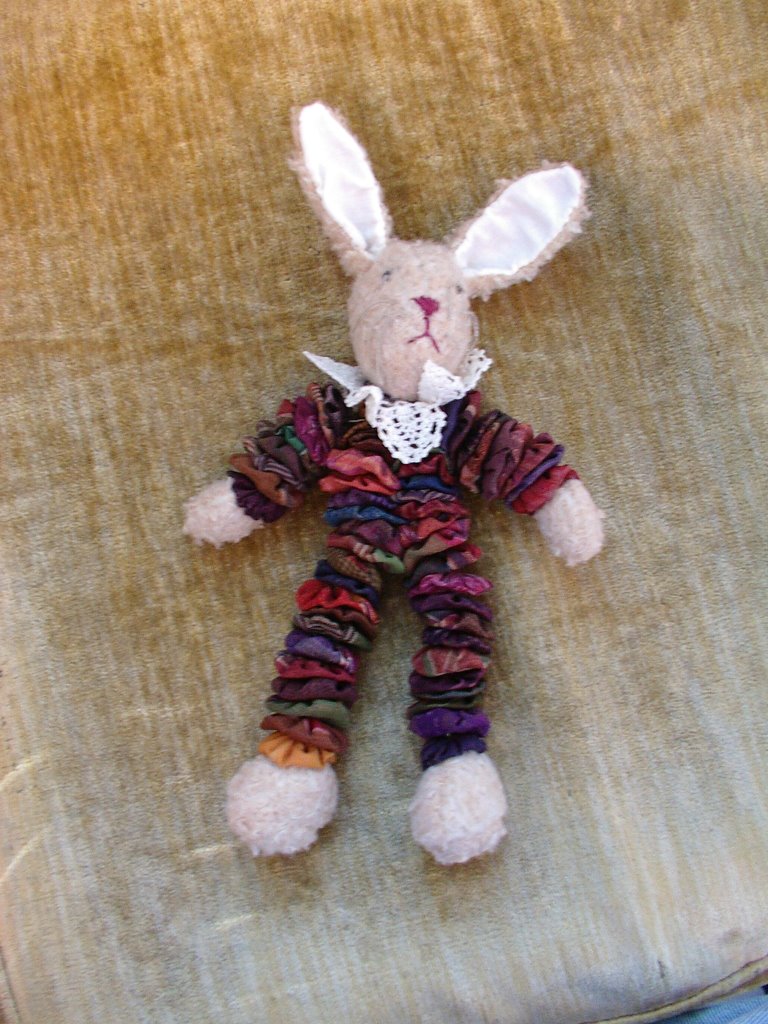 Copyrighted : The bunny was made from a kit years ago. I also made a bear from this same company in the form of a kit. My niece back east owns it, so I can't post a photo of that one. If some one knows the name of it, let me know and I will post it as I want to give credit where credit is due on that one. I can't remember who it was right now.
  So any questions on how to make the hands and the head I have the instructions somewhere, but can't find them at the moment. They are also under copyright so I can not give them out, sorry. But I can post the name of pattern and publisher when I find them. When I find them I will update. The rest of the instruction I made up from a doll my cousin gave me when I was a baby, so they are a pattern I drafted myself.
 The headless bear was done using a cup so as the yo-yos are smaller. He is my WIP for the week. I will make his head either today or tomorrow, then I will show him finished. The bear also has metal buttons for hand instead of yo-yos.
The pink one belongs to my middle daughter; I gave it to her for her birthday. The one I made for this tutorial I gave to my littlest daughter for her birthday. The others are mine. The one pictured left of the bunny was given to me by my cousin Brenda at my Baby shower so it is 35+ years old. Little did she know her one toy would become a life long favorite starting a collection of clown dolls (pirouette and mimes). She is now a survivor of cancer but will never be able to eat or drink again; she is feed through a IV every few days. So if you make one or more you will be honoring her as she is a great seamstress and a beloved cousin. I will probably make at least one more and give it to my oldest daughter for her next birthday. Then when they grow up I will probably make them for my grand kids. ;0) I hope that is a ways off yet!
 You can make up your own variations of this. Have fun! Holler if you have a question.
Please, if you make one send me the picture or a link to it so I can add your's here or on a special page for all to see. I would love a show-and-tell of all the yo-yo friends. Even if it is not one you made but you have had for years, please show them, too.
Update : I have a flicker group where you can post these photos. Here is the link Ga ga for yo yos
Ga Ga for yo-yos:
A group about people who like to make yo-yos and and make things with yo-yos. The fabric type not the toy type.

DO NOT USE THIS PATTERN TO MAKE THINGS TO SELL FOR PERSONAL USE ONLY!!!!


Sunshine,
ReplyDeleteYour directions are wonderful. I will be trying this sometime! Thanks for sharing!
Bonnie
SUNSHINE,
ReplyDeleteThe little clowns are so cute, good job on the directions, for those of us that can follow directions.
NANCY JO
Sunshine, your yo-yo toys are wonderful! So is your photography & face detailing - just lovely! Thank you so much for sharing with us.
ReplyDeleteSusan
Now that I've seen how to do it, I think I can, I think I can, do it....thanks sunshine.
ReplyDeleteThese are adorable. When my son was an infant, my grandmother brought him a clown that looks VERY much like this, only it was like continuous crochet that made it spiral round on its own. Have you ever seen a pattern for that?
ReplyDeleteI have never seen that pattern but not hard to draft the body arms and legs are all spirals. If this is the case they are just chains with an overage of dc to form the next 2 to 3 rows making it spiral.. I would make a chain long enough for one arm body and leg. Then attach other leg and arm to this. It would look like a stick drawing in crocheted chains. Then do the double crochets on that. I looked it up while typing this here is a link to a crocheted octopus but it has the general idea and you could modifie it to look like what you want the head would still even work too.
ReplyDeletehttp://www.brandis.com.au/craft/
octopus.html
Put those on one line then the link will work if I put it all on one line beta blogger erases part of the address.
I hope that helps
sunshine
I've been looking for instructions for a l o n g time! I had the "Jingle Bell Jack" book when I was a kid, and I loved mine. It didn't occur to me to search under "yo-yo doll" and not "jingle bell jack" until today.
ReplyDeleteThanks for posting this. :-)
I am glad it was of help to you. I didn't have the book as a kid I purchased it latter because I had a clown. I am not old enough to have had this book new only used. I think it is neat that you like the book so much you wanted a doll like it.
ReplyDeleteOh me Oh my! This is so cute. I have always wondered how to make these!
ReplyDeleteI just found your blog- will add it to my blog hop!
Lillian
These are so cute!
ReplyDeleteEach of us as children (there are 5) got one that our great-grandma made the yo-yos for and our grandma put together and then embroidered the faces on.
Each one is different and has its own 'personality'. They are truly family treasures!
I love looking at the fine work that they did. My grandma was an excellent seamstress and I feel like I was blessed with at least a little of her talent, but when I look at her creations I know I still have a ways to go.
Thanks for posting these. ~; }
That is neat to have so many things that both your great grandmother and grandmother made with their hands.
ReplyDeleteTake care sunshine
O, what a beautiful yo-yo friend!!! Thank you Sunshine for this very special blog. I received the link from Corina, a friend of mine and I'm so happy to say that she gave me the key for a very special place. I'll be here to see all your creations.
ReplyDeleteAll the best! Sma (from Romania)
I have been looking for the pattern for these forever! My grandmother made these also, and I loved them!!
ReplyDeleteSunshine: You just brought some sunshine into my life. I have been wanting to make yo yo friends for a long time and could not find anything in any of our stores in South Carolina. I finally went on the Internet and thanks to Google, found your site. I ordered a yo yo maker from Gina Halladay who owns a craft shop on the west coast and as soon as I receive it I will start to yo yo. I am already buying up remnants while I wait. I hope I can produce clowns as cute as the ones on your tutorial. I am 80 plus years old and would like to make and sell these as a way to augment my income. I have done different types of handiwork and enjoy working with my hands very much so I am looking forward to this new endeavor.
ReplyDeleteThank you for the wonderful directions. I feel certain I can follow them but if I have a problem I would like to take you up on your offer and holler.
Gratefully,
Dottie
Dear Sunshine: I posted a message on your blog and when I didn't see an acknowledgment of my message, I noticed that the most recent messages prior to mine were dated 2006. Apparently I am a year too late to get in on the chat. *wink* so I am taking the liberty of emailing you. I hope you don't mind, but I am so anxious to get started on this project.
ReplyDeleteI am attempting to make a yo yo clown and printed out your directions from your blog. The template that I purchased is made by Clover and is a large size. However, it is not as large as a cd which I see you indicate in your directions that it should be.
The finished yo yo made with this template measures only 1-1/2" which I think would make for an undernourished looking clown, don't you think? I found a store in N.C. that sells Clover templates so I am going to go there tomorrow to see if they have a larger one than the one I bought.
Do you make your yos yos from a 'store-bought' template or do you cut your own out of cardboard? I would really appreciate your opinion on this.
Many thanks,
Dottie Hoch
sorry for not responding sooner I have been ill
ReplyDeleteAs for templates I use a real cd not cardboard. I also use mini cds. The rabbit and the headless clown are made with yoyos that measure about 1 inch across. So I don't think the size of the yoyo is an issue. I have all the clover tools but other than making a sample of each I haven't used them for any actual projects all my yoyos have been hand cut and hand stitched with out a tool. I like the tool I talked about the green one once on my blog click on yoyo on the side to find it. It has pros and cons. The major con is the length of thread you have to use as it has to be long enough to go all the way around the large diameter of the circle where as when you do them by hand with out the clover tool you can gather as you go so your thread doesn't have to be long at all. Both do have uses. The clover tools are great for sheer and slick fabric corduroy is a little to thick though. That was what I did when I made them experiment with how it dealt with differnt fabrics. Please feel free to ask as many questions as you want and I will post this response on that topic thanks sunshine
first off thanks so much for posting on the dolls i want to make one in this life time lol. i love working with yoyo but not that talented with sewing but i see the crochet one where could i find that pattern to make the head i have the rest down pact..
ReplyDeletethank you for any help
kat
find a hacky sack pattern for a ball and just make that into a head
Deletehola, hermosos los juguetes . A mi en lo particular me recuerdan mi ni�ez. Gracias por el tutorial, no tenia la menor idea de como hacerlo
ReplyDeletesaludos
Indygo Junction offers sewing patterns for yo-yo animals, among them bear and bunny - with needlefelted heads it seems.
ReplyDeleteYou can replace the buttons, bells and other small objects with a stuffed yoyo (=ball) as "hands" and "feet".
One could look at "ruffle scarf", "spiral scarf" or "potato chip scarf" for a pattern for replacing the yoyos with knitted or crocheted "pattern". I think it would need a couple of stitches to keep the coils together. :-)
One could also replace the yoyos with round coasters, if one doesn't feel comfortable with sewing :-)
I love your tutorials, your blog, your photos! Thank you!
Sunshine,
ReplyDeleteI had a yo-yo clown doll as a child, but had forgetten until my mom moved into a new home and we unearthed him out of an old trunk. He was in quite a state of disrepair, although the lovely handpainted face remained. I took him home and drafted a pattern, just wasn't sure on how to get him sewn together, so thanks for your directions. I use yo-yos quite often on my quilts, and am looking forward to remaking my little clown friend!
Hi Sunshine!
ReplyDeleteI was looking up English Paper Piecing on the internet and your blog came up! What an exciting blog you have; I am going to add you to my favorites. I like to do many different crafts, too. It is nice to find someone who likes to hand-craft.
C. C.
I knew that someone had to still be creating these little guys!!
ReplyDeleteCheck out today's post of my Vintage Yo-Yo Clown.
rutheh.wordpress.com
http://rutheh.wordpress.com/2009/09/14/vintage-yo-yo-clown-doll-spared-from-trash/
Thanks it was a fantastic guide, now to make a yo-yo friend is definitely very easy by using your advice. Thanks
ReplyDeleteThank you for the blog. My mother in law just passed away, and my sister in law is really having a hard time dealing with her death. My husband and I were trying to think of something to do to help her, and decided to make a yo-yo doll with MIL's old clothes. It will be a treasure that will ease her pain now, AND be a multi generational gift that she can eventually hand down to a grandchild.
ReplyDeleteI can't wait to get started!!!!!
thank you sooooo much for the patterns. my grandson has allergies and needs everything done in cotton.your page has helped heaps, as patterns for yo yo toys are hard to find. thank you again sunshine.
ReplyDeleteI'm an old lady who loves making yo-yos. I've made a bedspread, clowns, table runners, etc., and even crocheted edges on them with tatting thread and size 11 hook. I have a suggestion for the way I cut the circles. I found it much easier to cut squares. You could do that easily with a rotary cutter, but I just sat in my chair with a pile of fabric, a cardboard square template and my sharp scissors. This is great while "watching" TV. When you have a stack of squares, then fold each one into quarters and with your scissors round off the corners all at once. After doing that a couple of times you'll be able to eye-ball nearly perfect circles. Practice with paper until you feel confident. It surely saves the tediousness of cutting circles!
ReplyDeletethank you for the tip i am sure my readers will be grateful for it thank you so much
DeleteI had one of these clown dolls when I was a little girl. My great aunt made it for me and I carried it around everywhere.
ReplyDeleteThank you for the clown pattern. I made one like that in my young years.
ReplyDeleteIs it complicate to do cause i want make one with my daughter of 10 years old
ReplyDeleteAfter putting in the button, how do finish the bottom of the head? And then does the head simply rest on top of the collar? Help!
ReplyDeleteI understand keeping the back of the head open until the button is attached and it's stuffed, then sewing it shut---but what do you do to the bottom of the head? I'm confused!
ReplyDeleteThe bottom of the head is made like a yoyo of a round circle is used... or in the car of mine seen shut and a collar was added
ReplyDeleteI made one of these dolls in 1972 for my baby. I lost the directions so I am glad you posted yours.
ReplyDelete