
Mark 5 lines that are 1 inch a part on fabric. These will be your sewing lines. You can use either pencil or wash away marker but it doesn't really matter for this. I would use pencil and a real light hand.
You can use any normal sewing thread for this experiment.
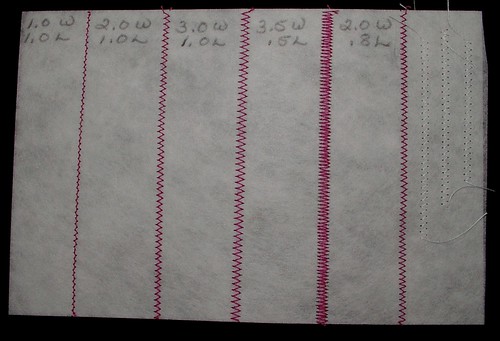
The purpose of this is so you can see how wide your machines settings are.
W= width
L=length
- set machine at 1.0 W and 1.0 L and sew your first line on the left of your fabric
- set machine at 2.0 W and 1.0 L and sew your first line on the left of your fabric
- set machine at 3.0 W and 1.0 L and sew your first line on the left of your fabric
- set machine at 3.5 W and 0.5 L and sew your first line on the left of your fabric (not all machines have this setting you can improvise for your machine)
- set machine at 2.0 W and 0.8 L and sew your first line on the left of your fabric (not all machines have this setting you can improvise for your machine)
When done making your samples place them in a view sheet in your notebook for future reference. Also add any information to the note book that you think might be helpful such as needle used, thread, when you did this with what machine. this is good practice if you own more than one machine or plan to buy another in the future as they will probably be a little different. You are doing what is know as the notebook method it will help you to remember what you have done and how you did it so you can repeat it in the future.

No comments:
Post a Comment