

Supplies:
- Template -- cd or plate, depending on the size you want (small plates work better than cd size). I did cd size for tutorial; it's easier to take photographs, but you will get smother rounded sides with a bigger circle (small salad plate or large soup bowl)
- Scissors or rotary cutter / mat for fabric
- Quilters see through ruler with square grids on it
- Scissors for paper
- Needle and thread if doing all by hand / sewing machine if doing all by machine / or half and half
- Card stock to make square template
- Pencil
- Trace round template onto fabric and cut out (use what ever method you want, such as: trace and cut with scissors or use a rotary cutter and mat with template).

- Lay right sides of circles together in preparation for sewing.

- Next, either sew by hand or on a sewing machine with a 1/4 inch seam allowance.

- Overlap beginning of seam by 1/2 to 1 inch.

- Cut a small slit in one side of fabric being careful not to cut through both layers. Make this incision close to where the folded sewn edge will be.
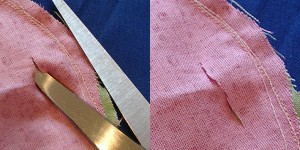
- Turn fabric to right side through the small hole you just made.
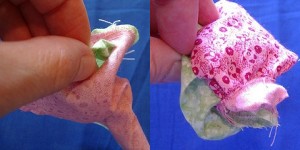
- Put something inside of circle to push all the edges out. The back side of the pencil works well for this.
- Smooth out circles.

- Iron circles.


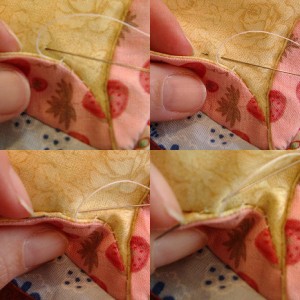
- Figure out inside square size. As this is different for each person who makes this because of different templates used or not everyone's seam allowance being the same. I will just reference how to do it. Way 1: Fold circle in half and iron; fold in half again in the opposite direction mating up first iron marks and iron again. The four marks that are left on the outside edges of the circle are the corner points of your squares. Do this to all your blocks. Sew from corner to corner. Make a row as long as your quilt's finished length will be. Way 2: Place see-through ruler over circle and see what size square will hit all sides, four corners of square at once, and cut that size square out of cardstock. This is your template for inner sewing dimensions of square. Place on all circle and trace. Sew on traced lines as before.

- When sewing seams, make sure that the seam you sew will cover the slit you have made when flipped over.


- Continue in this manner until you have enough strips to equal the width of the quilt.

- Next, start to sew these long strips together

- When all strips are sewn together, iron flaps down
- You now have a choice: you can either sew the flaps down by hand or with a sewing machine. If you use a machine, you can use decorative stitches; I sewed mine by hand.


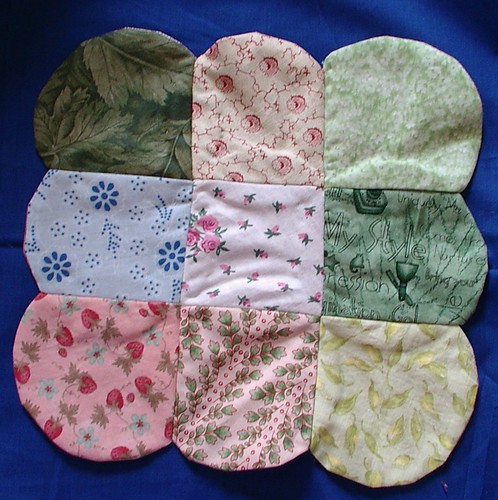
Finished, you can either sew down side scallops and make a straight edge quilt or leave them, as I have, as scallops for a decorative finish and less work.
Below is what the back of the quilt will look like. Front view is at the top of post.
There is no batting in this version. If you want batting, use warm and natural and sew it at the same time you do step # 3; trim close to seam and flip as before. This will make the quilt warmer, but less like cathedral windows. This is more of a spring-summer quilt, not a winter-keep-you-warm type of thing. Of course, this is a doll quilt, but you can use the same technique to make a normal size quilt, too.
If you have questions please ask so I can help you understand how to do this.
For an added surprise go here and you may just end up owning this quilt, or maybe another mini quilt I have made. As a celebration of the 4th of July and my blogiversary.

If you have questions please ask so I can help you understand how to do this.
For an added surprise go here and you may just end up owning this quilt, or maybe another mini quilt I have made. As a celebration of the 4th of July and my blogiversary.
whipup

DO NOT USE THIS PATTERN TO MAKE THINGS TO SELL FOR PERSONAL USE ONLY!!!!
Great tutorial! I'm going to save it to my delicious links and hopefully I'll be able to try it sometime!
ReplyDelete(I saw you in the quilting group on Flickr)
I LOVE this! I'll definitely try this. Thanks for the tutorial! :-)
ReplyDeleteI have seen an apple-core quilt done with these double-sided circles. They just overlap the circles with two opposing sides of a circle on top, and the other two opposing sides of the same circle under the adjacent circles. I think they did a buttonhole stitch to secure the cirlces to each other (I don't remember for sure). The colors actually made an American flag with the blue field, and red and white stripes. It was so great!
ReplyDeletePerfect and so easy to make, thank you!
ReplyDeleteLove this tut! I have always used the traditonal method for the cathedral window. After seeing how simple this method is I won't bother with the other way again :o)
ReplyDeleteI'm just getting my blog set up but this tutorial will be linked for sure!
Your site is a motherlode of info..it's great for the sewing enthusiast!
I found your blog and website through the "Farmgirl Connection" at Maryjanesfarm.com
Stephanie
www.dreamkngdomdesigns.com
A Creative Journey
One of my 1st quilts was a "rob Peter to pay Paul" pattern, very similar to this. Nice tutorial!
ReplyDelete:-) Gina
Hey there,
ReplyDeleteI really like this mock cathedral window....After seeing this I won't both using the traditional method again :o)
You have a great blog and website!
Stephanie at
www.dreamkingdomdesigns.com
A Creative Journey
Your quilt is soooo beautiful! You put so much into each square it must be difficult to part with any part of it. Thanks for the chance at winning the quilt piece.
ReplyDeleterholschen@air-pipe.com
Wow! I enjoyede watching you create this magic! Beautiful piece!
ReplyDeleteGreat blog and tutorial. Thanks so much for all the pictures and details in the directions. Your dedication is truly appreciated.
ReplyDeleteMorning,
ReplyDeleteI just finished this, this morning, which I started a couple of days ago. My first attempt at the Cathedral windows. I have been wanting to try this for a long time, but could never understand the directions, but when I found your blog, I followed it and it was very easy and rather fast. I did machine stitch my 'footballs' down instead of doing by hand, which really added to the back side. I wanted to try, so it is not perfect, but I think I will invest in those hard plastic templates as I would like to do more of this without scraps... lol. But hay, I wanted to try it and glad I did.
Many thanks for making it so clear and I am a visual learner, so your pictures really helped me understand.
Have a good day,
Karen.
how ingenious...and sneaky I LOVE IT!! Appeals to the naughty girl in me as well as the wanna do hard quilts quilter :D
ReplyDeleteThis is a great method! I think this is just the ticket for making a summer quilt for our bed. Now I just have to pick out fabrics; tough decision.
ReplyDeleteI recently made a baby quilt using this method - but with a variation. I didn't use a template. I simply used the old "thumbtack and tape" trick to sew two squares together in a circle, then cut along the seam. This allowed me to not only not have to use a template, I didn't have to be so careful cutting the squares out, just as long as I didn't cut too them small. I then followed the rest of the directions: cutting the small slit, turning inside out, etc.
ReplyDeleteThis is years late, but I want to share my suggestion to make your process easier and more accurate. Rather than cutting out the circles first, why not sew directly on the drawn lines and then cut it out with a 1/4 inch seam allowance. If everyone uses the same template to draw the circles, then they should end up all the same size, assuming that they all know how to sew on the line. That way, also, if you draw a 10 inch circle, then you'd end up with a 10 inch finished size circle. I think it's much easier to sew a circle on a line then to cut a circle on a line. Another tip, cut the batting in a square using a template, so that the football edges are not filled--except if you want a scalloped finished edge.
ReplyDeleteI plan to chair my guild's next charity sew-in where we will make these QAYG Circle quilts.
mil gracias! muy lindo y facil! siempre quise saber como se hacia este metodo
ReplyDeleteLove it too! ! I Thanks from NL, Canada
ReplyDeleteThis is fantastic. I have about a hundred circles for a quilt I inherited from my grandmother. Now I have something I can use them for. Thanks greatly for the great idea!
ReplyDelete